The Problem: Salesforce Files Leave Your Org Without Any Protection or Branding
Every day, files stored in Salesforce get downloaded, shared, forwarded, and printed — often without any indication of where they came from, who owns them, or what their status is.
A proposal shared with a prospect carries no mark of your organisation’s brand. A draft contract forwarded before final approval has no visible indication that it is not yet authorised. A confidential report downloaded from a Case record has no label warning recipients of its sensitivity. A document shared externally could be reproduced, redistributed, or misrepresented with no traceability back to your Org.
Watermarking is a long-established solution to these problems — but in native Salesforce, there is no built-in capability to apply watermarks to files. Admins and users who need to watermark documents must:
- Download the file
- Open it in a third-party editor
- Apply the watermark
- Save the file locally, and re-upload to Salesforce.
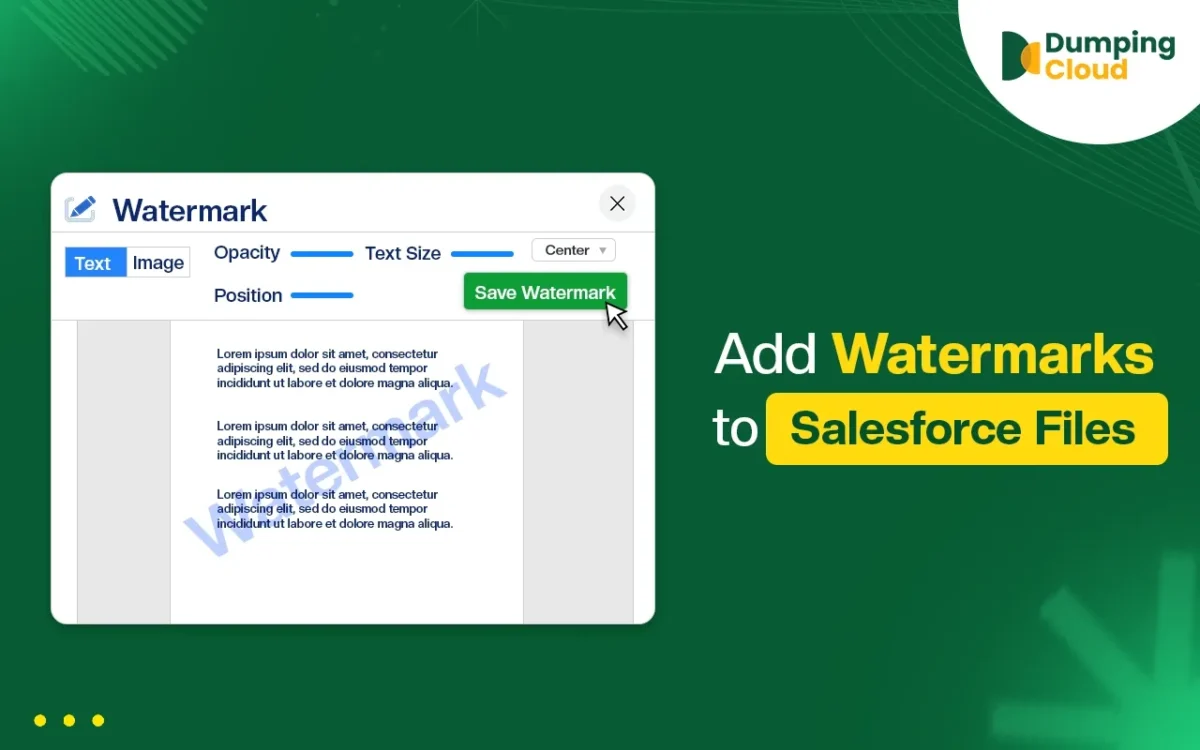
DumpingCloud – Salesforce Files Manager brings watermarking directly into the Salesforce workflow. With full support for both text and image watermarks, customisable appearance settings, and compatibility across all file types, Admins can now stamp any Salesforce file with a professional, controlled watermark in a matter of clicks — without leaving the record page.
What the Watermark Feature Does
The Watermark feature in “Dumping Cloud – Salesforce Files Manager” allows you to:
- Apply a text watermark — such as “CONFIDENTIAL”, “DRAFT”, “APPROVED”, your company name, or any custom text — to any file
- Apply an image watermark — such as a company logo or official stamp — to any file
- Watermark any Salesforce file type — PDFs, images, Word documents, and more
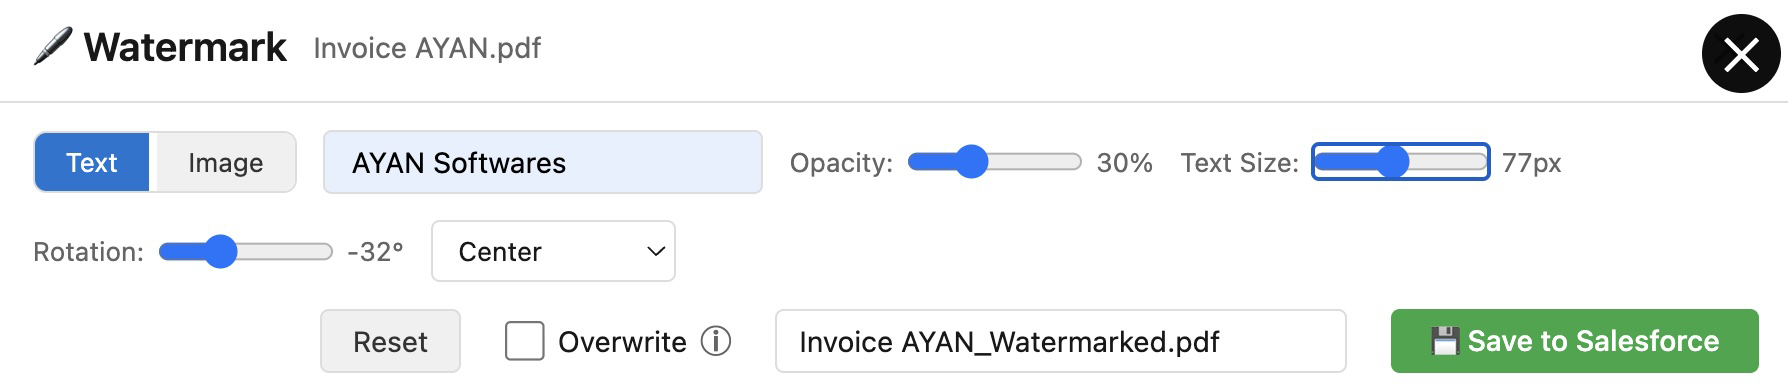
- Customise the watermark appearance with full control over position, opacity, font, size, and rotation
- Perform the operation directly from the extension panel, without downloading or opening any external tool

Watermark Types Supported
Text Watermark
Apply any custom text string as a watermark across your file. Common use cases include:
- “CONFIDENTIAL” — For sensitive internal documents shared externally
- “DRAFT” — For documents in review that should not be treated as final
- “APPROVED” — For documents that have completed an approval process
- “DO NOT DISTRIBUTE” — For materials with restricted circulation
- Company name or department — For brand identification and traceability
- Date or version stamp — For version control and audit traceability
Image Watermark
Upload and apply an image — such as a company logo, an official seal, or a confidentiality badge — as a watermark across your file. Ideal for:
- Brand identification on client-facing documents and proposals
- Official stamps on signed or approved documents
- Logo overlays on marketing materials stored in Salesforce
Customisation Options
DumpingCloud provides full control over how your watermark appears:
| Option | Description |
|---|---|
| Position | Place the watermark at the centre, corner, header, footer, or a custom position on the file |
| Opacity | Adjust transparency from fully opaque to a subtle, semi-transparent overlay |
| Font | Choose the typeface for text watermarks to match your brand or document style |
| Size | Control the scale of the watermark — from a discreet label to a prominent full-page overlay |
| Rotation | Rotate the watermark at any angle (e.g., diagonal placement at 45° is a common professional standard |
Who Benefits Most
The Watermark feature addresses a wide range of Admin and business requirements:
- Legal and compliance teams — Marking draft contracts, NDAs, and legal documents with “DRAFT” or “CONFIDENTIAL” before sharing for review
- Sales teams — Branding proposals, quotes, and presentations with the company logo before sending to prospects
- Finance and procurement — Stamping invoices and purchase orders with “APPROVED” or “PAID” status markers after processing
- Operations and HR — Applying “CONFIDENTIAL” or “DO NOT DISTRIBUTE” to sensitive internal documents before cross-departmental sharing
- Executive communications — Marking board materials, strategy documents, and investor reports with restricted-access labels
- Audit and regulatory preparedness — Ensuring all externally shared documents carry traceable identification marks for compliance purposes
Step-by-Step Guide: How to add Watermarks to Salesforce Files
Prerequisites
Before you begin, ensure the following:
- Google Chrome is installed on your desktop
- DumpingCloud is installed from the Chrome Web Store (Install here)
- You are logged into your Salesforce Org in the same Chrome browser
- You have the necessary Salesforce permissions to view and edit files on the target record
- If applying an image watermark, your logo or stamp image is available on your local machine
01
Step 1
Navigate to the Source Record
Open Google Chrome and log in to your Salesforce Org. Navigate to the record that currently holds the file(s) you want to watermark — this is your source record.

02
Step 2
Open DumpingCloud – Salesforce Files Manager
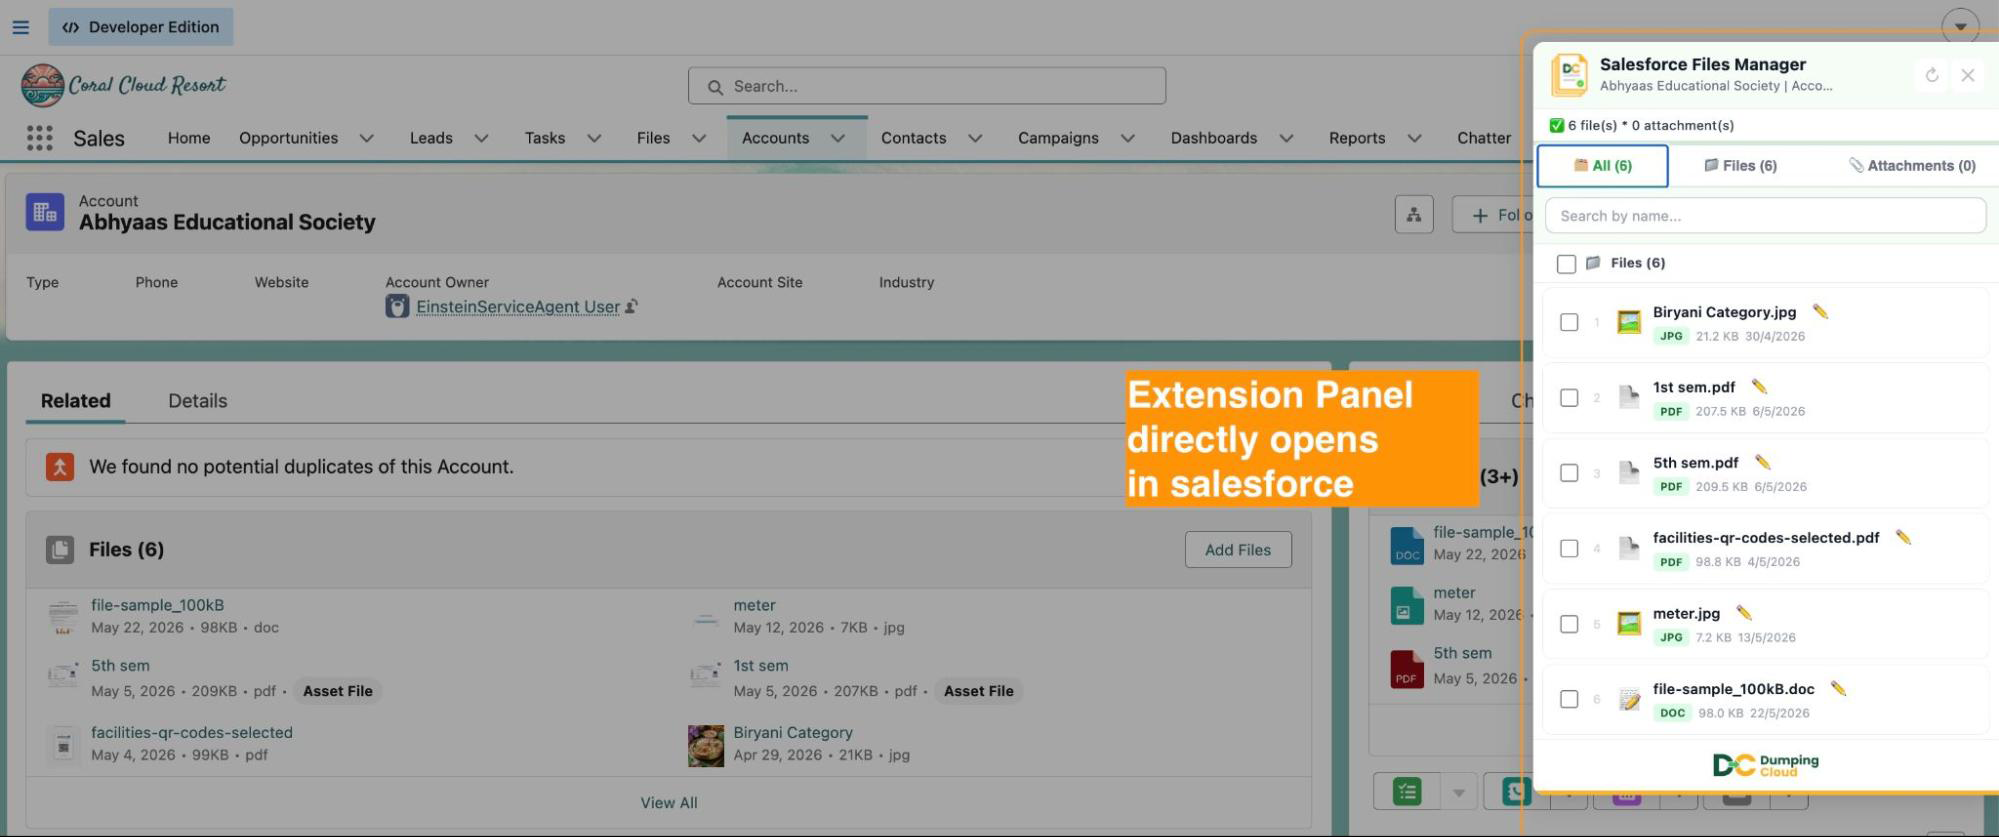
Click the Salesforce Files Manager icon. The extension automatically detects your active Salesforce session. No additional login is required.

The extension panel will open and automatically load all files and attachments associated with the current record.
03
Step 3
Select the File(s) to Watermark
To watermark a single file: Click the checkbox next to the specific file you wish to watermark.
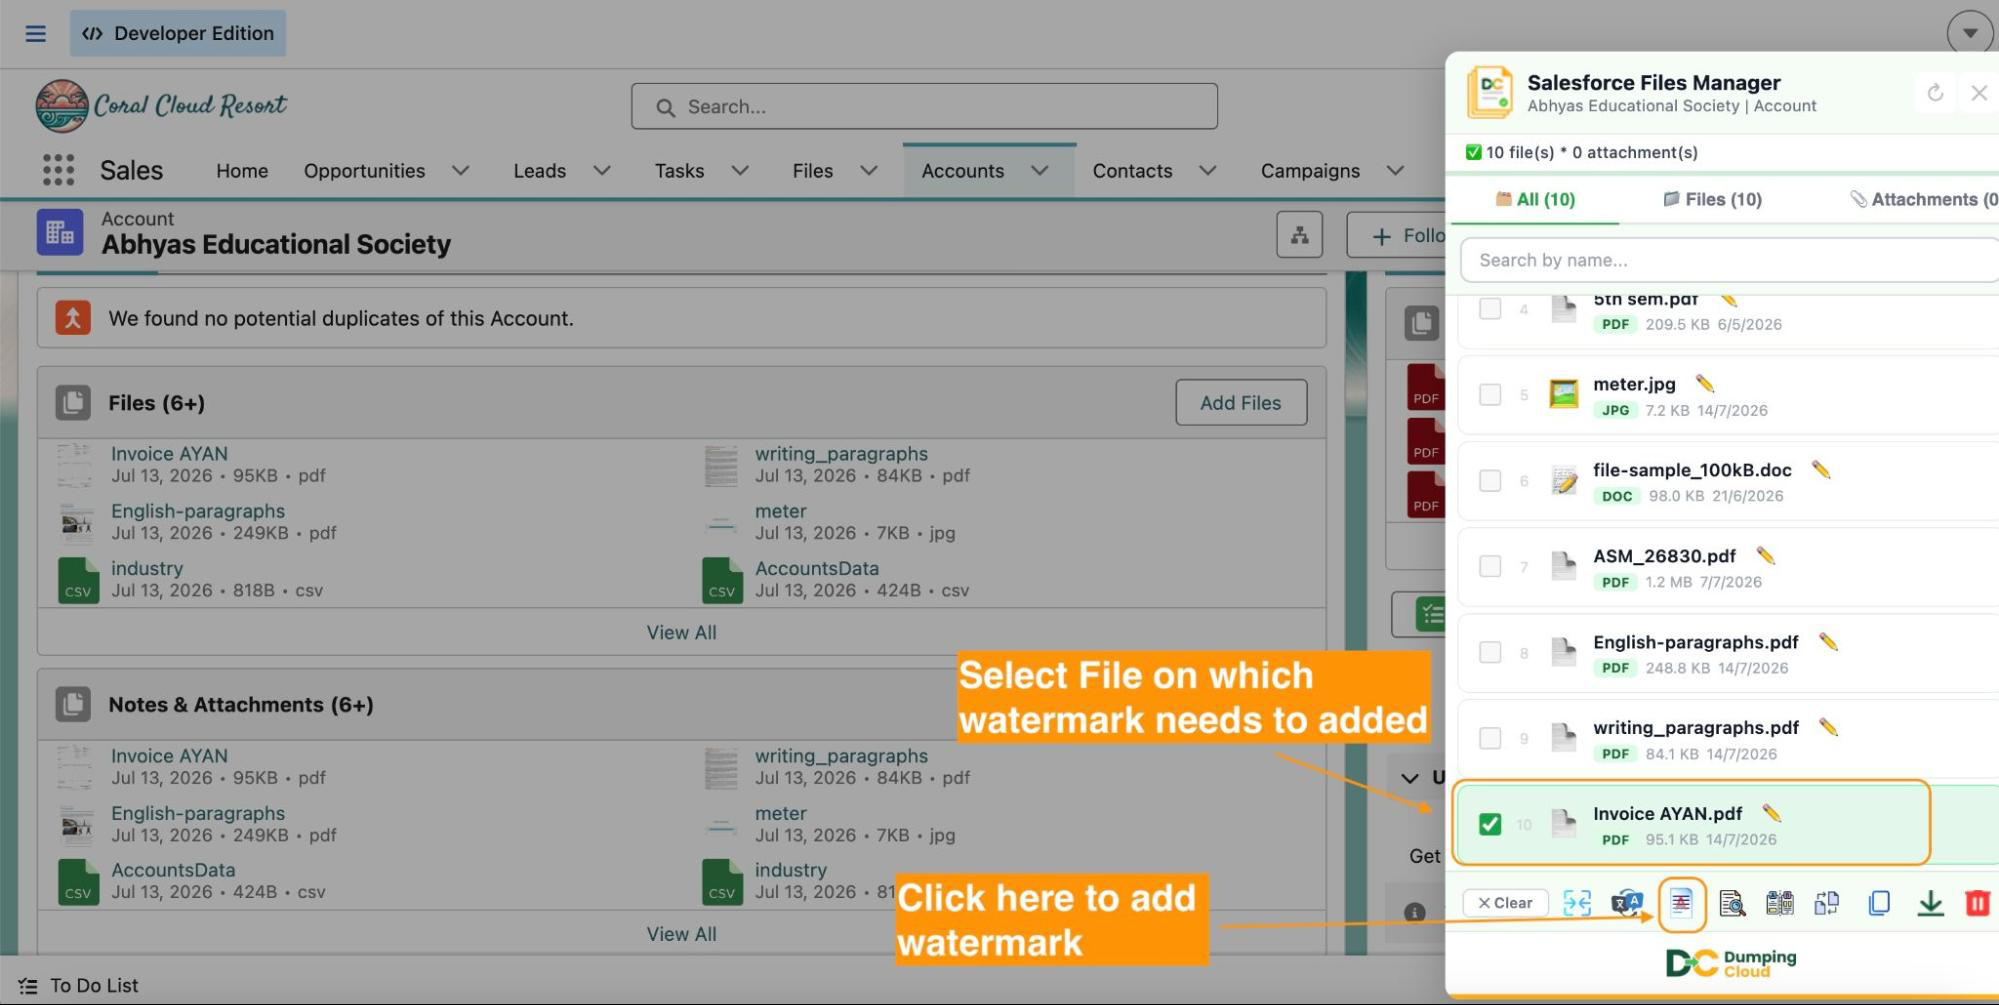
Click the “Watermark” icon – With your files selected, click the “Watermark” icon in the extension panel action bar. The Watermark configuration panel will open.
04
Step 4
Choose Your Watermark Type
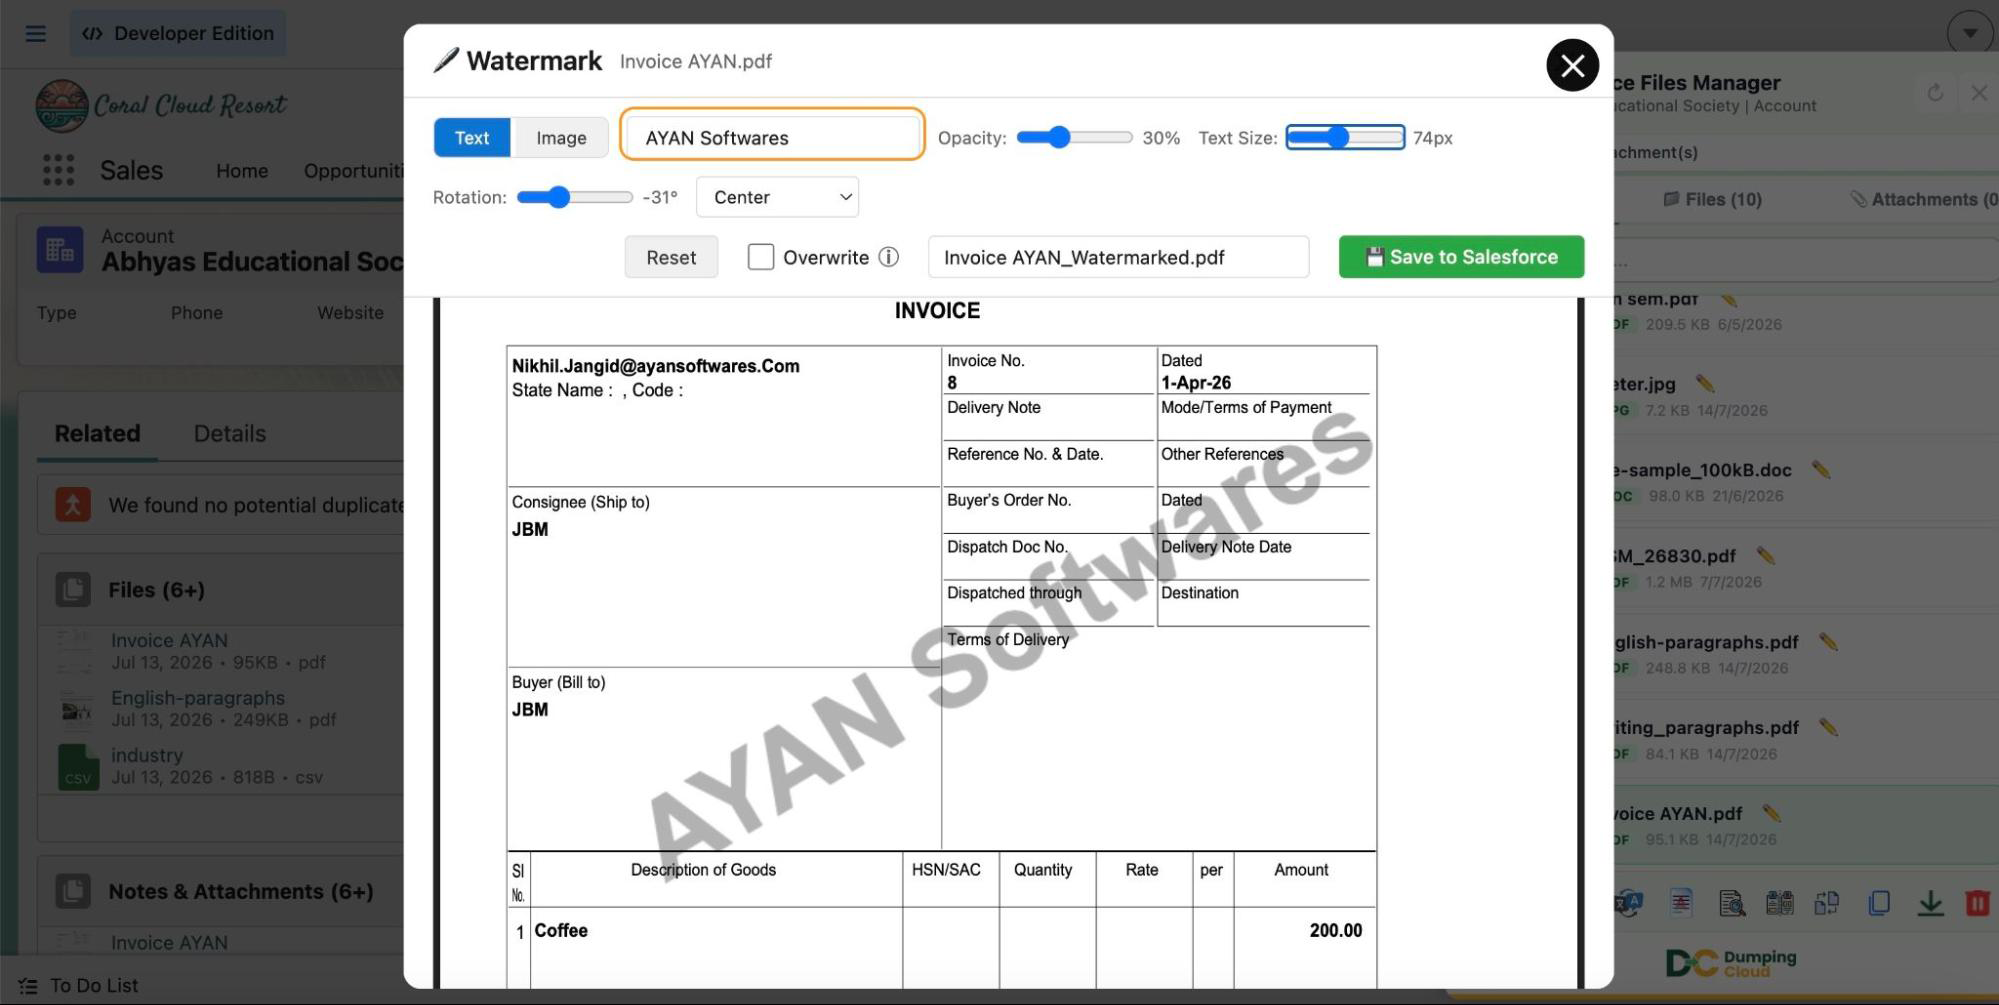
In the Watermark configuration panel, users can select the watermark type and configuration for the watermark appearances.
Watermark type:
- Text Watermark: Select the text option and type your watermark text into the input field (e.g., “CONFIDENTIAL”, “DRAFT”, your company name).
- Image Watermark: Select the image option and upload your logo or stamp image from your local machine.
Watermark Appearance
Configure the watermark appearance using the available controls:
- Position — Select where on the file the watermark should appear (centre, corners, header, footer, or custom)
- Opacity — Use the slider to set the transparency level of the watermark
- Font — For text watermarks, choose your preferred typeface from the dropdown
- Size — Set the scale of the watermark relative to the file dimensions
- Rotation — Set the angle of the watermark (e.g., 45° for a diagonal stamp effect)
A live preview will update as you adjust each setting, allowing you to confirm the appearance before applying.
05
Step 5
Apply the Watermark
Once you are satisfied with the configuration and preview, click “Save to Salesforce”. The extension will process the selected file(s), apply the watermark according to your settings, and save the watermarked version (as a new file) back to the Salesforce record.
Overwrite: User has an option to select the checkbox for the “overwrite” in case the user wants to overwrite the existing file with the new watermarked file in salesforce.

06
Step 6
Verify the Watermarked File
The extension panel will refresh to show the updated file list. Use the in-window preview feature to open the watermarked file directly in the extension and confirm the result before sharing or distributing. Navigate to the Files related list on the Salesforce record to confirm the watermarked file is now saved in the Org.
Key Advantages Over the Manual Approach
| Capability | Download → Edit → Re-upload | Salesforce Files Manager |
|---|---|---|
| Apply a text watermark | ✅ Via third-party tool | ✅ Directly in the extension |
| Apply an image watermark | ✅ Via third-party tool | ✅ Directly in the extension |
| Watermark multiple files at once | ❌ One at a time | ✅ Bulk operation supported |
| Customise position, opacity, font, size, rotation | Depends on tool | ✅ Full control in-panel |
| Live preview before applying | Depends on tool | ✅ Real-time preview |
| Stays within Salesforce workflow | ❌ Requires external app | ✅ No external tools needed |
| Time to watermark a file | Minutes per file | Seconds per file |
Frequently Asked Questions
Does the watermark permanently alter the original file? The watermarked version is saved as the updated file on the Salesforce record. It is recommended to retain an unwatermarked copy on the record if you may need the original version later — or use the Copy feature to preserve the original before applying a watermark.
Can I apply different watermarks to different files in the same operation? Bulk watermarking applies the same watermark configuration to all selected files in a single operation. To apply different watermarks to different files, perform separate watermark operations for each configuration.
Can I remove a watermark after it has been applied? Watermarks applied to files are embedded into the document. They cannot be removed via the extension once applied.
Does watermarking affect the file’s version history in Salesforce? Applying a watermark saves an updated version of the file to Salesforce. Users still have an option to overwrite existing files.
Do I need System Administrator permissions to use the Watermark feature? You need sufficient Salesforce permissions to view and edit the files on the relevant record. The extension respects your existing Salesforce profile and sharing rules.
Summary
Watermarking is an essential document control practice — but until now, it has had no place in the native Salesforce workflow. The result has been inconsistent manual processes, third-party tool dependencies, and files leaving the Org without the protection, branding, or status markers they require.
The Watermark feature in DumpingCloud brings this capability directly into Salesforce — with support for text and image watermarks, full customisation over appearance, bulk file processing, and a live preview — all without downloading a single file or opening an external application. Whether you are protecting confidential documents, branding client-facing proposals, or marking draft agreements before review, professional watermarking is now a built-in part of your Salesforce file management workflow.
Install DumpingCLoud – Salesforce Files Manager
For support or enquiries, contact us at mohit.bansal@ayansoftwares.com or call +91 99531 70767.
DumpingCloud — Manage Salesforce content like a Pro.

The Problem: Multiple Versions of a File on the Same Record, and No Way to Compare Them Inside Salesforce
Document versions accumulate fast on active Salesforce records.
A Contract record might hold the initial draft, a redlined version from legal, a revised draft incorporating changes, and the near-final copy awaiting signature — all stored as separate files on the same record. An Opportunity might have an original proposal and two revised versions submitted at different stages of negotiation. A Case might contain an initial diagnostic report and an updated one filed after further investigation.
The question every Admin, reviewer, or decision-maker inevitably faces is: what actually changed between these two files?
Native Salesforce offers no way to answer this from within the platform. The only option is to download both files, open each in a separate application, manually position the windows side by side, and switch back and forth to spot differences. For documents with significant length or complexity, this is not just inconvenient — it is genuinely error-prone. Changes get missed. Reviews take longer than they should. Decisions get delayed.
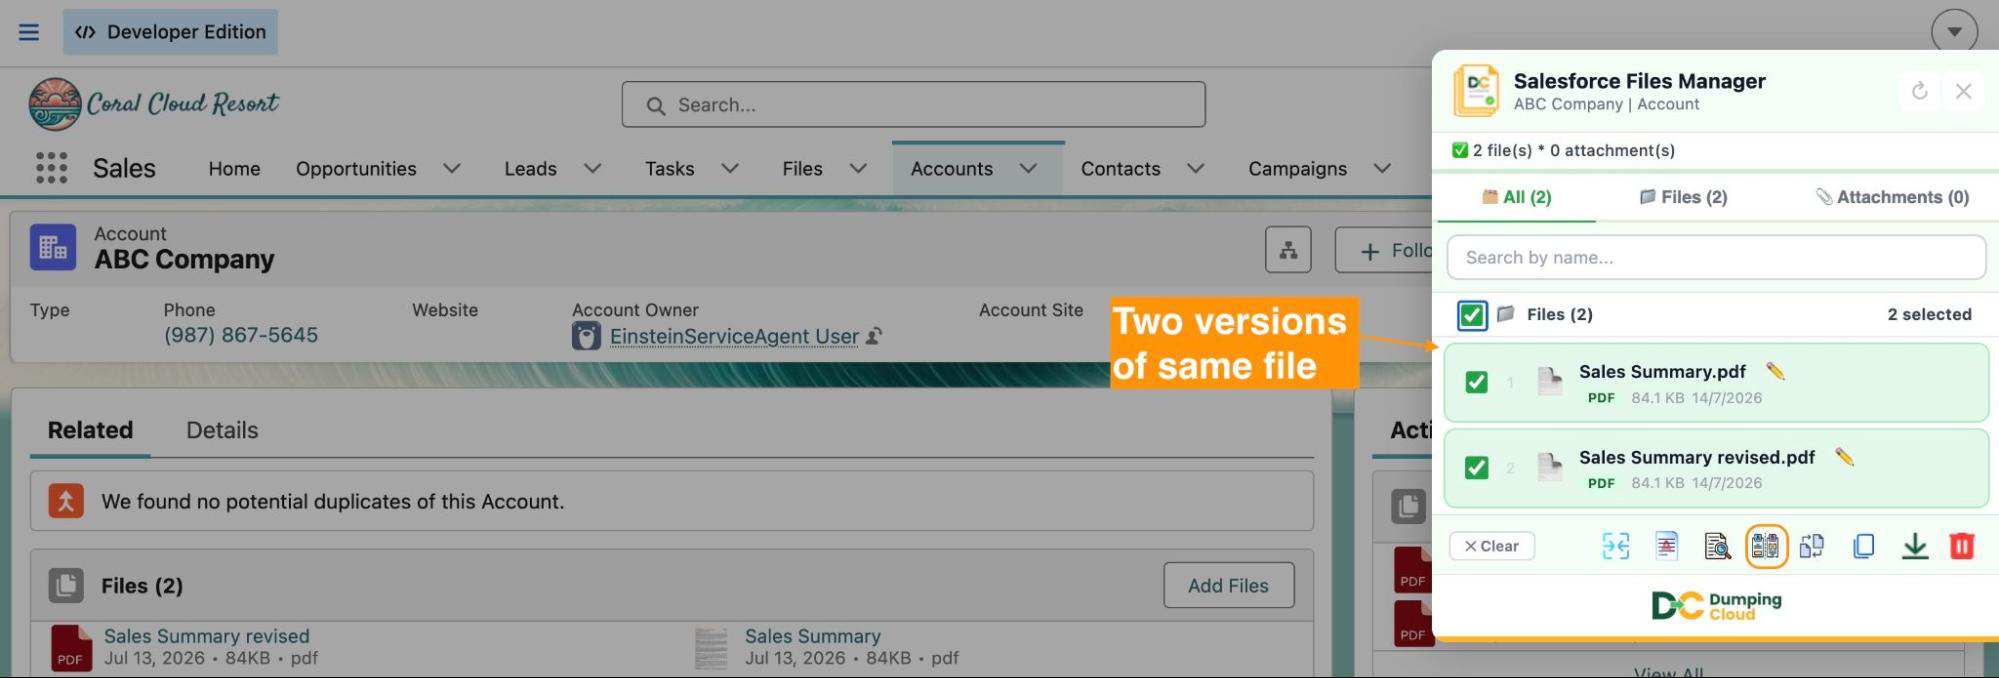
DumpingCloud – Salesforce Files Manager solves this with a dedicated side-by-side Compare feature — allowing users to compare salesforce files on the same Salesforce record and view them simultaneously in a split-screen panel, directly within the browser, without downloading either file.
What the Compare Feature Does
The Compare feature in DumpingCloud allows you to:
- Select any two files on the same Salesforce record and open them in a side-by-side visual comparison view
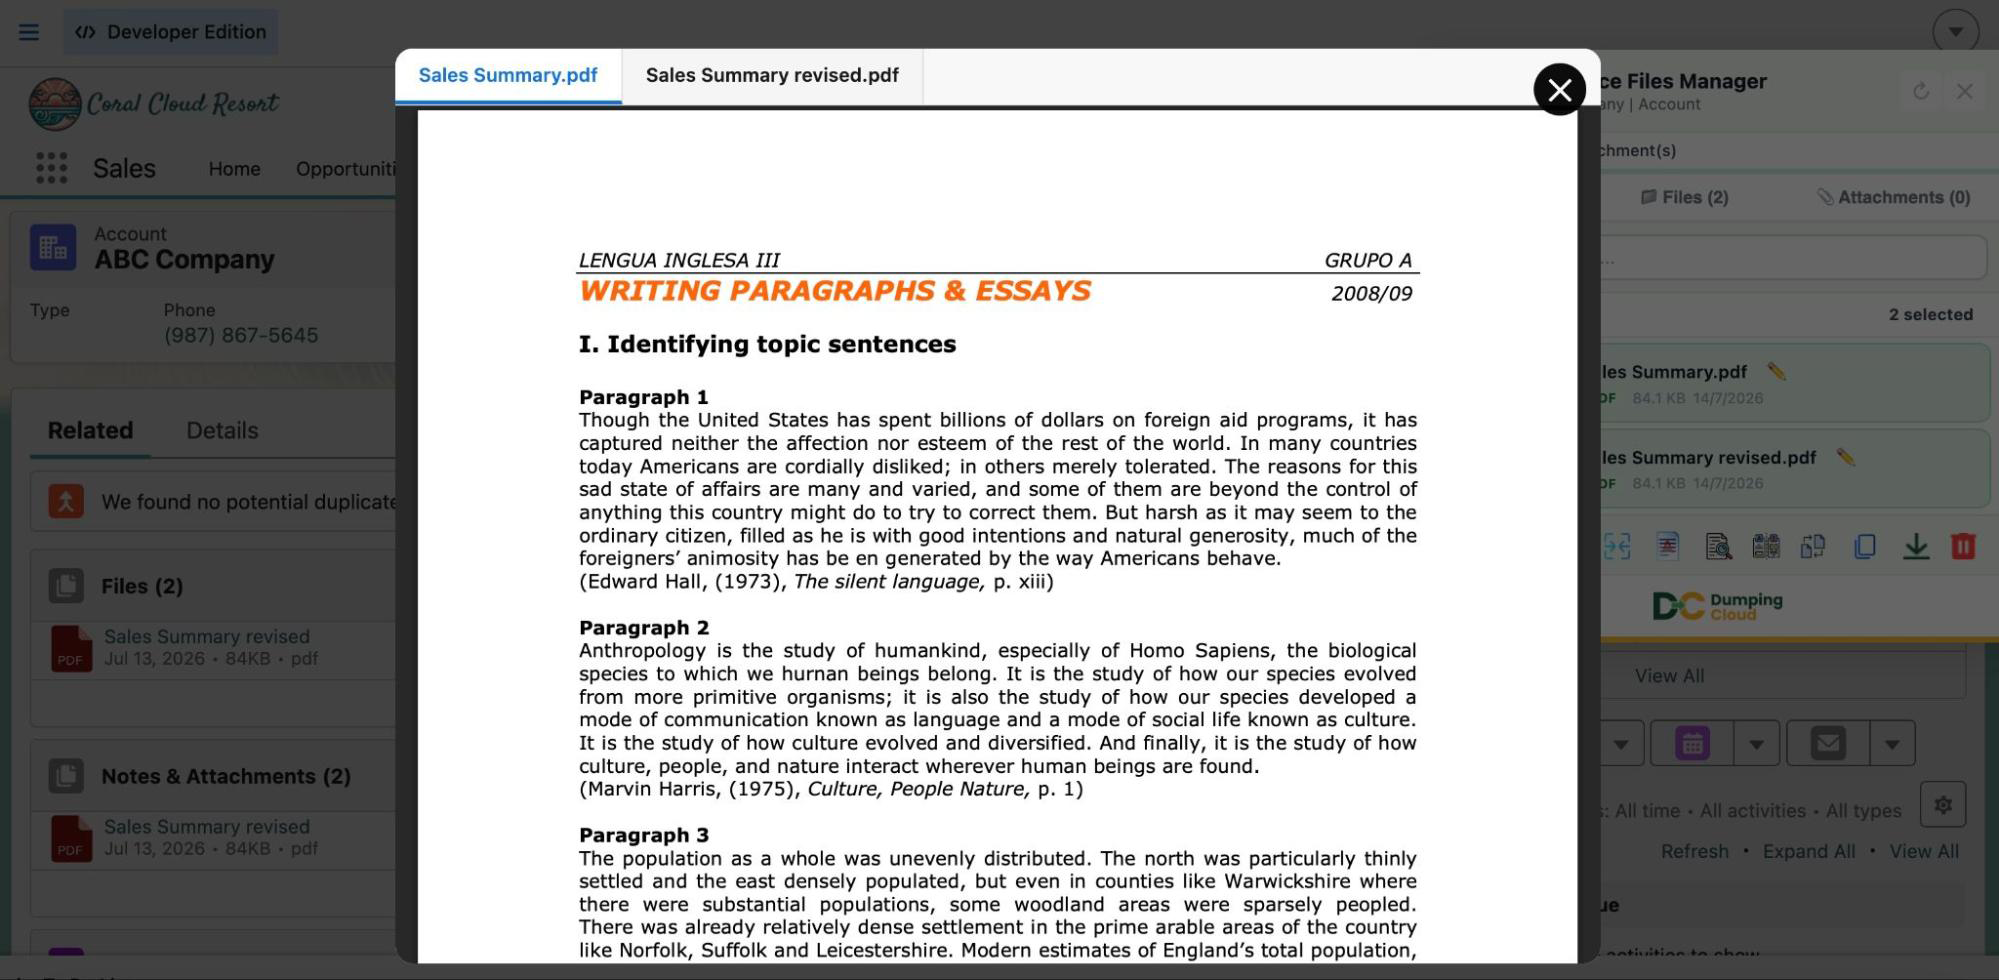
- View both files simultaneously in a split-screen panel within the extension — no external applications required
- Scroll both documents in sync to maintain positional alignment while reviewing corresponding sections
- Support all file types — PDFs, images, Word documents, spreadsheets, presentations, and more
- Perform the comparison entirely within the browser — no downloading, no third-party tools, no switching between applications
Who Benefits Most
The Compare feature addresses a common need across multiple roles and workflows in a Salesforce Org:
- Legal and contracts teams — Comparing the original contract draft against a redlined or revised version to identify exactly what clauses or terms have changed before proceeding to signature
- Sales teams — Reviewing two versions of a proposal to confirm what was updated between rounds of negotiation before sending the latest version to a prospect
- Salesforce Admins — Verifying that a corrected or updated document differs from the previous version in the expected way before archiving or deleting the older file
- Customer support teams — Comparing an initial diagnostic report with an updated one filed after further investigation to understand how the situation evolved
- Finance and procurement — Placing two versions of a purchase order, invoice, or financial statement side by side to verify the changes before approval
- Quality assurance and compliance — Ensuring that a revised policy document or regulatory submission reflects all required updates relative to the previous version
Step-by-Step: How to Compare Files Using DumpingCloud
Prerequisites
Before you begin, ensure the following:
- Google Chrome is installed on your desktop
- DumpingCloud – Salesforce Files Manager is installed from the Chrome Web Store (Install here)
- You are logged into your Salesforce Org in the same Chrome browser
- The two files you want to compare are both attached to the same Salesforce record
- You have the necessary Salesforce permissions to view the files on the target record
01
Step 1
Navigate to the Record and Open the Extension
Open Google Chrome and log in to your Salesforce Org. Navigate to the record containing the two files you want to compare — for example, a Contract with two document versions, or an Opportunity with two proposal drafts.
Click the DumpingCloud icon in your Chrome toolbar to open the extension panel. The panel will load all files associated with the current record.
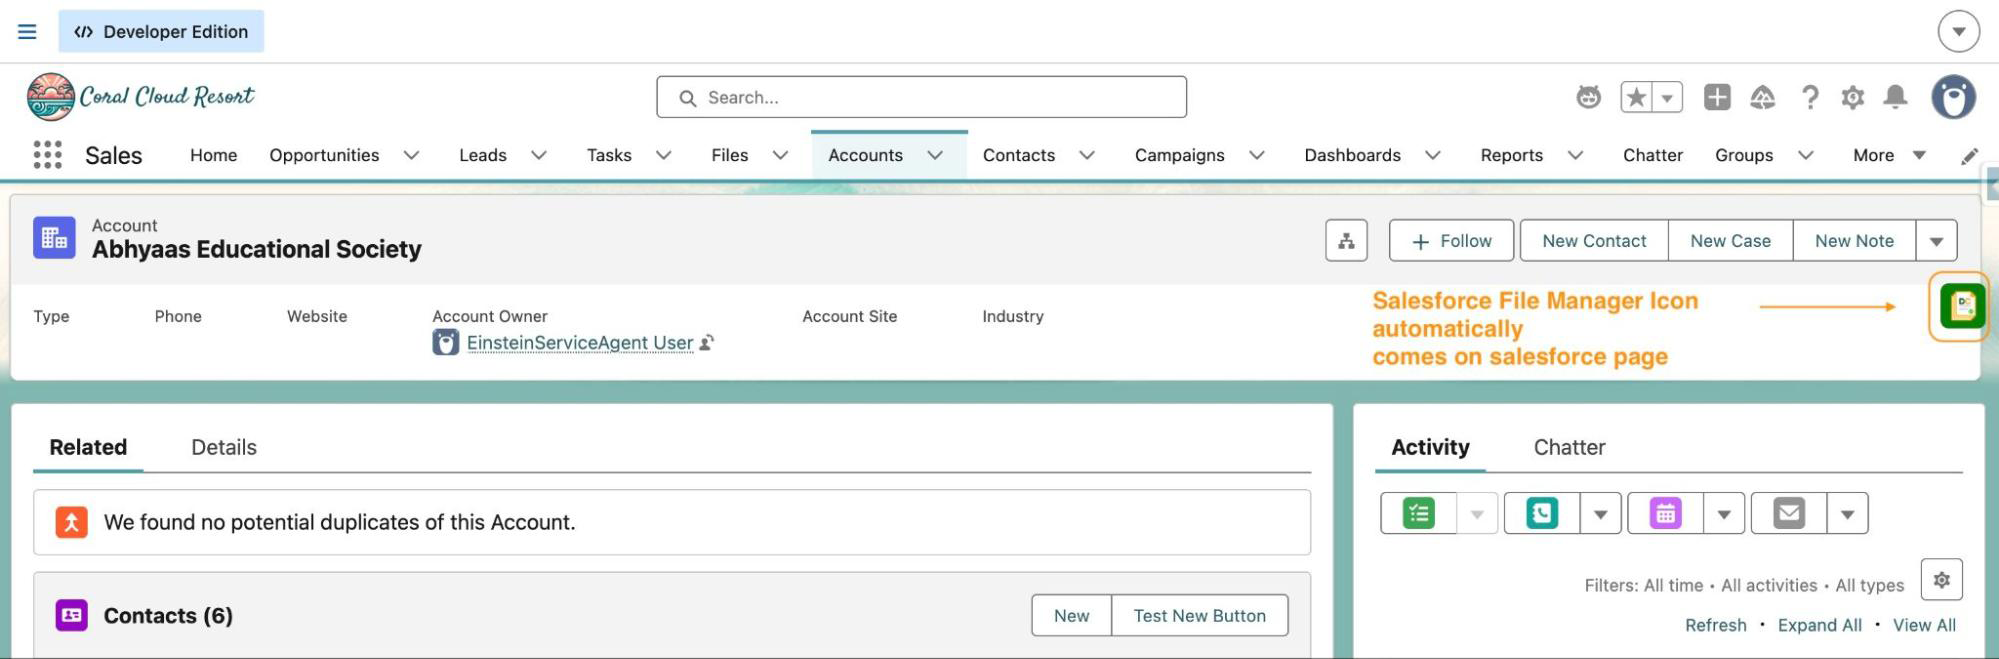
The extension panel will open and automatically load all files and attachments associated with the current record.
02
Step 2
Select Exactly Two Files to Compare
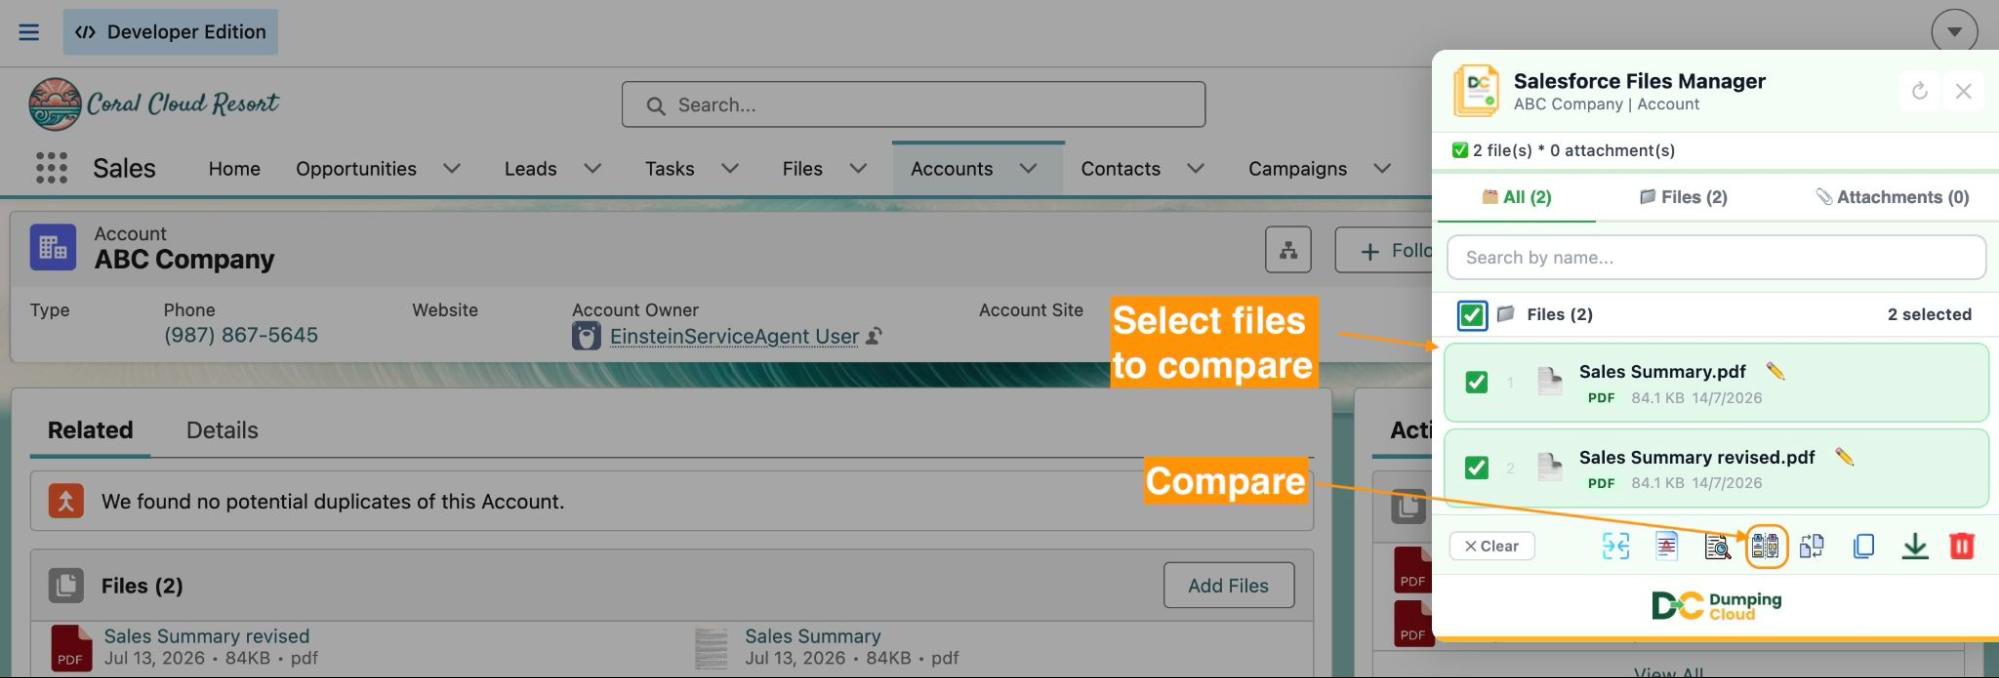
Click the checkboxes next to the two files you wish to compare. The Compare feature requires exactly two files to be selected — no more, no fewer.
The two selected files will be highlighted in the extension panel, with a file count indicator confirming two files are chosen.
Click the “Compare” icon
With exactly two files selected, click the “Compare” icon in the extension panel action bar.
03
Step 3
Review the Side-by-Side Comparison View
The extension will open the side-by-side comparison view, displaying both files simultaneously in a split-screen layout within the panel.
- The first selected file appears on the left panel
- The second selected file appears on the right panel
- Both file names are displayed at the top of their respective panels for clear identification
Scroll through either panel to review the file content. Both panels scroll in sync, keeping corresponding sections aligned for easier comparison.
04
Step 4
Navigate Through the Files
Use the scroll functionality within each panel to move through the document content. Both panels remain synchronised so that when you scroll one, the other follows — ensuring you always compare the same relative position in both files.
For paginated documents such as PDFs, use the page navigation controls at the bottom of each panel to jump to specific pages.
05
Step 5
Exit the Comparison View
Once your review is complete, click the close or back button to exit the comparison view and return to the main extension file list.
From there, you can take any follow-up action on the files — download, delete, rename, move, or any other operation available in the extension.
Key Advantages Over the Manual Approach
| Capability | Manual Process | DumpingCloud |
|---|---|---|
| Compare two files side by side | Download both → open in separate apps → manually align | ✅ Directly in the extension |
| Supported file types | Depends on local applications | ✅ All file types |
| Synchronised scrolling | ❌ Manual scroll coordination | ✅ Automatic sync scrolling |
| Stays within Salesforce workflow | ❌ Requires external applications | ✅ No external tools needed |
| Risk of missing changes | Higher — manual side-by-side is error-prone | Lower — structured split-screen view |
| Time to set up comparison | Minutes | Seconds |
Frequently Asked Questions
Can I compare files from two different Salesforce records? The Compare feature currently supports comparison of files on the same Salesforce record. To compare files from different records, use the Copy feature to bring both files onto the same record first, then use Compare.
Can I compare more than two files at once? The Compare feature is designed as a two-file side-by-side comparison. Exactly two files must be selected to activate the Compare button. For multi-file review scenarios, compare files in pairs sequentially.
Does the Compare feature highlight differences between the two files automatically? The current Compare feature is a side-by-side visual comparison — both files are displayed simultaneously for manual review. Automatic text difference highlighting (diff) is not part of the current feature set. For documents where precise change tracking is required, the redline or tracked changes features within the original authoring application (e.g., Microsoft Word) remain the most appropriate tool.
Does comparing files affect the original files in any way? No. The Compare feature is entirely read-only. It opens a visual view of both files for review purposes only. No changes are made to either file, their content, their metadata, or their Salesforce record associations.
What file types can be compared? The Compare feature supports all file types available in DumpingCloud, including PDFs, images, Word documents, Excel spreadsheets, PowerPoint presentations, and more.
Do both files need to be the same file type to be compared? No. You can compare files of different types side by side — for example, a PDF version and a Word version of the same document. This can be useful when reviewing a source document against a converted or reformatted version.
Do I need System Administrator permissions to use the Compare feature? You need sufficient Salesforce permissions to view the files on the relevant record. The Compare feature is read-only and does not modify any data, so no elevated permissions beyond file viewing are required.
Summary
When multiple versions of a document exist on the same Salesforce record, reviewing what changed between them should be fast, structured, and something you can do without leaving the platform. The manual alternative — downloading both files, opening separate applications, and trying to spot differences across two independent windows — is slow and unreliable.
The Compare feature in DumpingCloud – Salesforce Files Manager replaces that process with a clean, synchronized, side-by-side viewing experience built directly into the extension panel. Any two files, any file type, the same record — open both in seconds, scroll in sync, and make informed decisions without a single download.
👉Add DumpingCloud to Chrome — Free
For support or enquiries, contact us at mohit.bansal@ayansoftwares.com or call +91 99531 70767.
DumpingCloud — Manage Salesforce content like a Pro.

The Problem: Multiple Files on the Same Record That Should Be One Document — and No Way to Combine Them natively in Salesforce
Every Salesforce record tells a story. And often, that story is spread across multiple separate files.
Scenario 1 : A Contract record holds a cover letter, the main agreement, three exhibits, and a signature page — all uploaded as individual files.
Scenario 2 : An Opportunity has a proposal document, a pricing sheet, a case study, and a product brochure that all need to go to the prospect as a single, professional PDF package.
Scenario 3 : A Case contains a sequence of diagnostic reports, each filed at a different stage of the investigation, that need to be combined into one consolidated document for the final resolution summary.
Scenario 4 : An HR record has an offer letter, a job description, and a benefits overview that should be sent together as a unified onboarding pack.
Current Legacy Solution: In every one of these scenarios, the correct output is one file. But native Salesforce has no ability to combine files. The only path available is to download every file individually, open a PDF editor or third-party merging tool, import all the files, arrange them in the correct order, export the merged result, and re-upload it to the Salesforce record.
This process is slow, tool-dependent, error-prone, and entirely disconnected from the Salesforce record where the files live and where the work happens.
DumpingCloud – Salesforce Files Manager solves this with a built-in PDF Merge feature :
- Giving you a full page-level editor to select files
- Pick individual pages of each file
- Control page order
- Rotate pages
- Remove unwanted pages
- Undo mistakes
and produce a single polished merged PDF saved directly back to the Salesforce record — all without leaving the salesforce.
What the PDF Merge Feature Does
The PDF Merge feature in Dumping Cloud -Salesforce Files Manager allows you to:
- Select any two or more files from the same Salesforce record and combine them into a single PDF
- Merge any file type — PDFs, Word documents, images, spreadsheets, presentations, and more are all supported as inputs, with the output always produced as a unified PDF
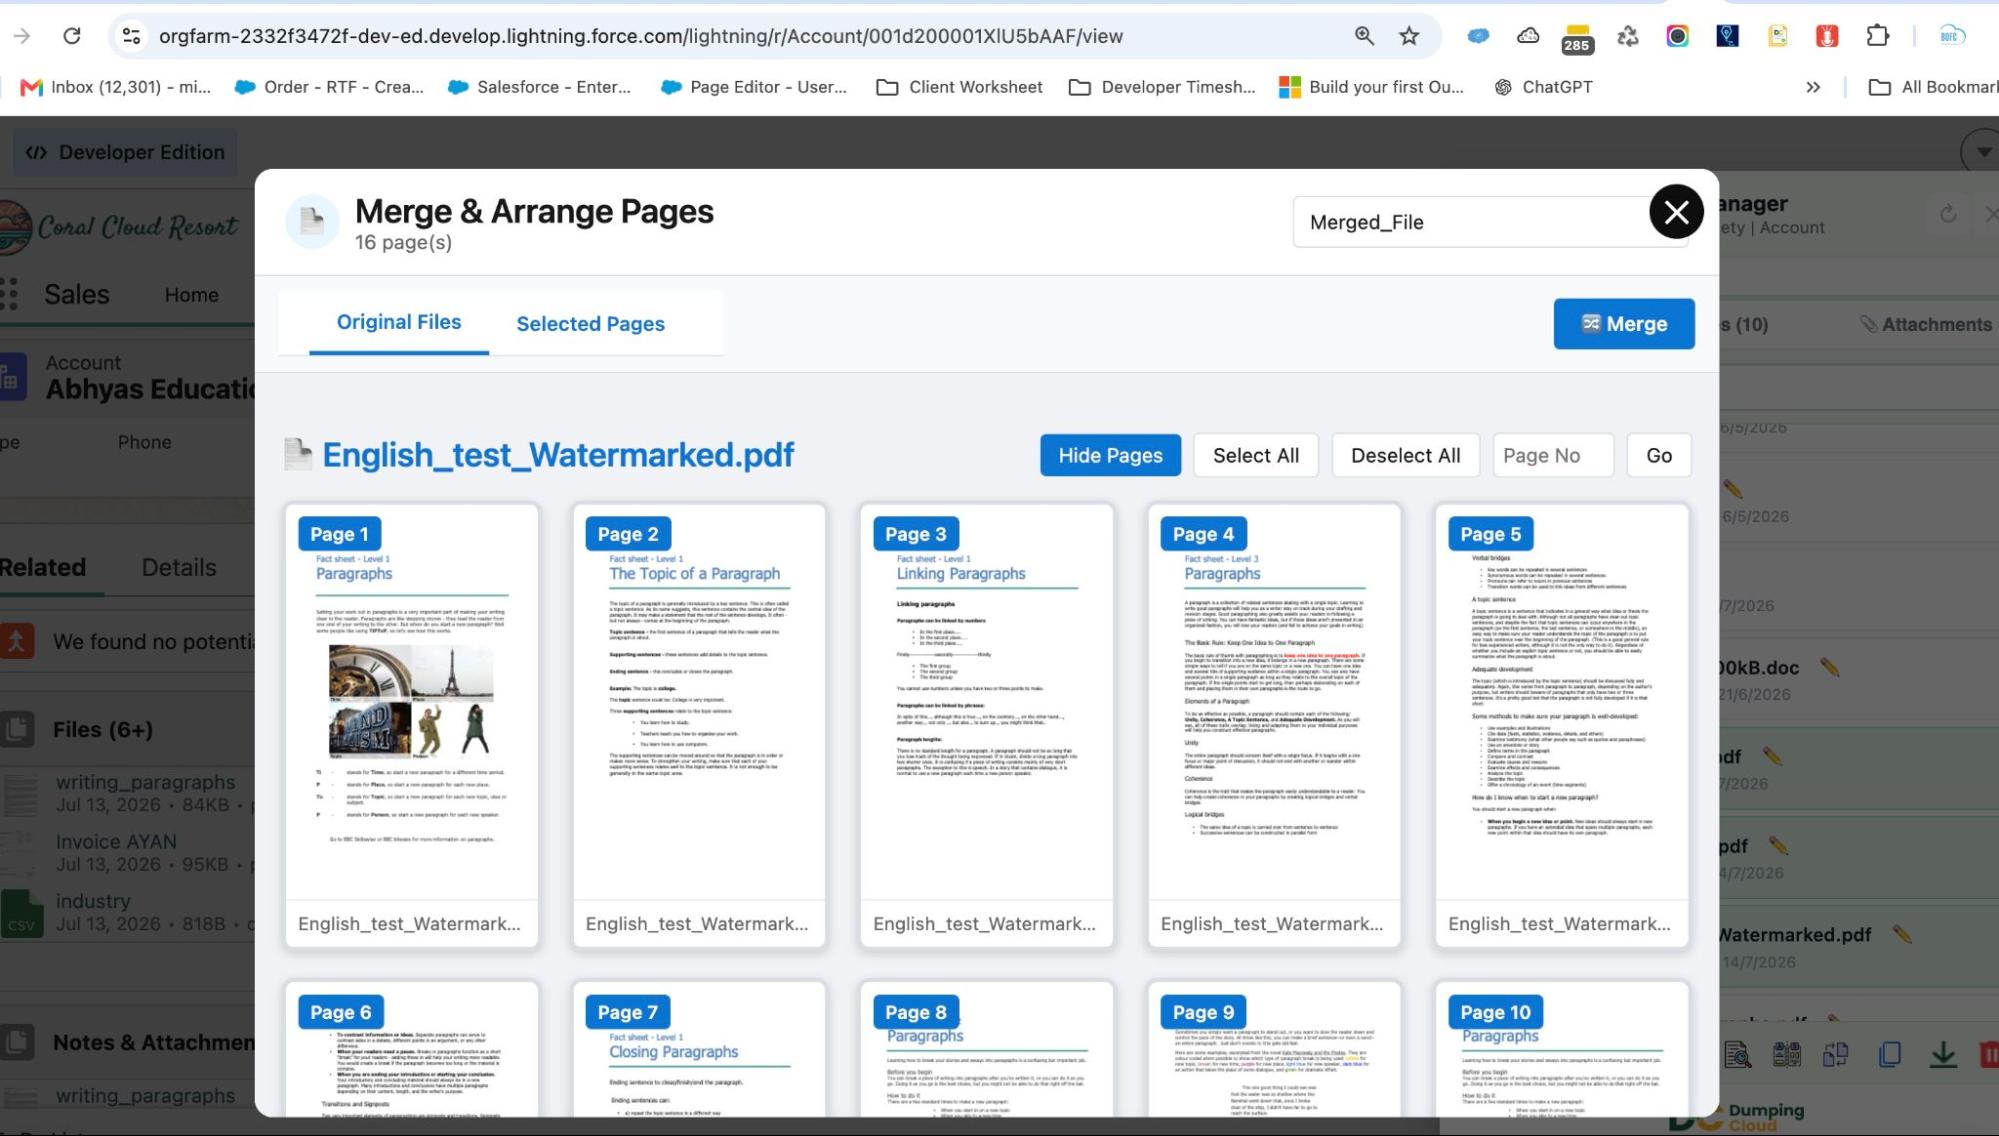
- Select individual pages from multi-page files — click thumbnails manually or enter page ranges using print-style notation (e.g., “1-3, 7, 11-14”) to include only the exact pages you need
- Reorder pages using drag-and-drop — arrange pages from across all selected files into exactly the right sequence before merging
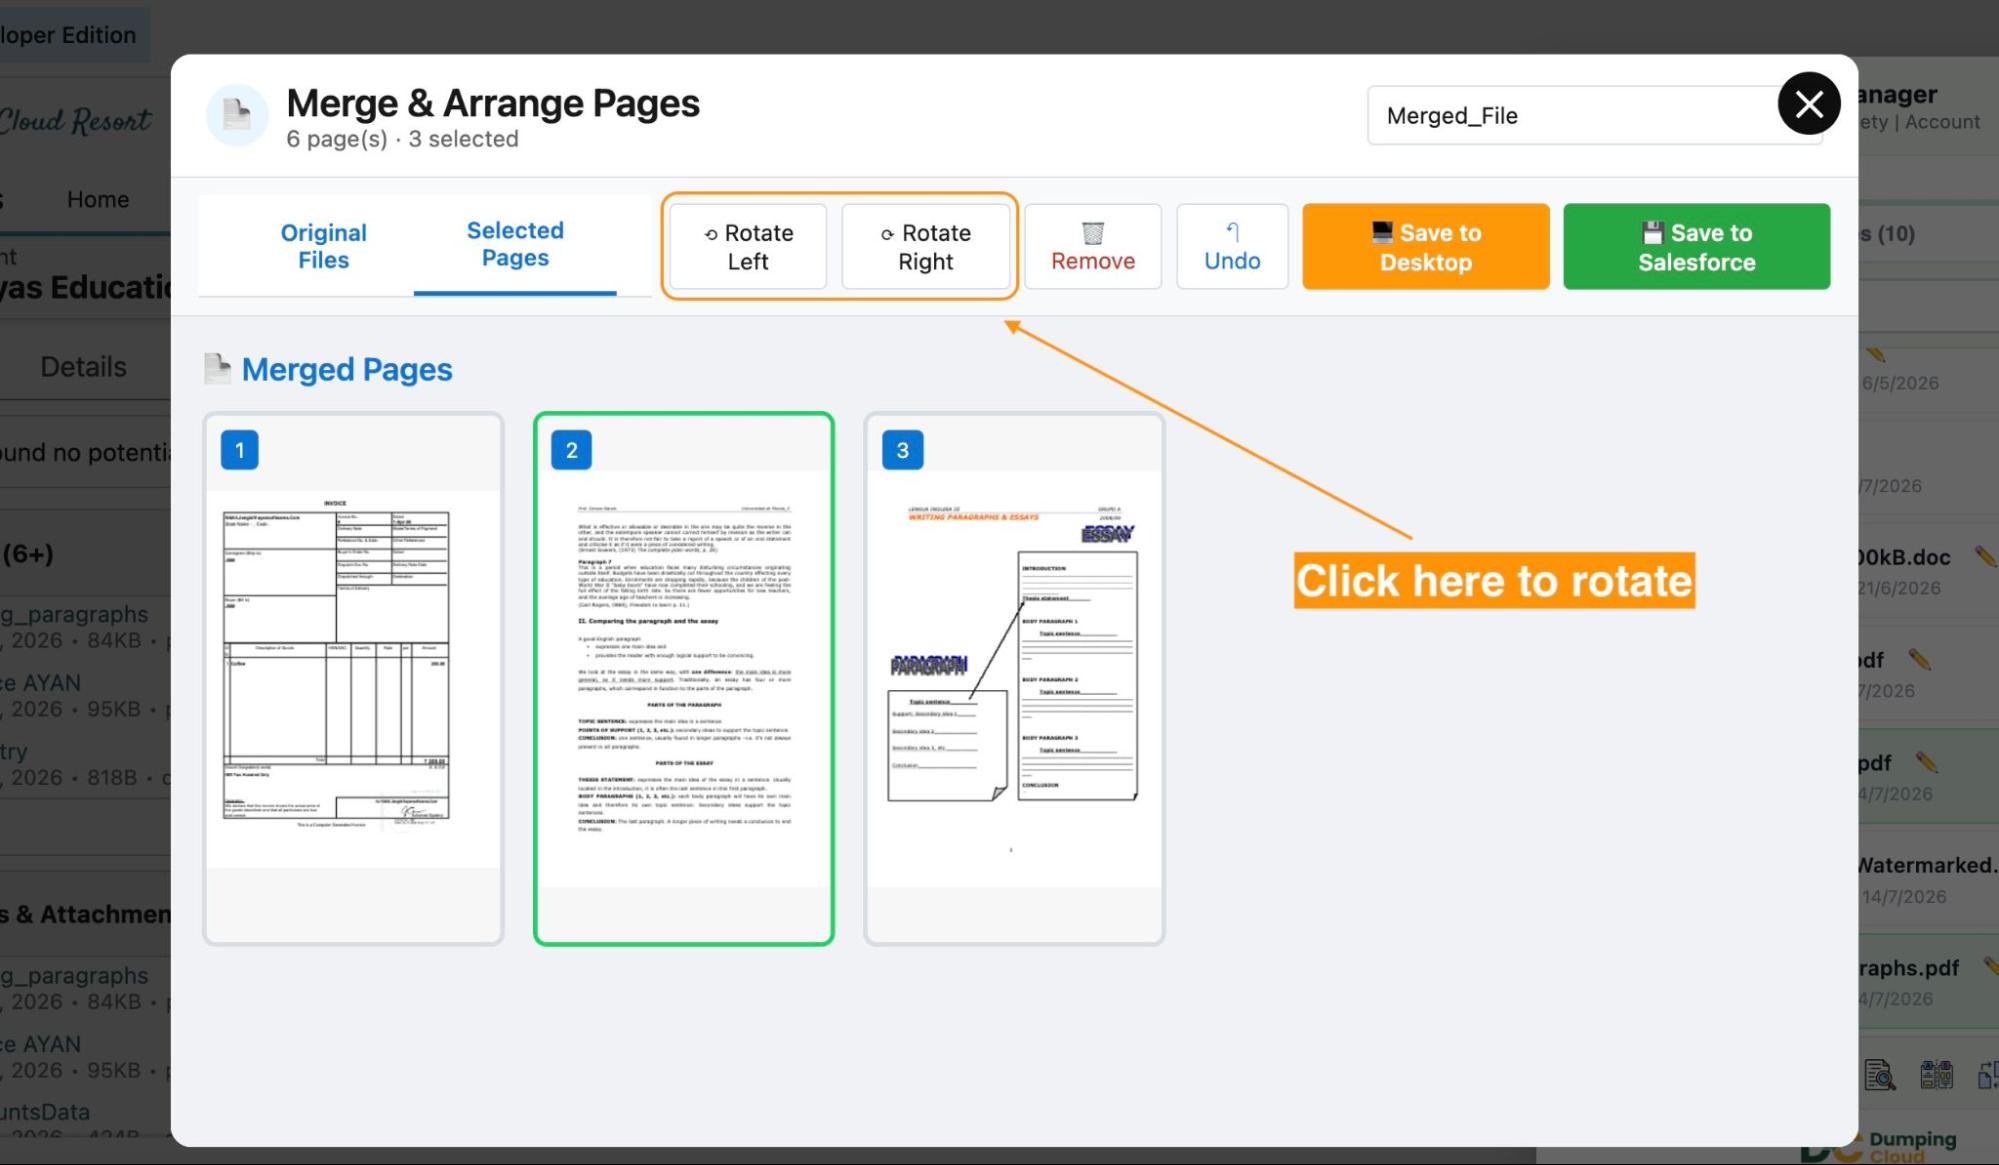
- Rotate pages left or right — correct the orientation of any individual page directly in the merge editor
- Remove pages — exclude any page from the final output without affecting the original source file
- Undo any action — reverse page removals, rotations, or reordering mistakes at any point before saving
- Choose how the merged file is saved — overwrite an existing file on the record, or save as a brand new file alongside the originals
- Perform the entire operation within the extension panel — no PDF editor, no third-party merging tool, no downloading required
Step-by-Step: How to Merge Files Using DumpingCloud Extension
Prerequisites – Before you begin, ensure the following:
- Google Chrome is installed on your desktop
- DumpingCloud – Salesforce Files Manager is installed from the Chrome Web Store (Install here)
- You are logged into your Salesforce Org in the same Chrome browser
- All files you intend to merge are attached to the same Salesforce record
- You have the necessary Salesforce permissions to view and edit files on the target record
01
Step 1
Navigate to the Record and Open the Extension
Open Google Chrome and log in to your Salesforce Org. Navigate to the record containing the files you want to merge — for example, an Opportunity with multiple proposal components, or a Contract with separate agreement sections.
Click the DumpingCloud – Salesforce Files Manager icon in your Chrome toolbar to open the extension panel. The panel will load all files associated with the current record.

02
Step 2
Open DumpingCloud
Click the checkboxes next to each file you want to include in the merge operation. Select a minimum of two files.
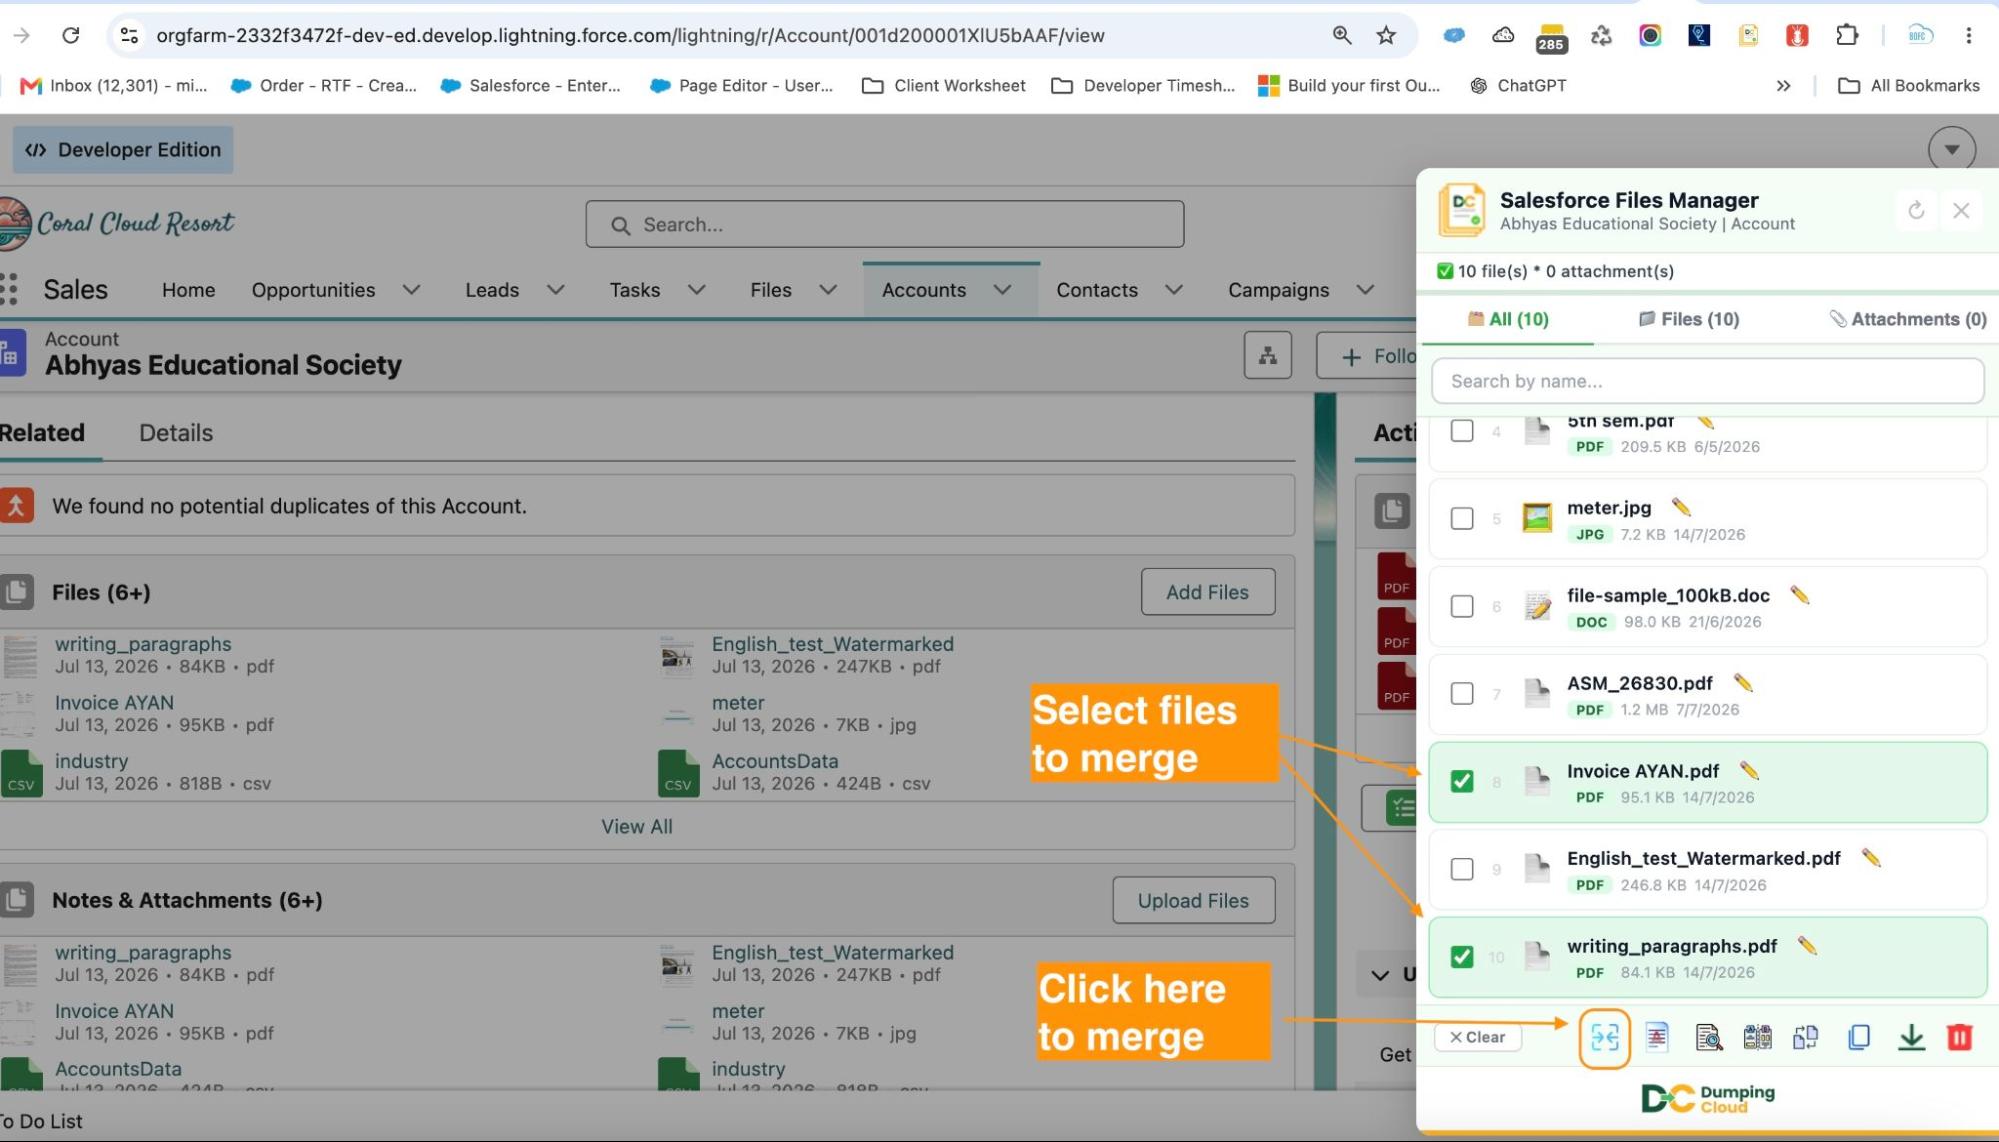
Click the “Merge” icon
With your files selected, click the “Merge” icon in the extension panel action bar. The merge editor will open, loading all pages from all selected files as individual thumbnails in a visual grid.

03
Step 3
Select the Pages to Include
In the merge editor, all pages from all selected files are displayed as thumbnails and included by default. Specify exactly which pages to include using either method — or a combination of both:

Option 1 — Click to select or deselect thumbnails manually. Click any page thumbnail to deselect it (it will grey out). Click it again to re-include it. Best for shorter documents or when pages are easily identifiable from their thumbnails.
Option 2 — Enter a page range using print-style notation. Use the page number input field to type your page selection. The same syntax you use when printing works here:
- Single page: 5
- Continuous range: 3-7
- Multiple pages: 1, 4, 9
- Combined: 1-3, 7, 11-14
The thumbnail grid updates in real time to reflect your input, letting you visually confirm the selection before moving on. Both methods can be used together — for example, enter a range to get most of the pages, then click individual thumbnails to fine-tune the selection.

Once the page selection is done, Click the Merge button. It will display all the selected pages along with the set of actions.

04
Step 4
Reorder the Pages
Drag and drop page thumbnails to arrange them into the correct sequence for the final document. Pages from different source files can be freely mixed and interleaved. The page position numbers update in real time as you drag.

Use the Undo button at any point to reverse a reorder action if needed.
Click the remove icon on any page thumbnail to exclude it from the final merged output. The page is immediately removed from the grid. The original source file on the Salesforce record is unaffected.
05
Step 5
Rotate Any Pages as needed
For any page displaying in the wrong orientation, click the rotate left or rotate right icon on its thumbnail to correct it. Rotation is applied immediately and is visible in the thumbnail preview.
Use the Undo button to reverse a rotation if needed.
06
Step 6
Name the Merged File and Choose Your Save Option
Enter a descriptive name for the merged PDF output (e.g., “DealPackage_ClientName.pdf”, “Contract_Complete_2026.pdf”). Then select your save option:
- Save as new file — Adds the merged PDF to the record alongside the originals
- Overwrite existing file — Replaces a selected existing file on the record with the merged PDF

07
Step 7
Verify on the Target Record
Once satisfied with the page selection, order, orientation, file name, and save option, click “Merge Now” to execute. The extension will process all selected pages, combine them in the defined sequence, and save the merged PDF to the Salesforce record.
A progress indicator will display during processing. Time will vary based on the number and size of pages being merged.
A success confirmation will display once the merge is complete. Use the in-window preview to open and review the merged PDF directly in the extension, confirming page sequence, orientation, and content. Navigate to the Files related list on the Salesforce record to confirm the merged file is saved and correctly named.
Key Advantages Over the Manual Approach
| Capability | Download → Merge Tool → Re-upload | DumpingCloud |
|---|---|---|
| Merge PDFs into one document | ✅ Via third-party tool | ✅ Directly inside Extension |
| Merge non-PDF files (Word, images, Excel) | Depends on Tool | ✅ All File Types Supported |
| Select individual pages from multi-page files | Depends on Tool | ✅ Click thumbnails or enter print-style page ranges |
| Drag-and-drop page reordering | Depends on Tool | ✅ Built into merge editor |
| Rotate individual pages left or right | Depends on Tool | ✅ Per-page rotation controls |
| Undo actions during editing | Depends on Tool | ✅ Full undo support |
| Overwrite existing or save as new file | ❌ Manual re-upload required | ✅ Both options available |
Frequently Asked Questions
Can I select individual pages from a multi-page document rather than including the whole file?
Yes — and there are two ways to do it. The first is to click page thumbnails directly in the visual grid to select or deselect them individually. The second is to use the page number input field, which accepts the same print-style notation you would use when printing a document: single pages (e.g., 5), continuous ranges (e.g., 3-7), multiple selections (e.g., 1, 4, 9), or combinations (e.g., 1-3, 7, 11-14). Both methods can be used together, and the thumbnail grid updates in real time to reflect your selection.
Can I mix pages from different files in any order I choose?
Yes. The drag-and-drop page reordering in the merge editor allows you to freely interleave pages from any of the selected source files into any sequence, regardless of which file they originated from.
What happens if I rotate a page incorrectly?
Click the Undo button to reverse the rotation. Undo works across all editing actions — rotations, removals, and reorders — and can be applied repeatedly to step back through your changes.
Does removing a page from the merge editor affect the original file in Salesforce?
No. All edits in the merge editor — page removals, rotations, and reordering — affect only the merged output. The original source files on the Salesforce record remain completely unchanged.
Will the original source files be deleted after merging?
If you choose “Save as new file”, all original source files remain on the record untouched. If you choose “Overwrite existing file”, only the specific file you select to overwrite is replaced. No other source files are automatically removed.
Can I merge files from different Salesforce records?
The Merge feature operates on files attached to the same Salesforce record. To merge files from different records, use the Copy feature to bring all required files onto one record first, then perform the merge.
What is the output format of the merged document?
The output is always a single PDF, regardless of the input file types. All source files — PDFs, Word documents, images, spreadsheets, and presentations — are converted and combined into one unified PDF.
Does the merged PDF retain the text searchability of the original files?
Yes. Where source files contain searchable text, the merged PDF will preserve text searchability, making the document suitable for text search and copy-paste operations after merging.
Do I need System Administrator permissions to use the Merge feature?
You need sufficient Salesforce permissions to view and edit files on the relevant record. The extension respects your existing Salesforce profile and sharing rules.
Summary
Scattered files on a Salesforce record are a daily reality — but delivering them as a single, professionally assembled document should not require a trip outside the platform. The PDF Merge feature in Dumping Cloud – Salesforce Files Manager brings a full page-level editing experience directly into Salesforce: select your files, choose the exact pages you need, drag them into the right order, rotate any that are misaligned, remove anything that should not be included, undo freely, and save the polished merged PDF — all in one session, on any record, in under a minute.
Whether you are assembling a deal package for a prospect, consolidating a contract with all its exhibits, packaging case documentation for a client, or combining HR documents for a new hire, the Merge feature gives you the precision, control, and speed the task demands.
Install DumpingCloud
For support or enquiries, contact us at mohit.bansal@ayansoftwares.com or call +91 99531 70767.
DumpingCloud – Salesforce Files Manager — Manage Salesforce content like a Pro.
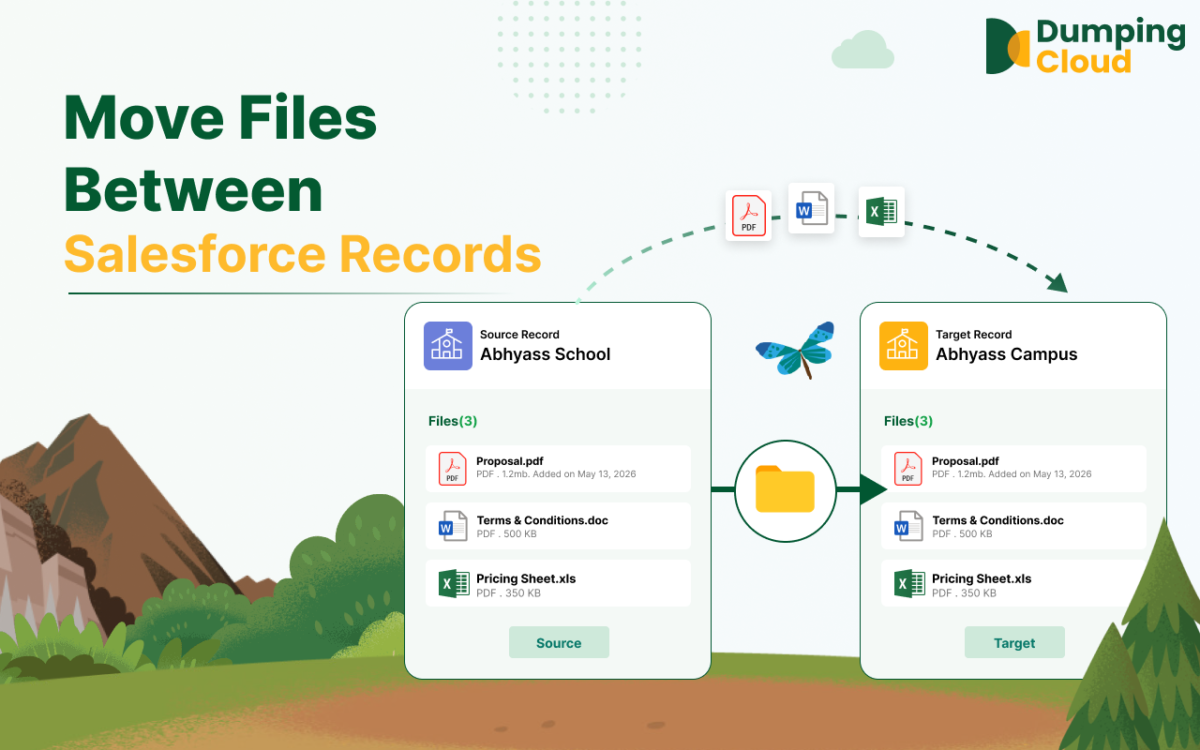
The Problem: Files Land in the Wrong Place. Moving Them is a Nightmare.
It happens more often than it should.
A sales rep uploads a signed contract to the wrong Opportunity. A support agent attaches a customer document to the incorrect Case. An Admin merges two Accounts and needs to consolidate files from both records into one. A file uploaded months ago now needs to live on a different record as part of a data restructuring exercise.
In native Salesforce, there is no built-in mechanism to move a file from one record to another. Your options are limited and painful:
- Download the file locally, navigate to the target record, and re-upload it manually — then delete the original
- Write Apex or use the Salesforce API to programmatically re-link ContentDocumentLink records
- Accept that the file stays where it is and manage the confusion downstream
None of these are acceptable for Admins operating at scale.
DumpingCloud – Salesforce Files Manager introduces a direct, no-code Move operation — allowing you to migrate salesforce files from any source record to any target record within the same Org, in just a few clicks.
What the Move Feature Does
The Move feature in DumpingCloud allows you to:
- Move a single file (or attachment) from one Salesforce record to another
- Mass Migrate Salesforce files (or attachments) simultaneously in a single operation
- Move files across any record types — from an Account to a Case, an Opportunity to a Contact, or between two records of the same type
- Remove the file from the source record automatically once moved, keeping your Org clean and avoiding duplicate file links
- Perform the operation without re-authenticating — the extension uses your active Salesforce session throughout
How Move Differs from Copy
It is important to understand the distinction between the two operations:
| Operation | Source Record | Target Record | Result |
|---|---|---|---|
| Move | File is removed | File appears | File exists only on the target record |
| Copy | File remains | File appears | File exists on both records |
Use Move when the file belongs exclusively on the target record and should no longer be associated with the source. Use Copy when the file needs to be accessible from multiple records simultaneously.
Who Benefits Most
The Move feature is particularly valuable for Salesforce Admins in the following scenarios:
- Incorrect uploads — Quickly correcting files that were attached to the wrong record by a user
- Record merges — Consolidating files after merging duplicate Accounts, Contacts, or Leads
- Data restructuring — Relocating files as part of org-wide data model changes or migration projects
- Opportunity-to-Contract transitions — Moving proposal and quote files from an Opportunity to its associated Contract record once a deal is closed
- Case escalations — Transferring all attachments from a child Case to a parent Case during escalation workflows
- Org clean-up initiatives — Reorganizing files that have accumulated on the wrong records over time
Step-by-Step: How to Move Files Using DumpingCloud – Salesforce Files Manager
Prerequisites
- Google Chrome is installed on your desktop
- DumpingCloud – Salesforce Files Manager is installed from the Chrome Web Store (Install here)
- You are logged into your Salesforce Org in the same Chrome browser
- You have the necessary Salesforce permissions to view and manage files on both the source and target records
01
Step 1
Navigate to the Source Record
Open Google Chrome and log in to your Salesforce Org. Navigate to the record that currently holds the file(s) you want to move — this is your source record.
02
Step 2
Open DumpingCloud – Salesforce Files Manager
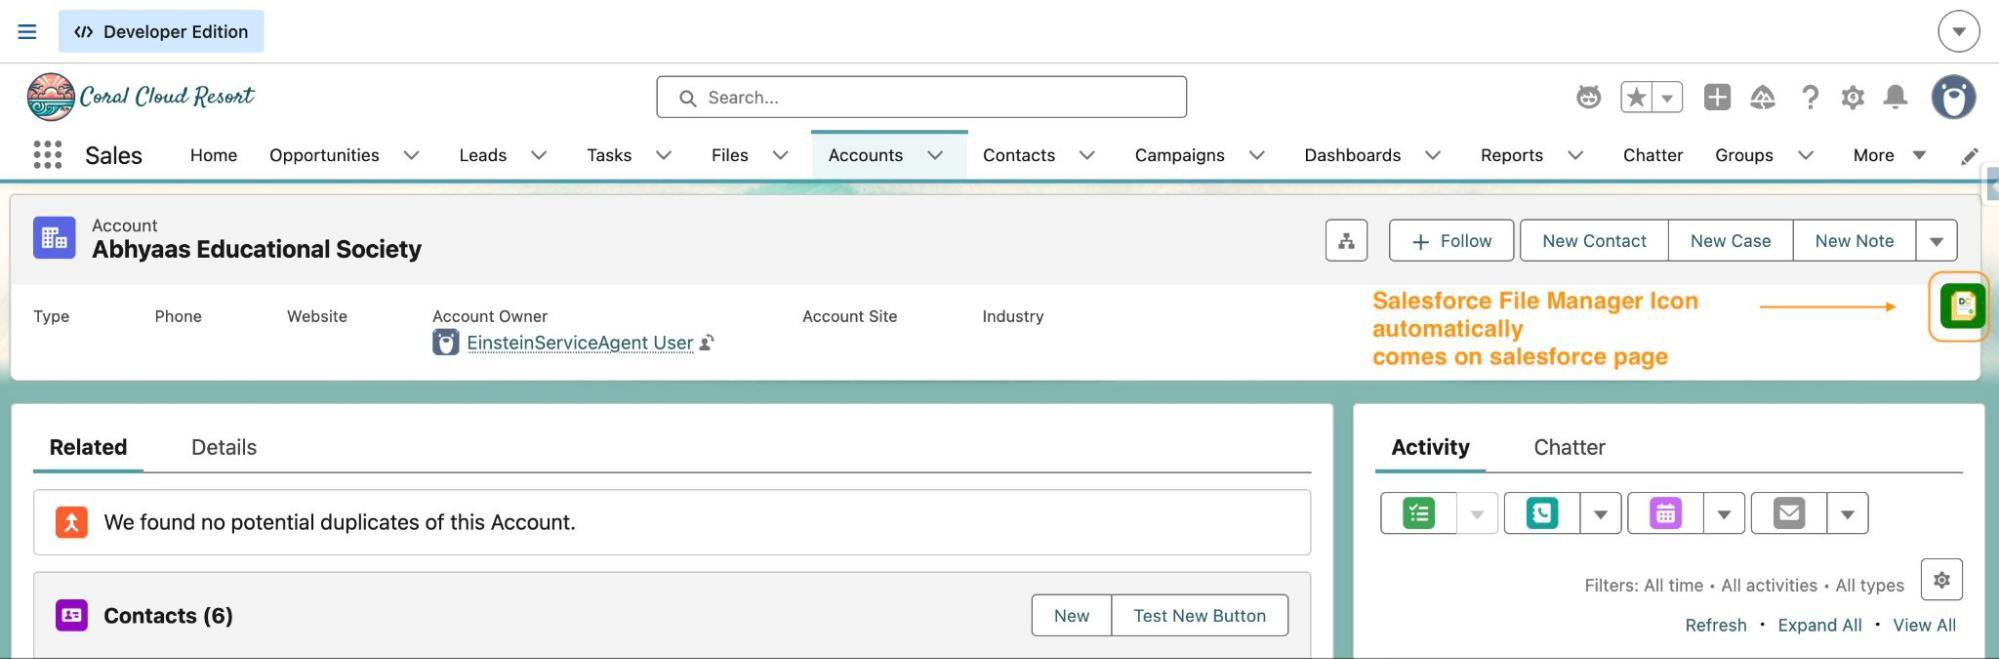
Click the DumpingCloud icon. The extension automatically detects your active Salesforce session. No additional login is required.
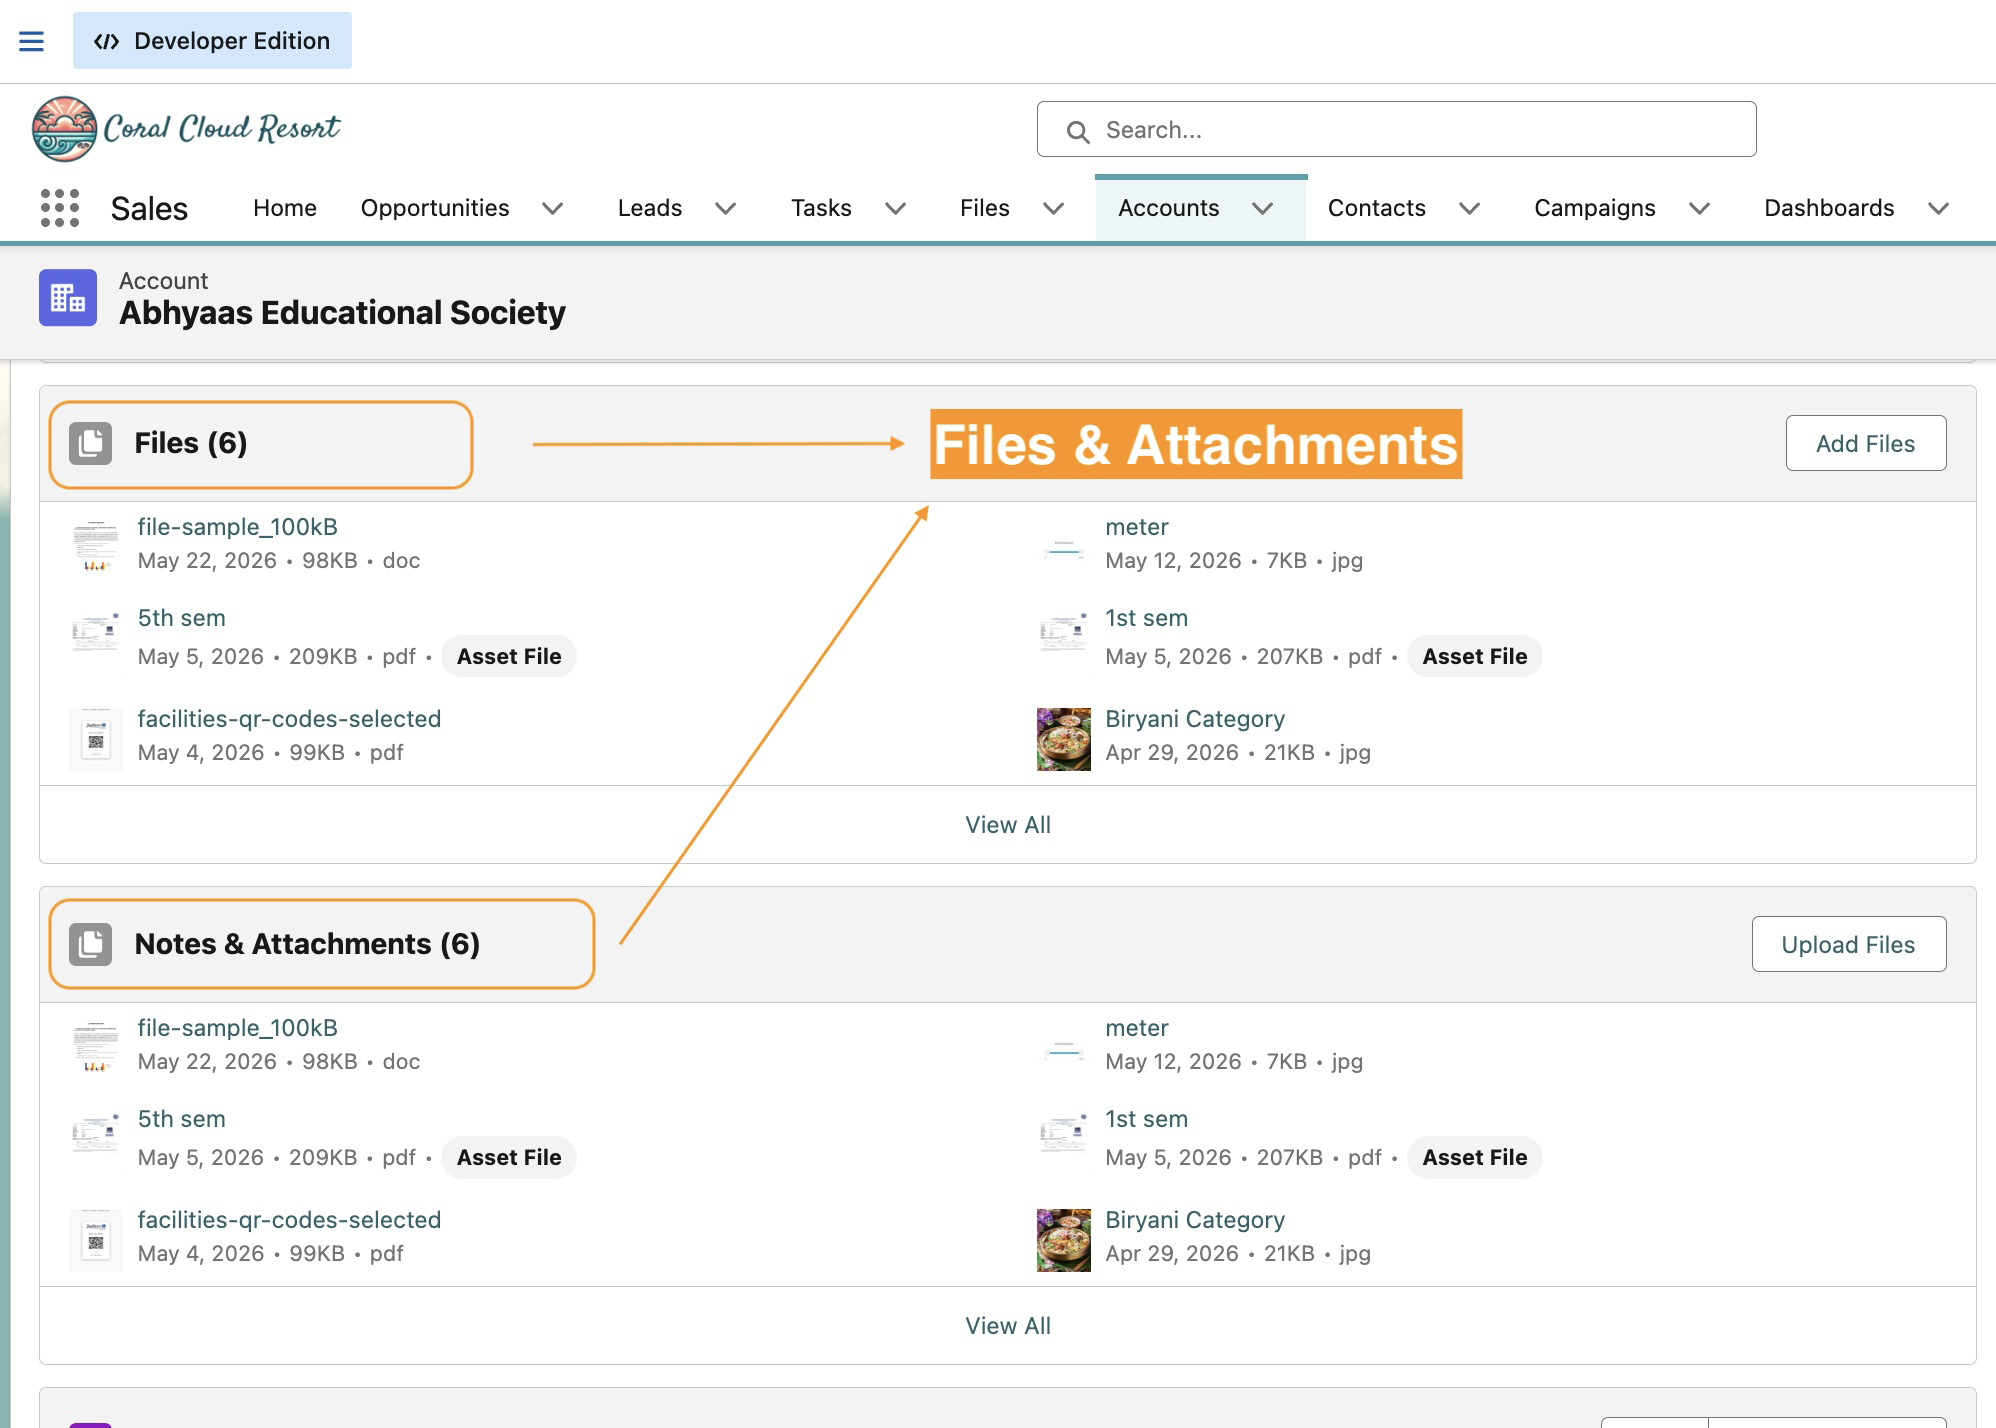
The extension panel will open and automatically load all files and attachments associated with the current record.

03
Step 3
Select the File(s) to Move
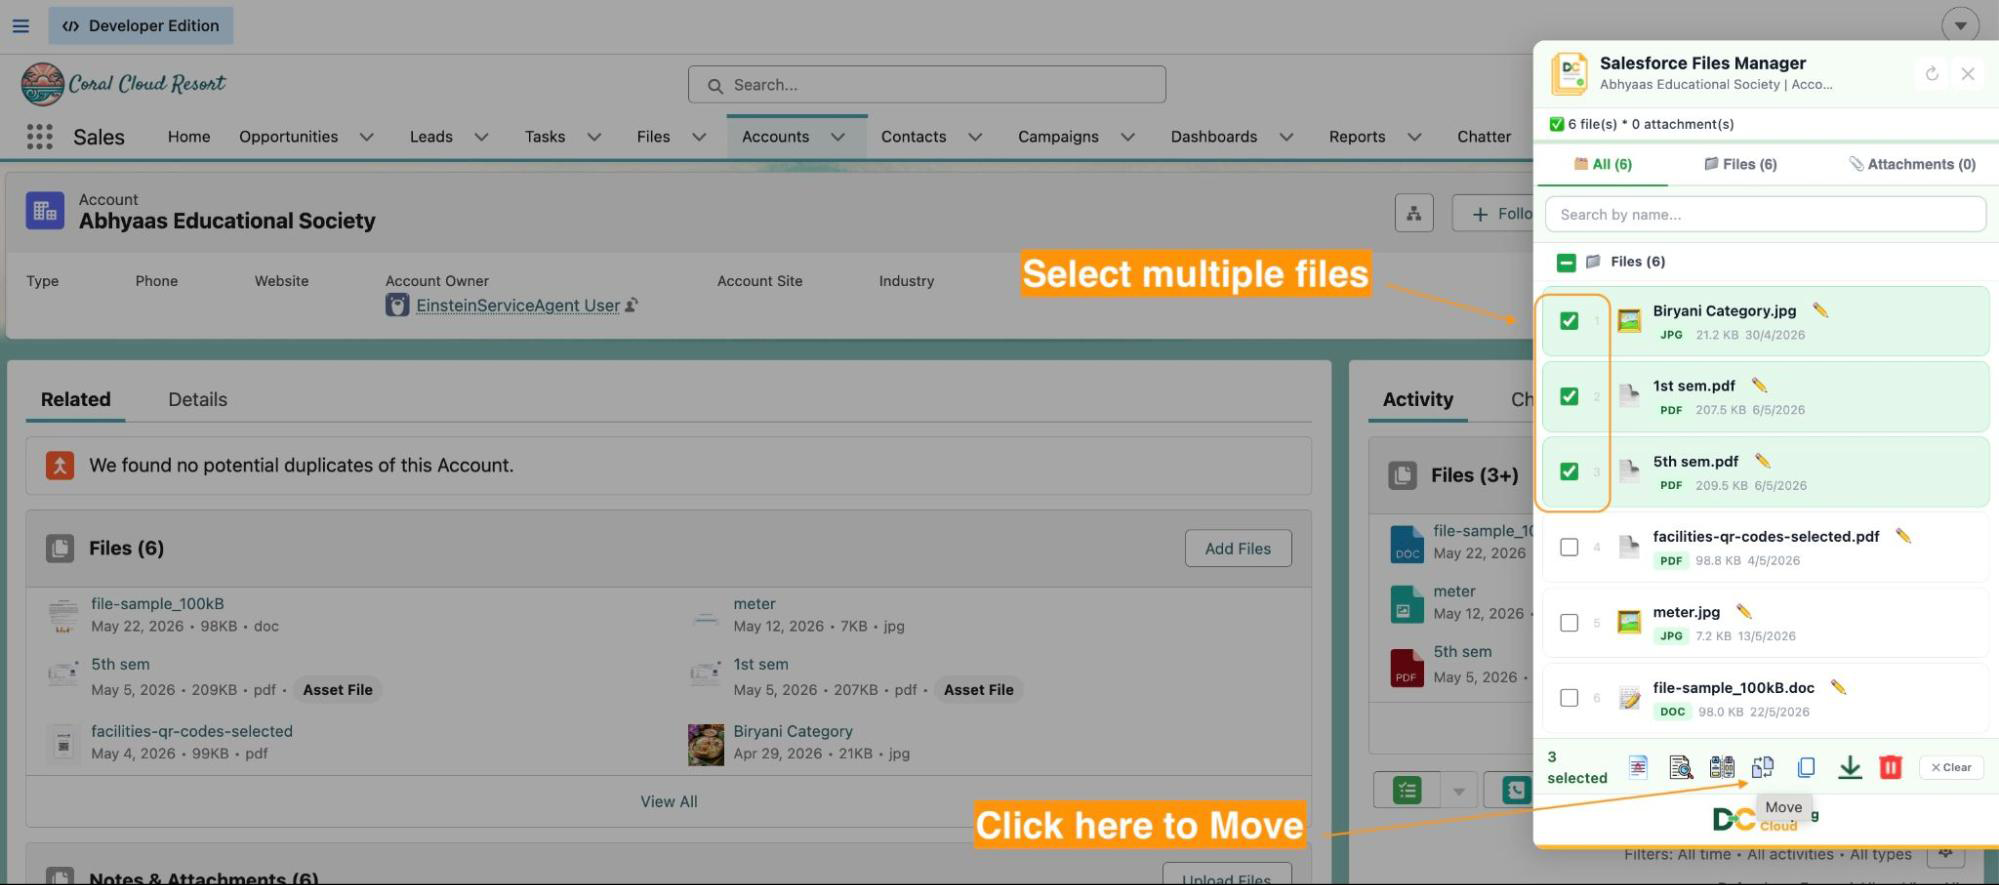
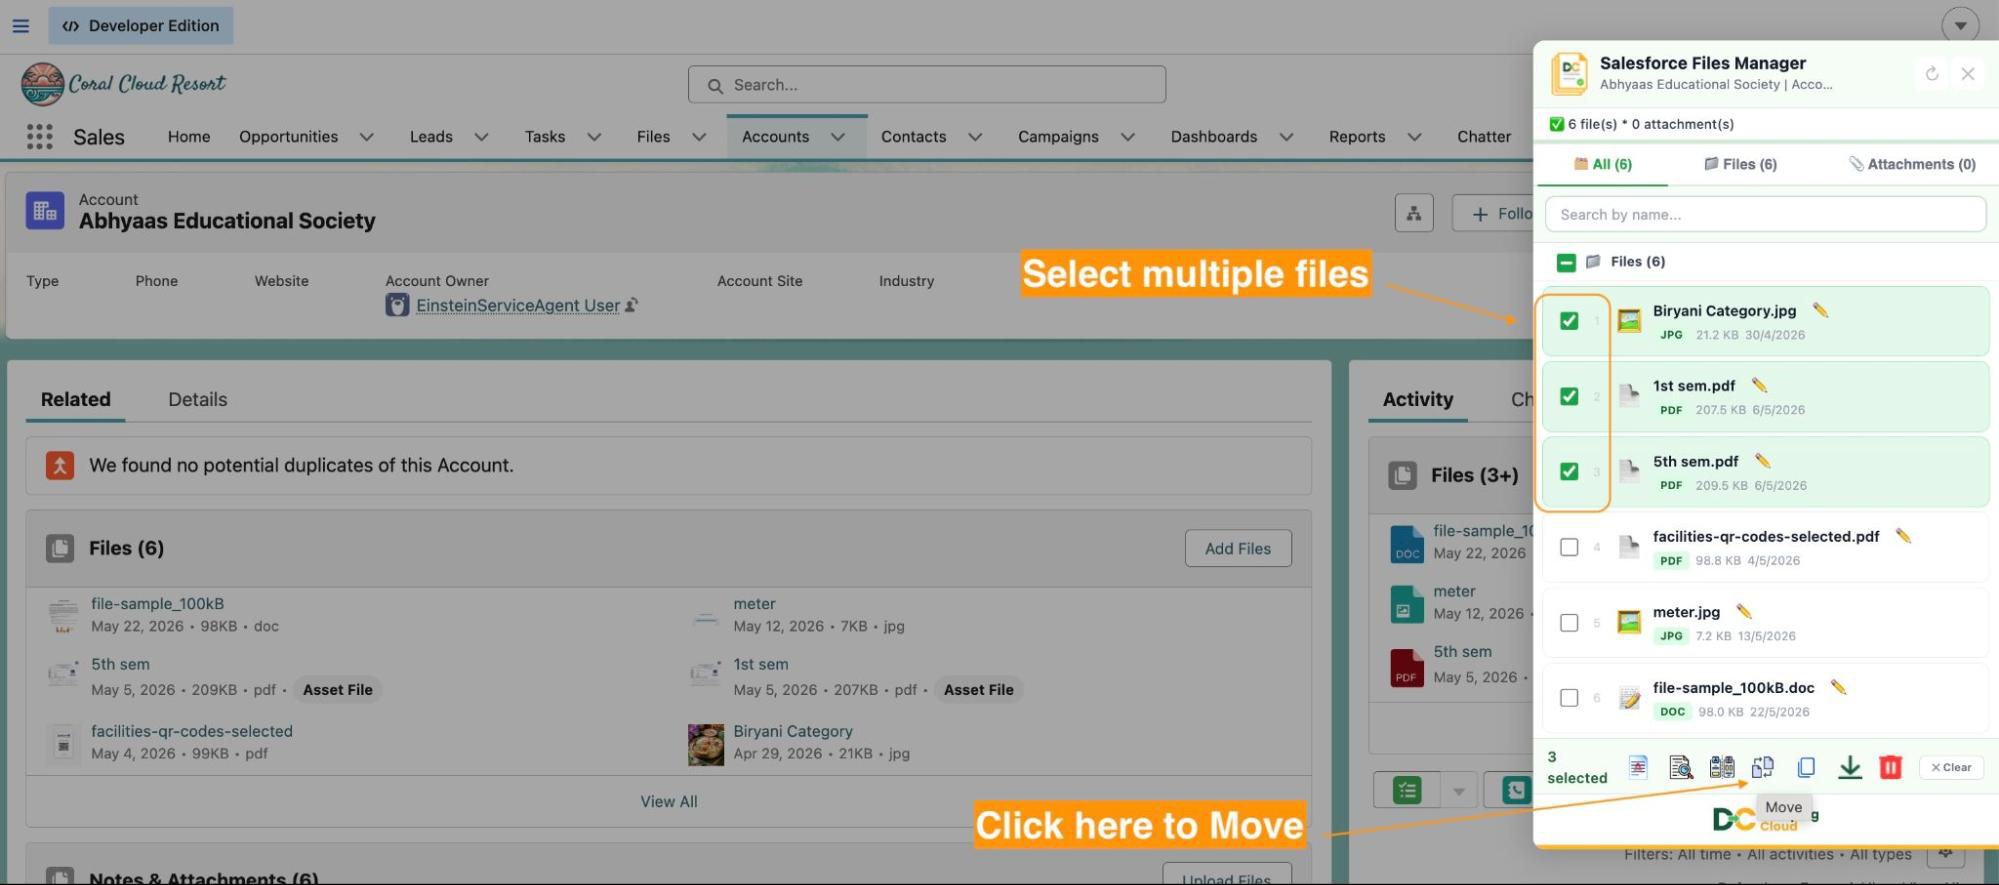
To move a single file: Click the checkbox next to the file you wish to move.
To move multiple files: Click the checkboxes next to each file you want to relocate. You may also use “Select All” to select every file on the record in one action.
04
Step 4
Click the “Move” Button
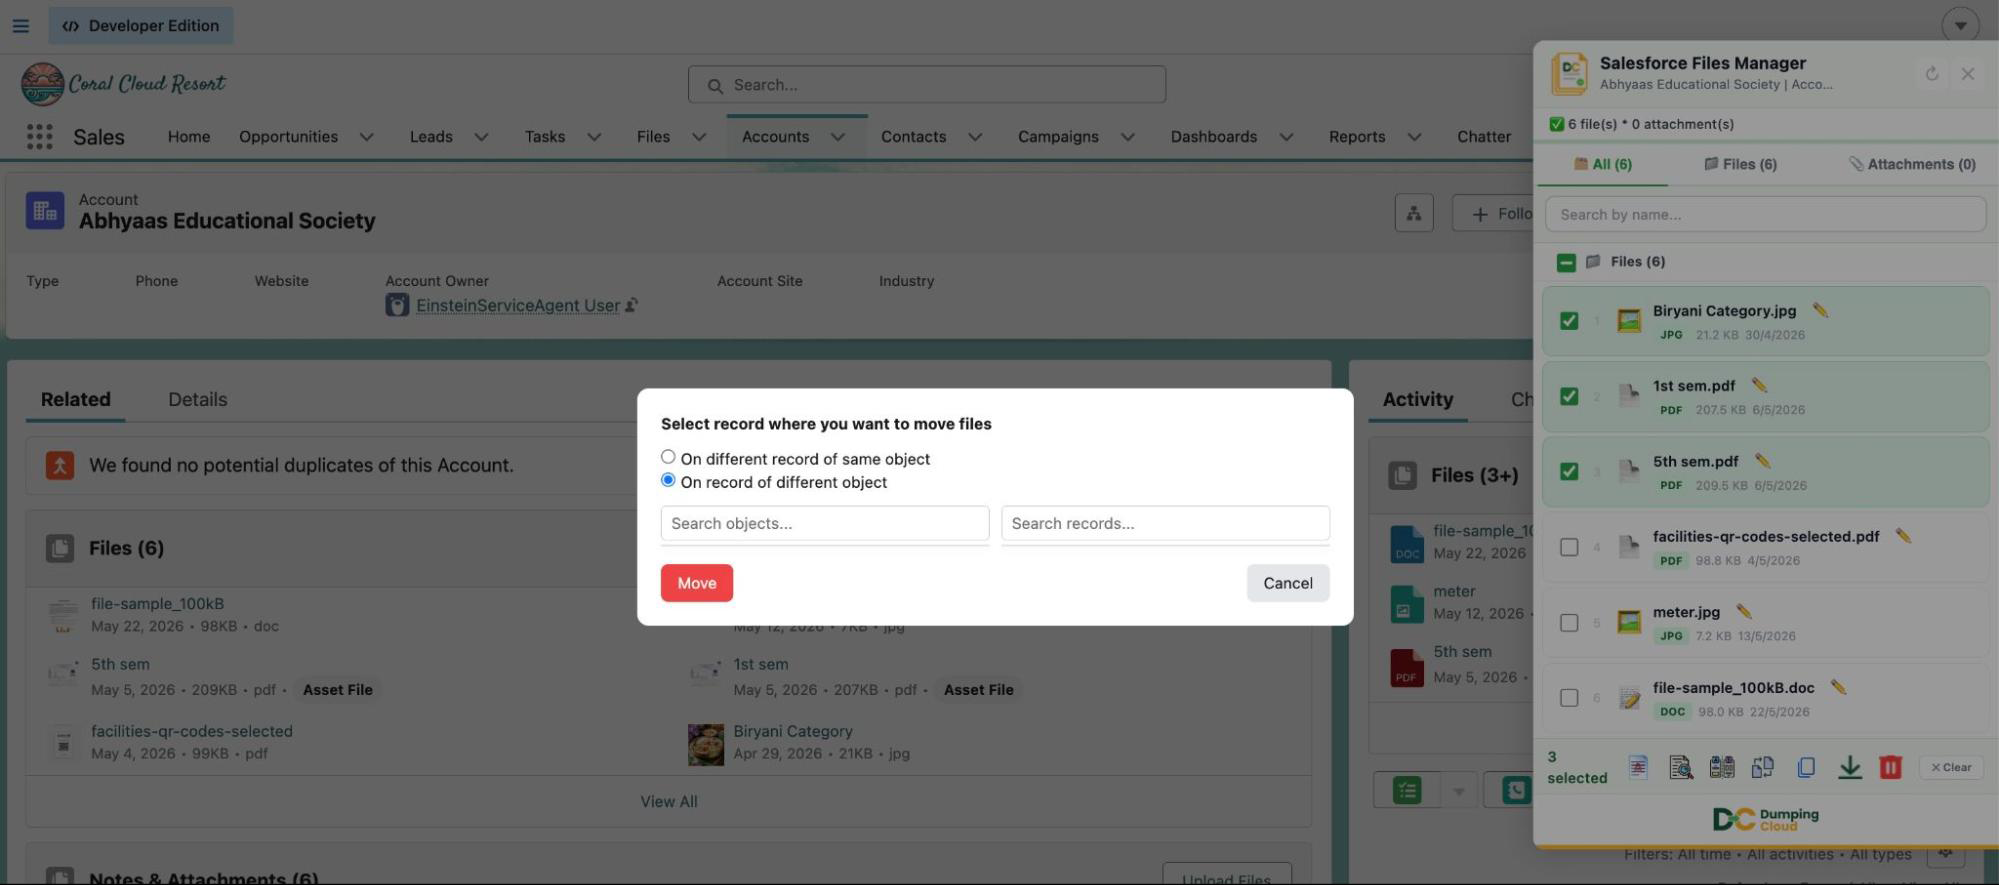
With your files selected, click the “Move” button in the extension panel action bar.
A target record selection prompt will appear, asking you to specify the destination record:
- Select the different record of same object
- Select the record of different object
05
Step 5
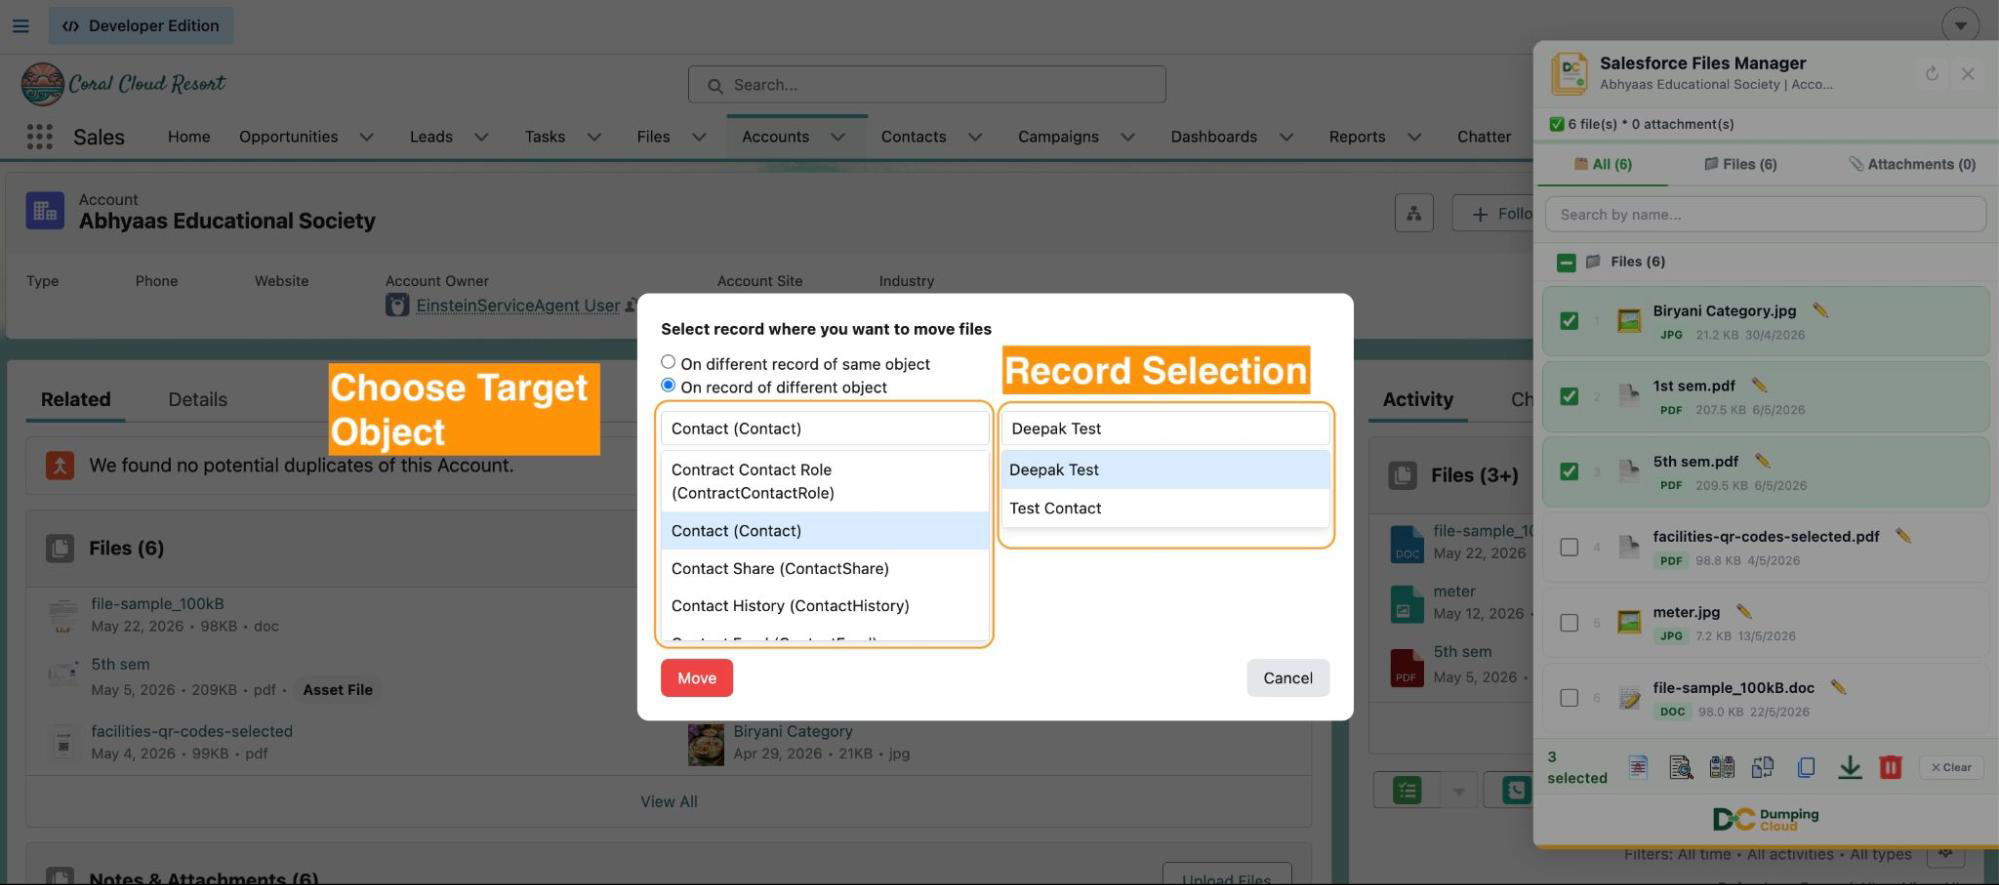
Specify the Target Record
In the target record prompt, enter the name or ID of the destination record where the files should be moved. The extension will search within your Salesforce Org and display matching records for you to confirm.
Select the correct target record from the results.
06
Step 6
Confirm the Move
Review your selection — the files to be moved and the target record — then click “Confirm Move” to execute the operation. The extension will:
- Link the selected files to the target record in Salesforce
- Remove the file association from the source record
- Display a success confirmation once the operation is complete

07
Step 7
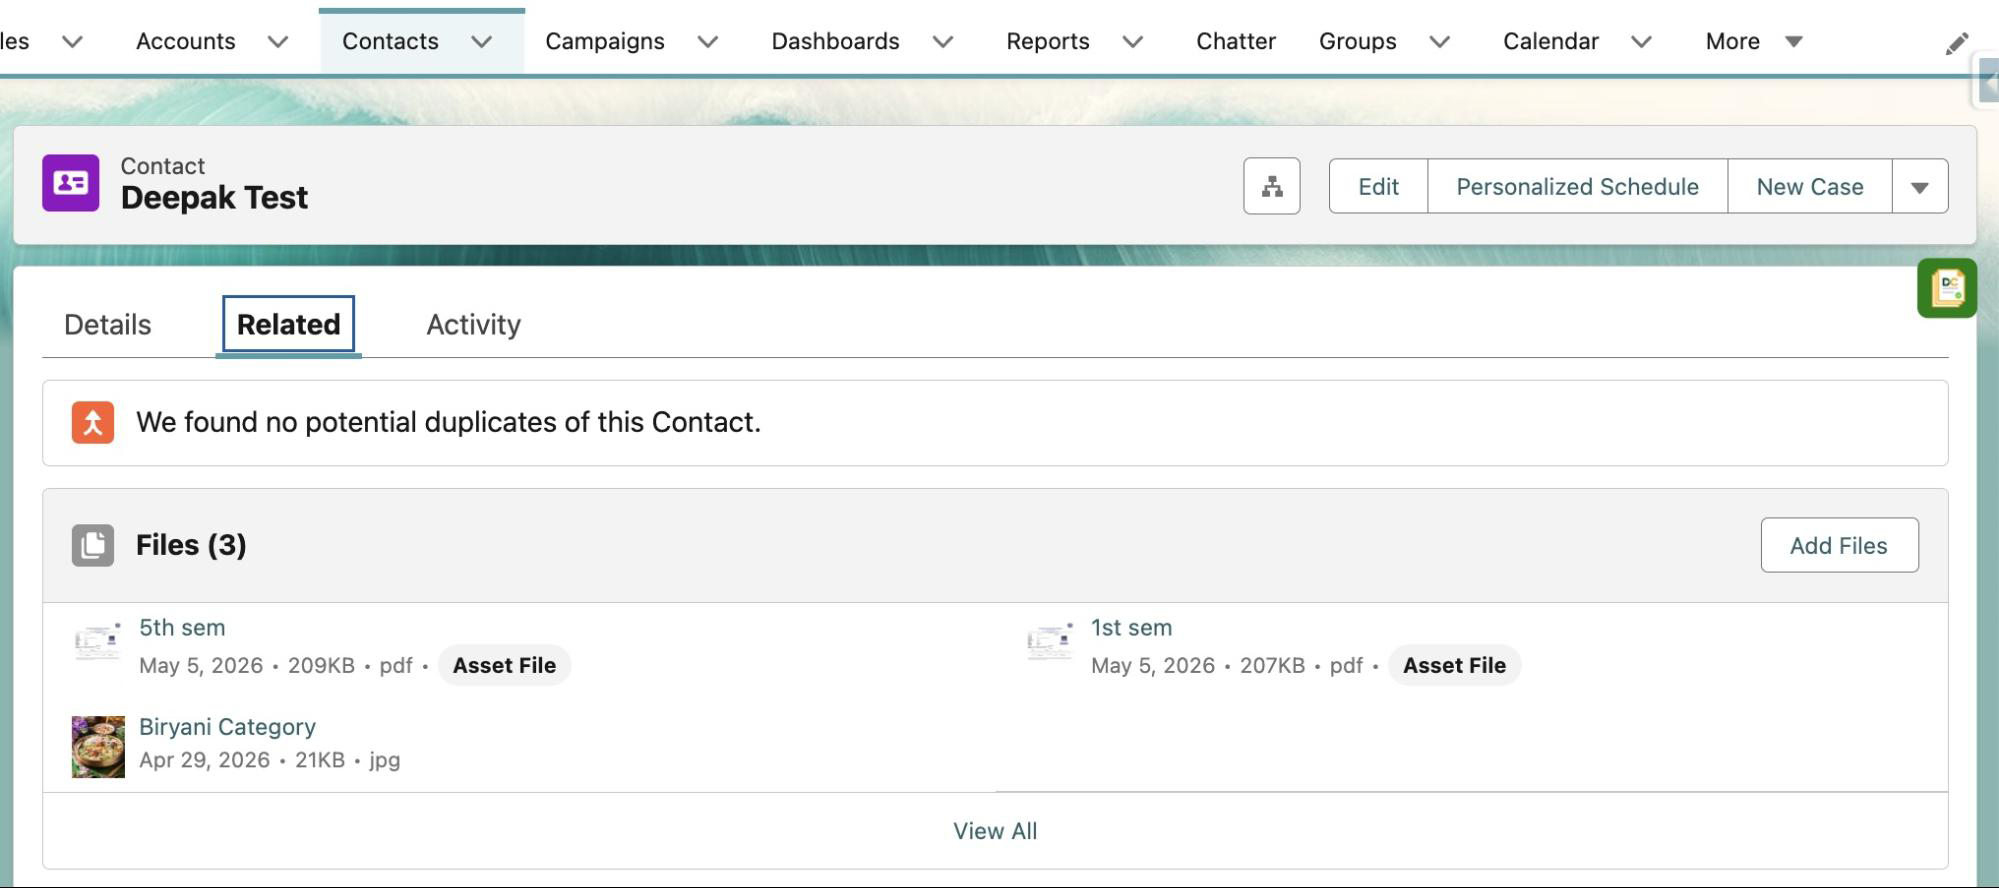
Verify on the Target Record
Navigate to the target record in Salesforce and check the Files related list to confirm the files have arrived correctly. The source record’s Files related list will no longer show the moved files.
Key Advantages Over Native Salesforce
| Capability | Native Salesforce | Salesforce Files Manager |
|---|---|---|
| Move a single file between records | ❌ Not supported | ✅ Supported |
| Move multiple files simultaneously | ❌ Not supported | ✅ Supported |
| Move across different object types | ❌ Not supported | ✅ Supported |
| Requires Apex / API development | ✅ Required | ❌ No code needed |
| Removes file from source automatically | ❌ Manual deletion required | ✅ Automatic |
| Works across all record types | — | ✅ All standard & custom objects |
Frequently Asked Questions
Will the file be deleted from Salesforce after a Move? No. The file itself (the ContentDocument) is not deleted. Only the record association (ContentDocumentLink) is updated — the file is unlinked from the source record and linked to the target record. The file continues to exist in Salesforce Files storage.
What happens if I accidentally move a file to the wrong record? Simply open the target record (where the file was incorrectly moved), launch DumpingCloud – Salesforce Files Manager, and use the Move feature again to send it to the correct destination.
Can I move files between different object types — for example, from an Account to a Case? Yes. The Move feature works across any combination of standard or custom Salesforce objects, as long as you have the necessary permissions on both records.
Does moving a file affect its version history or metadata? No. File metadata, version history, and content remain intact. Only the record association is changed.
Do I need System Administrator permissions to use the Move feature? You need sufficient Salesforce permissions to access files on the source record and create file associations on the target record. The extension respects your existing Salesforce profile and sharing rules.
Can I undo a Move? There is no one-click undo within the extension. However, you can perform a reverse Move — navigate to the target record, open the extension, and move the file back to the original record.
Summary
Misplaced files are an unavoidable reality in any active Salesforce Org. But resolving them should not require a developer, an API call, or a tedious download-delete-re-upload cycle. The Move feature in DumpingCloud – Salesforce Files Manager gives Admins a direct, reliable, and auditable way to relocate files between records in seconds — preserving file integrity, respecting Salesforce permissions, and keeping your Org organized at all times.
Install DumpingCloud
For support or enquiries, contact us at mohit.bansal@ayansoftwares.com or call +91 99531 70767.
DumpingCloud— Manage Salesforce content like a Pro.
Every active Salesforce Org has the same story.
Test files uploaded during UAT that never got removed. Duplicate attachments created when users re-uploaded instead of versioning. Obsolete proposal drafts sitting on closed Opportunities. Temporary documents attached during a support Case that have long since been resolved. Incorrect files uploaded to the wrong record by well-meaning users.
Over months and years, this clutter compounds — consuming expensive Salesforce file storage, creating confusion for users trying to find the right version of a document, and making records harder to navigate.
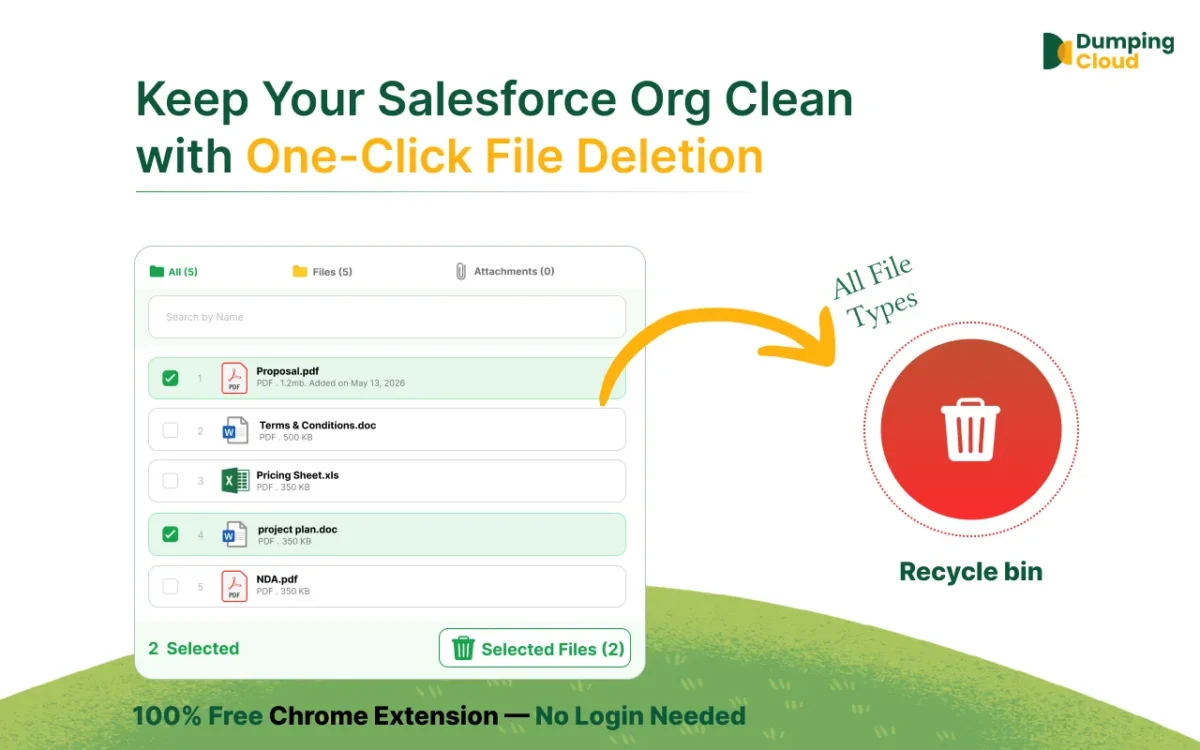
Native Salesforce allows you to delete salesforce files — but only one at a time, and only after navigating into each file’s detail page individually. For an Admin tasked with cleaning up hundreds of records or performing a bulk file audit, this is not a process. It is a punishment.
DumpingCloud – Salesforce Files Manager gives Admins a fast, reliable, and controlled capability to delete multiple salesforce files — allowing you to remove single or bulk files from any record in a matter of clicks, without navigating away from the record page.
What the Delete Feature Does
The Delete feature in DumpingCloud allows you to:
- Delete a single file from any Salesforce record in one click
- Select and delete multiple files simultaneously from the same record
- Delete all files at once using the “Select All” action
- Work across any standard or custom Salesforce record — Accounts, Contacts, Opportunities, Cases, Contracts, and more
- Perform deletions without re-authenticating — the extension uses your active Salesforce session throughout.
Who Benefits Most
The Delete feature is particularly valuable for Salesforce Admins in the following scenarios:
- Post-UAT cleanup — Removing test files uploaded during user acceptance testing or sandbox refreshes that were inadvertently pushed to production
- Storage optimisation — Identifying and deleting obsolete, duplicate, or oversized files to reduce Salesforce file storage consumption and costs
- Record merges — Removing redundant files after merging duplicate Accounts, Contacts, or Leads
- Data quality initiatives — Bulk-removing incorrectly uploaded files as part of a broader org hygiene project
- Case closure workflows — Clearing temporary working documents from resolved Cases before archiving
- Duplicate file removal — Deleting re-uploaded copies where users uploaded the same file multiple times instead of creating a new version
An Important Note on Deletion in Salesforce
Before using the Delete feature, Salesforce Admins should be aware of how file deletion works within the platform:
- Deleting a file from a record removes it from Salesforce entirely if it is only linked to that one record. The file moves to the Salesforce Recycle Bin and is permanently deleted after 15 days, or when the Recycle Bin is manually emptied.
- If the same file (ContentDocument) is linked to multiple records, deleting it from one record removes only that association — the file remains accessible from the other records it is linked to.
- Deleted files can be restored from the Recycle Bin within the 15-day window, provided the Recycle Bin has not been emptied.
- The Delete operation respects your Salesforce profile permissions — you can only delete files your user has permission to delete.
Step-by-Step: How to Delete Files Using DumpingCloud
Prerequisites
Before you begin, ensure the following:
- Google Chrome is installed on your desktop
- DumpingCloud – Salesforce Files Manager is installed from the Chrome Web Store (Install here)
- You are logged into your Salesforce Org in the same Chrome browser
- You have the necessary Salesforce permissions to delete files on the target record
- You have confirmed which files are safe to delete — bulk delete is fast and should be used deliberately
01
Step 1
Navigate to the Record
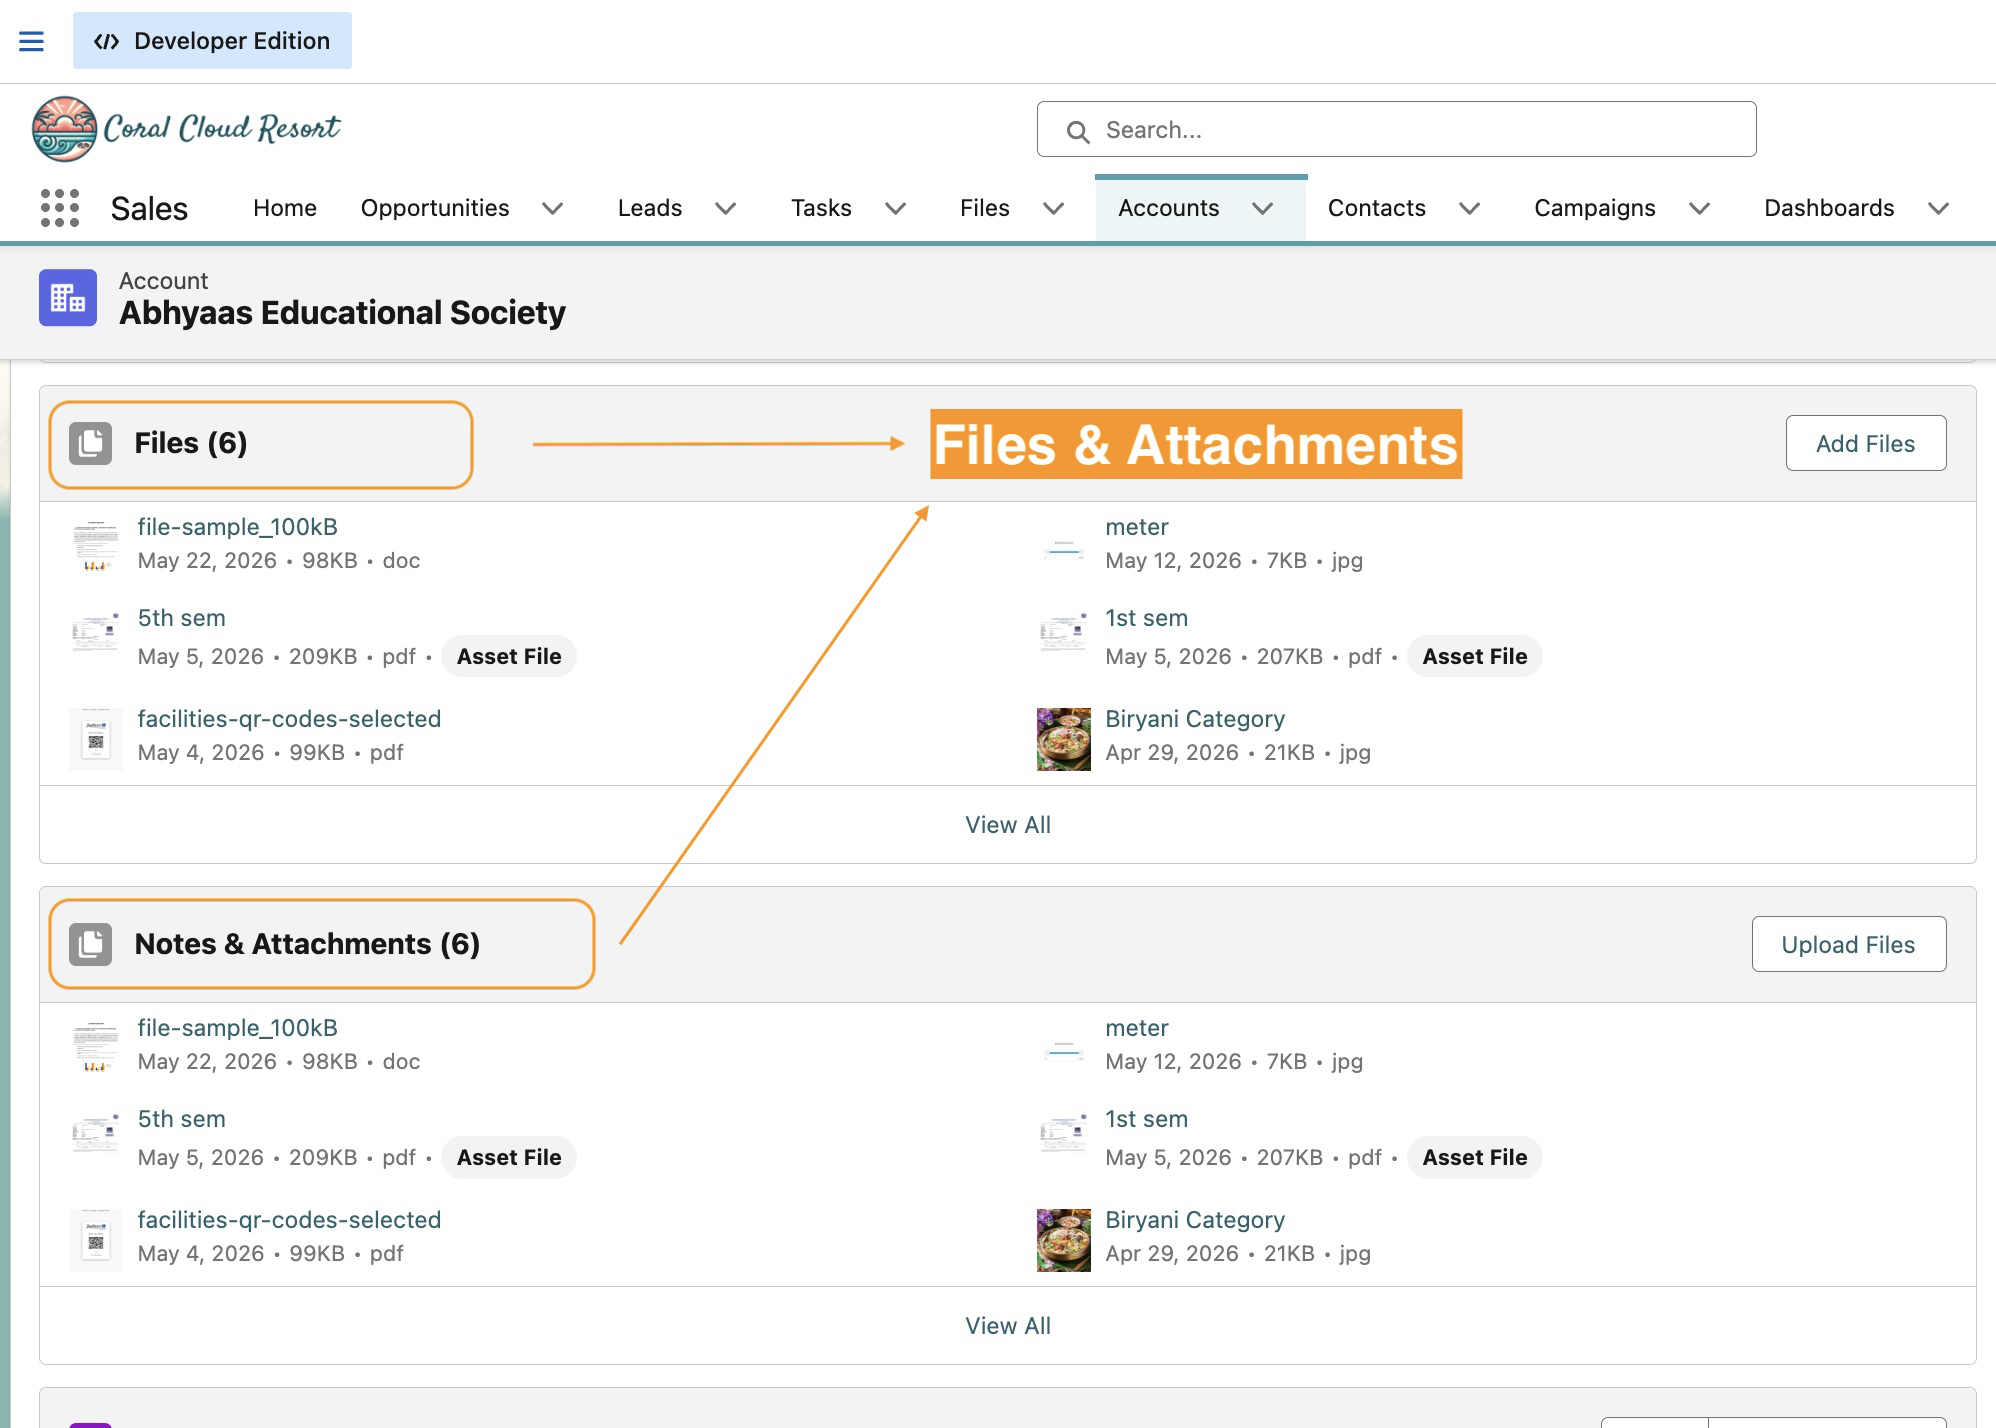
Open Google Chrome and log in to your Salesforce Org. Navigate to the record containing the file(s) you want to delete.
Confirm the files you intend to delete are visible in the Files related list on that record.
02
Step 2
Open DumpingCloud
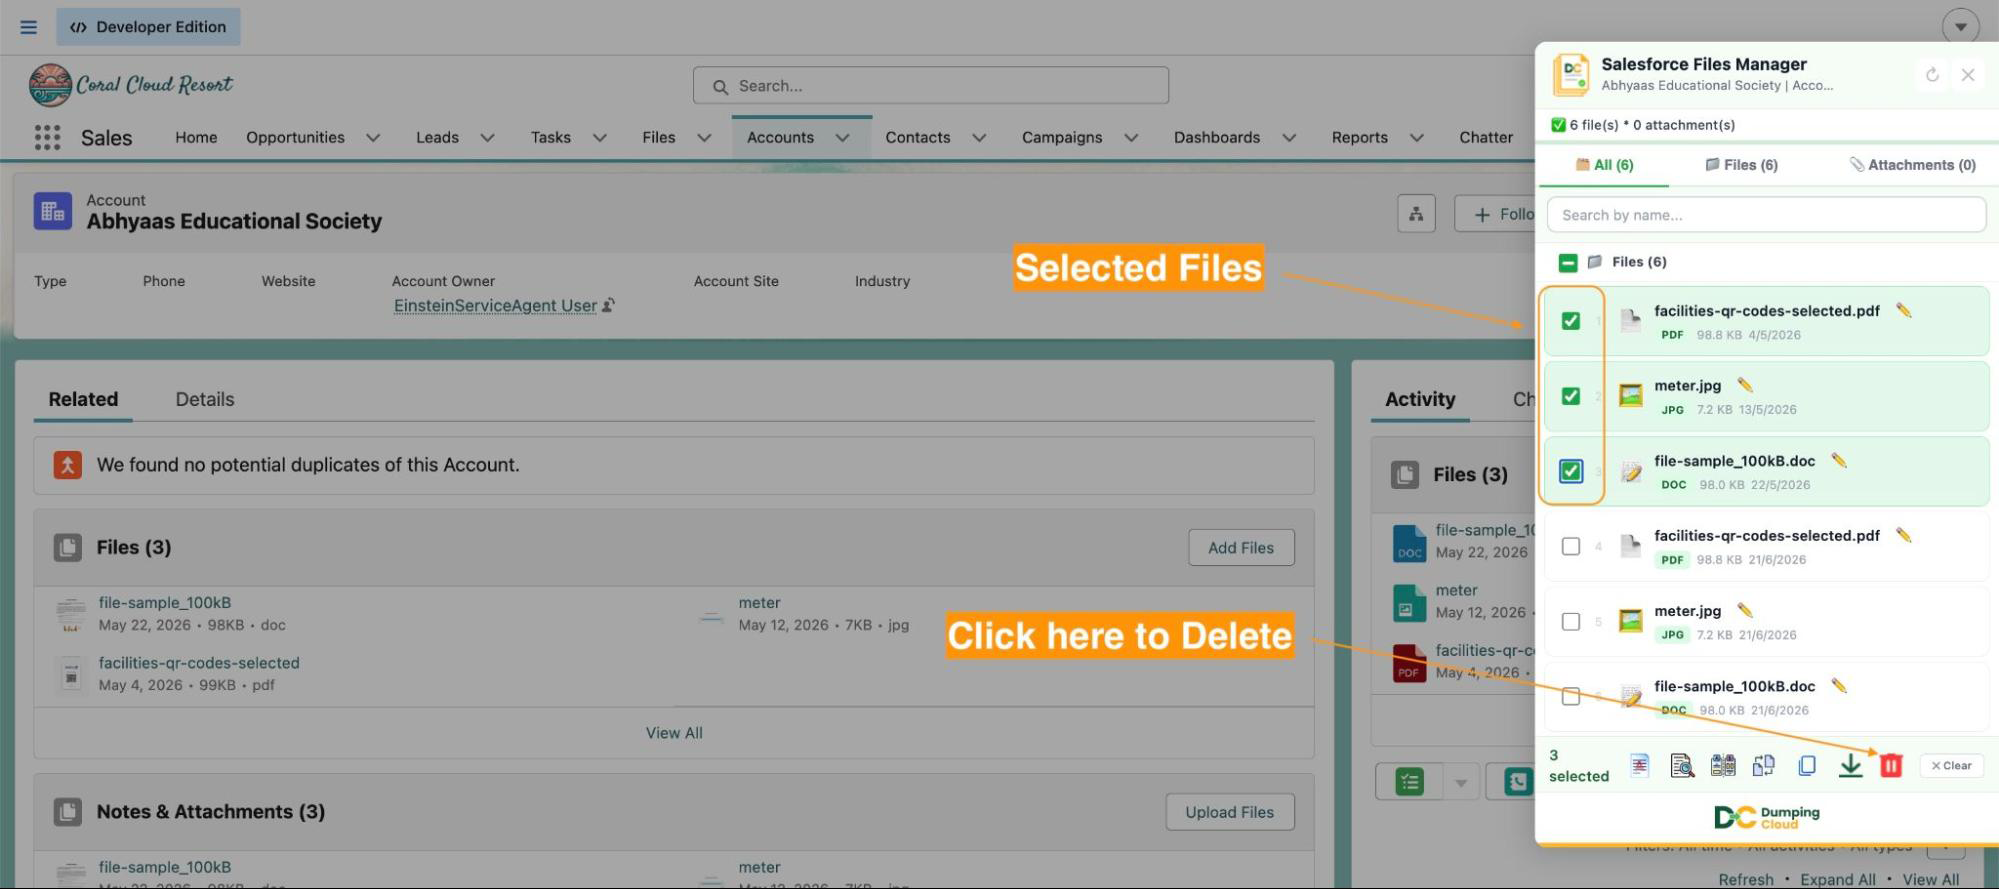
Click the DumpingCloud – Salesforce Files Manager icon. The extension automatically detects your active Salesforce session. No additional login is required.
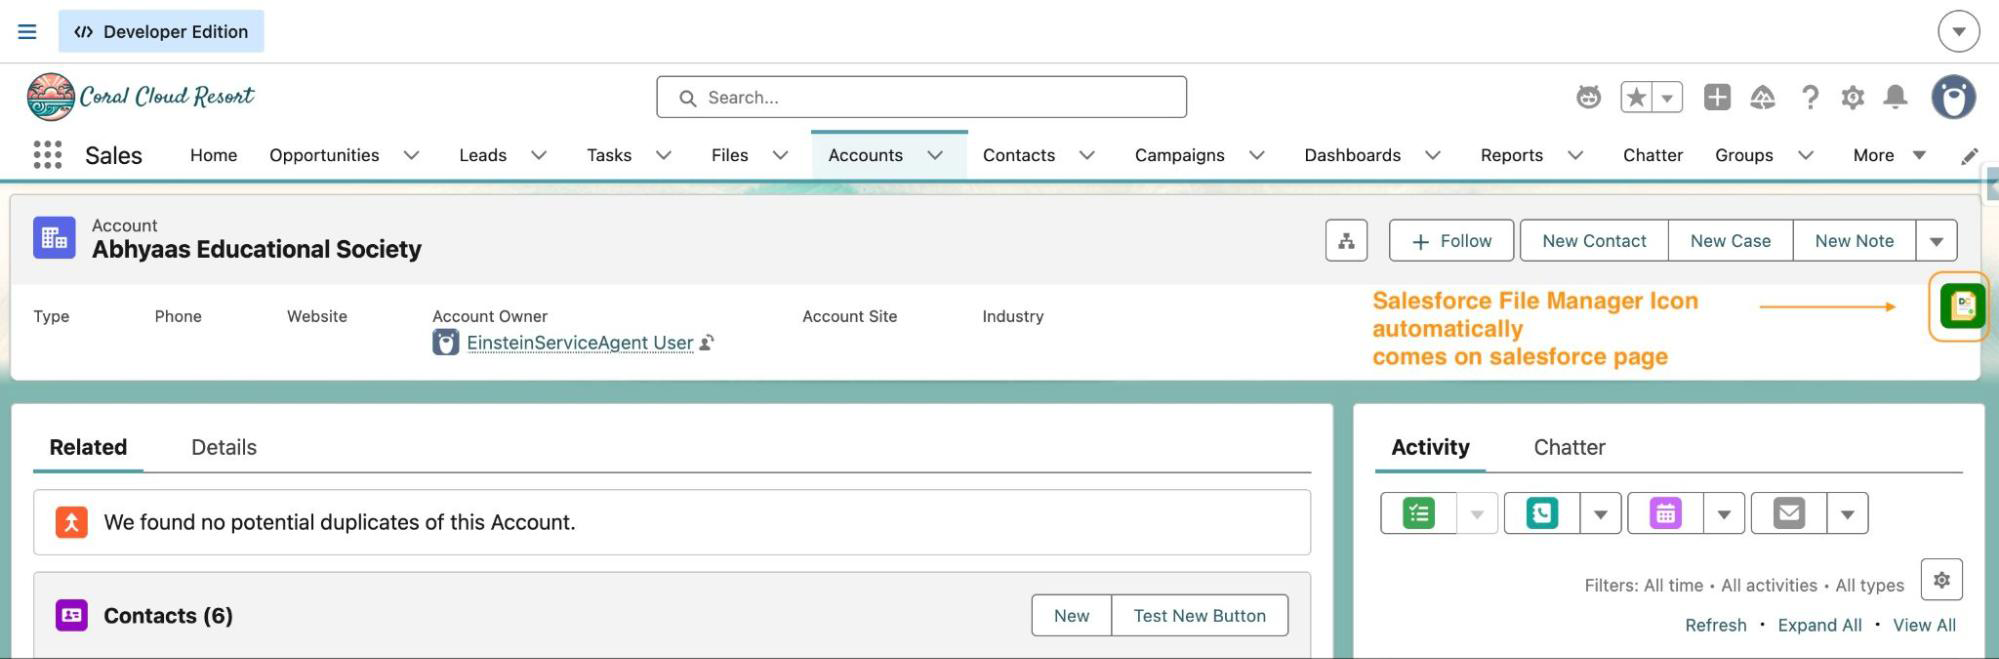
The extension panel will open and automatically load all files and attachments associated with the current record.

03
Step 3
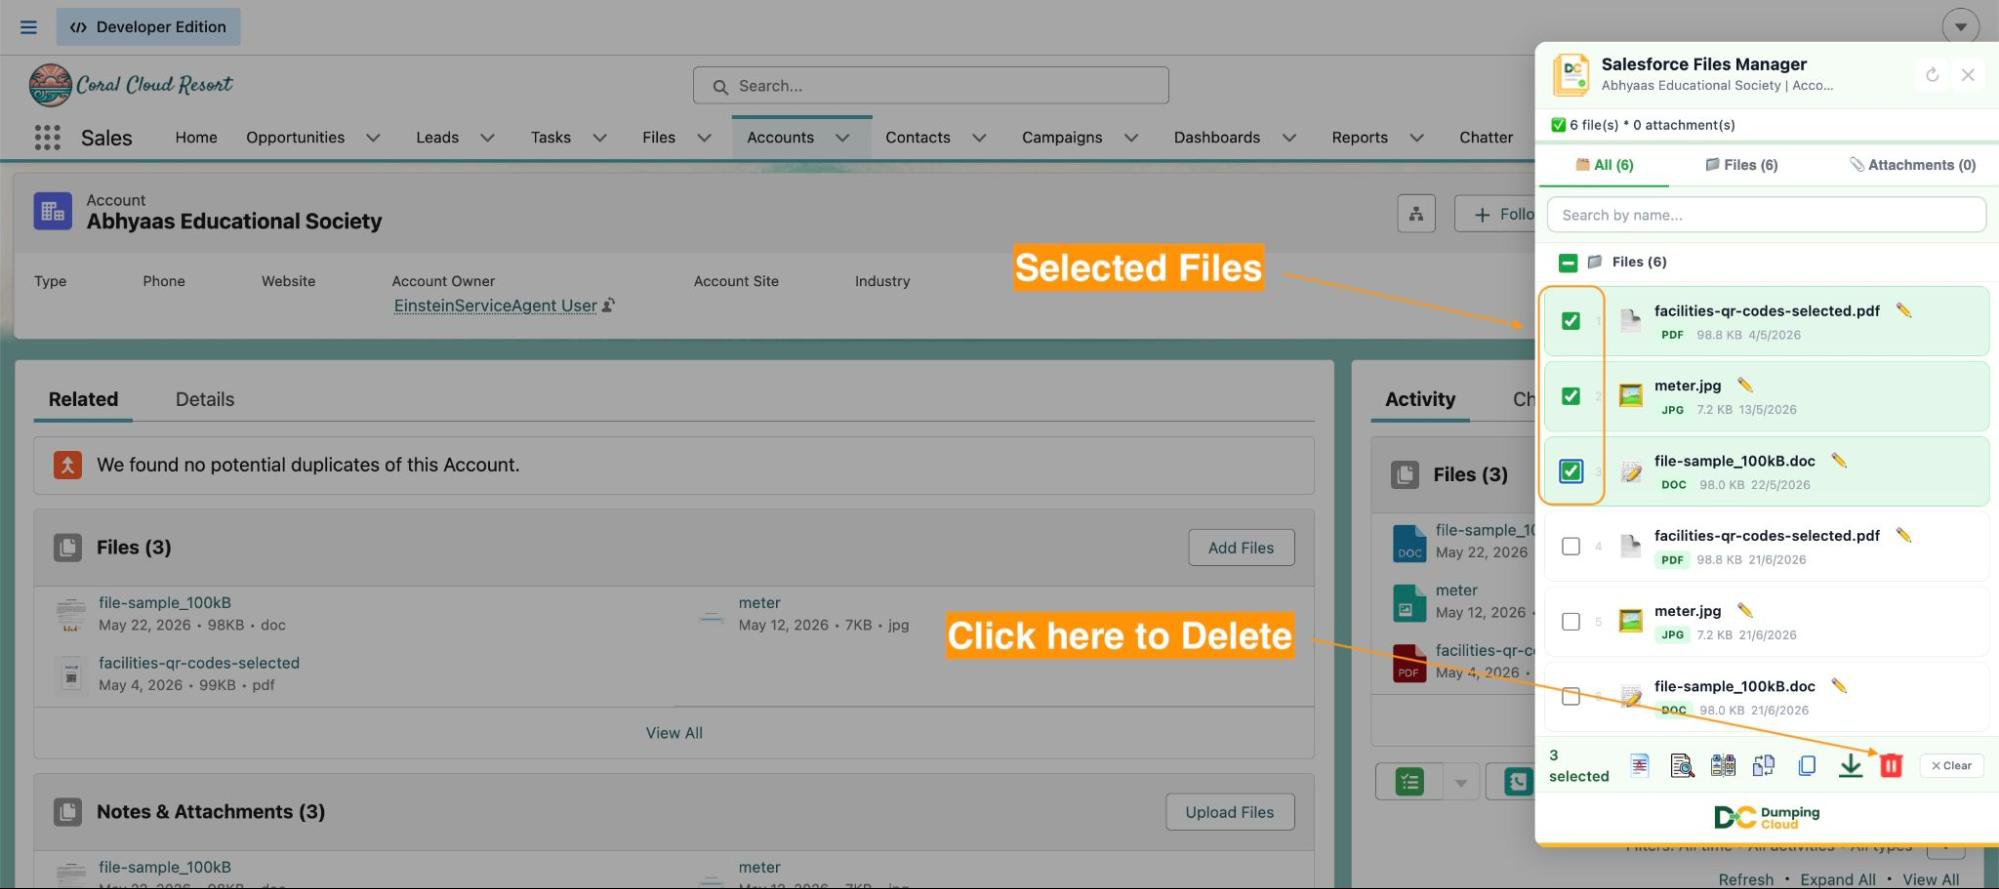
Select the File(s) to Delete
To delete a single file: Click the checkbox next to the specific file you wish to remove.
To delete multiple specific files: Click the checkboxes next to each file you want to delete. You may select any combination of files across the list.
To delete all files on the record: Click the “Select All” checkbox at the top of the file list to select every file in one action.
04
Step 4
Click the “Delete” Button
With your files selected, click the “Delete” button in the extension panel action bar.
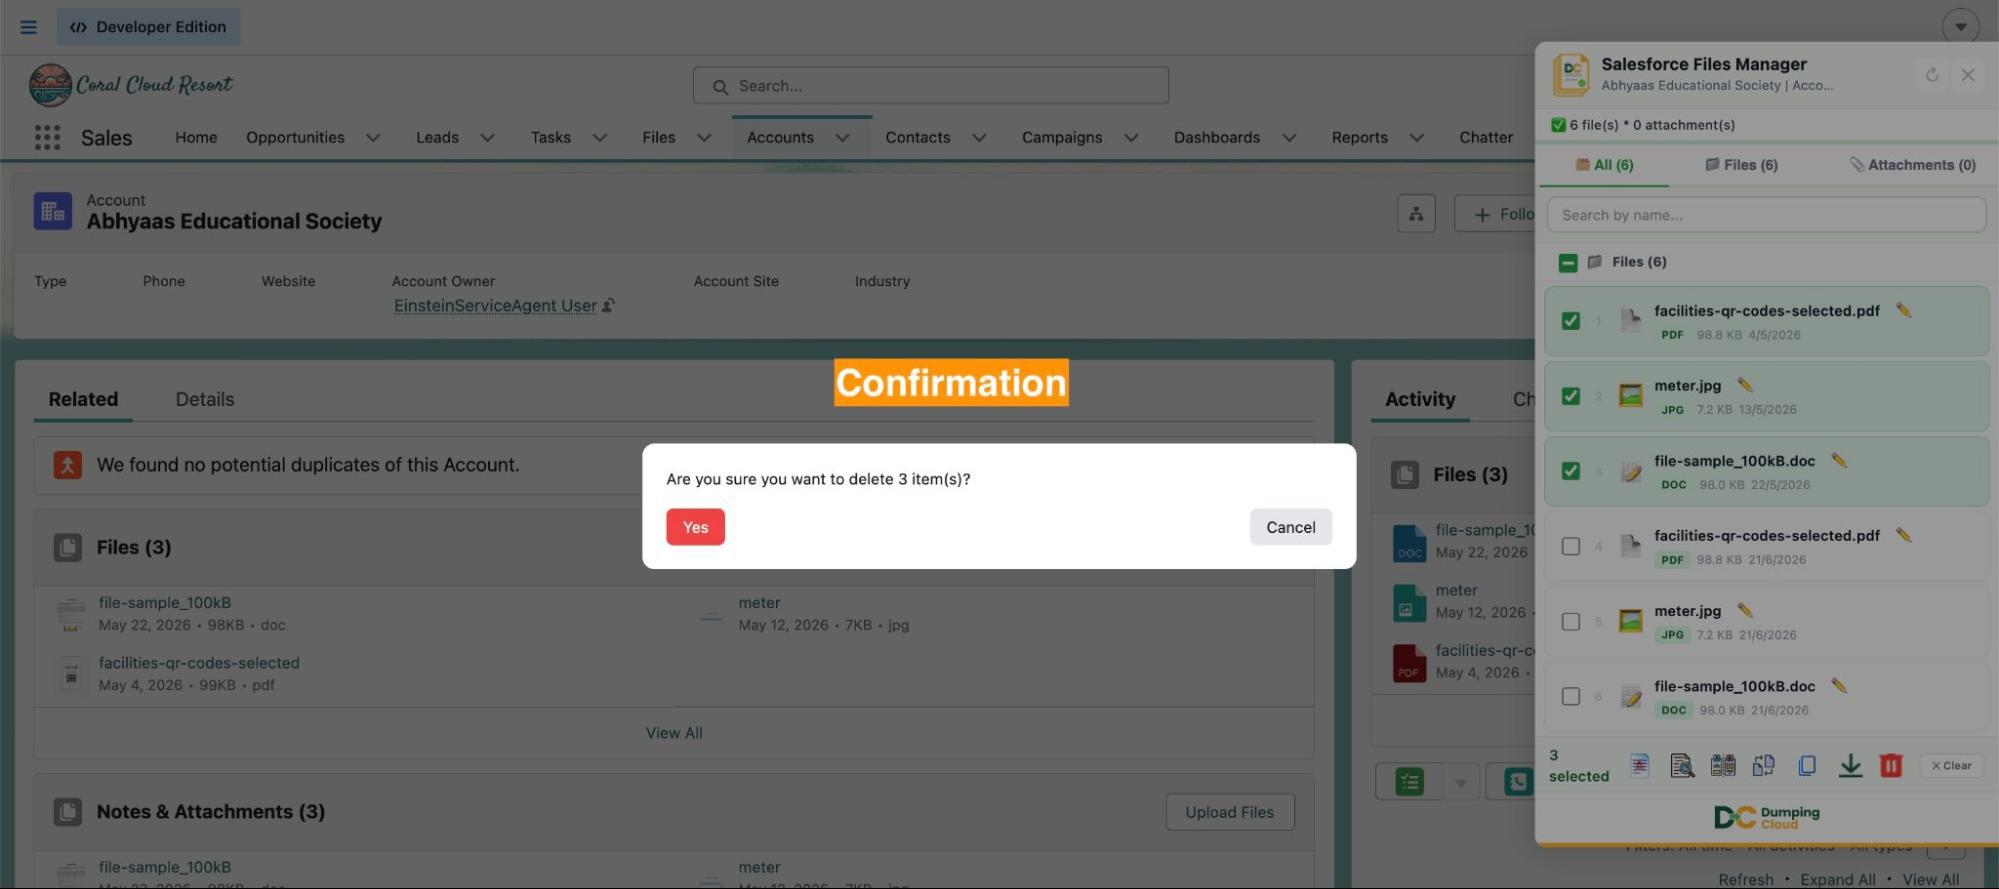
A confirmation prompt will appear before any deletion takes place, asking you to verify that you intend to delete the selected files.
05
Step 5
Confirm the Deletion
Review the confirmation prompt carefully. It will display the count of files selected for deletion.
Click “Yes” to proceed. Click “Cancel” if you wish to review your selection before proceeding.
06
Step 6
Deletion Complete
Once confirmed, the extension will delete the selected files from the record. A success message will confirm the number of files removed.
The file list in the extension panel will refresh automatically, reflecting the updated state of the record.
07
Step 7
Verify on the Salesforce Record
Navigate to the Files related list on the Salesforce record to confirm the deleted files no longer appear. If you need to recover a file within the 15-day window, navigate to the Salesforce Recycle Bin to restore it.
Key Advantages Over Native Salesforce
| Capability | Native Salesforce | Salesforce Files Manager |
|---|---|---|
| Delete a single file | ✅ Supported (via file detail page) | ✅ Supported (directly from panel) |
| Delete multiple files at once | ❌ Not supported | ✅ Supported |
| Delete all files in one click | ❌ Not supported | ✅ Supported |
| Confirmation prompt before deletion | ✅ Yes | ✅ Yes |
| Requires navigating to file detail page | ✅ Required | ❌ Not required |
| Works across all record types | Partial | ✅ All standard & custom objects |
Frequently Asked Questions
Is deletion permanent? Deleted files are moved to the Salesforce Recycle Bin and are permanently removed after 15 days, or when the Recycle Bin is manually emptied. Within that window, files can be restored by navigating to the Salesforce Recycle Bin.
What if a file is linked to multiple records — will deleting it remove it from all of them? If a file (ContentDocument) is associated with multiple records, deleting it from one record removes only that specific association (ContentDocumentLink). The file remains accessible from all other records it is linked to. The file is only fully deleted when removed from its last associated record.
Is there a confirmation step before files are deleted? Yes. DumpingCloud – Salesforce Files Manager displays a confirmation prompt listing the selected files before any deletion is executed. No files are removed until you explicitly confirm the action.
Can I undo a bulk delete? Individual file restoration is possible via the Salesforce Recycle Bin within 15 days of deletion. There is no one-click bulk undo within the extension, which is why the confirmation prompt and careful selection are important.
Do I need System Administrator permissions to delete files? You need sufficient Salesforce permissions to delete files on the relevant record. The extension respects your existing Salesforce profile and sharing rules — it cannot delete files your user does not have permission to remove.
Will deleting files through the extension affect Salesforce storage immediately? Files moved to the Recycle Bin continue to count against your Salesforce storage until they are permanently deleted (after 15 days or upon manually emptying the Recycle Bin). To reclaim storage immediately, empty the Recycle Bin after deletion.
Summary
File clutter is one of the most common and costly maintenance challenges in a Salesforce Org — consuming storage, degrading record quality, and slowing down users trying to find the right documents. Native Salesforce offers no efficient way to address this at scale.
The Delete feature in DumpingCloud – Salesforce Files Manager gives Admins the speed and control they need to clean up records decisively — whether removing a single misplaced file or bulk-deleting dozens of obsolete attachments in a single operation. Combined with a built-in confirmation prompt and Salesforce’s native Recycle Bin safety net, it is a powerful tool that can be used confidently and without risk of irreversible mistakes.
Install DumpingCloud
For support or enquiries, contact us at mohit.bansal@ayansoftwares.com or call +91 99531 70767.
DumpingCloud — Manage Salesforce content like a Pro.
The Problem Every Salesforce Admin Knows
You have a Case with 30 attachments. A client needs all of them.
What does Salesforce give you natively? The ability to download one file at a time. Click. Wait. Click. Wait. Repeat — thirty times.
For Salesforce Admins managing high-volume records across Accounts, Cases, Opportunities, or Contracts or any custom object, this is not just inconvenient — it is a measurable drain on productivity. There is no native bulk download capability in Salesforce, and workarounds typically involve custom reports, developer scripts, or manual Data Loader configurations that are overkill for day-to-day file operations.
DumpingCloud – Salesforce Files Manager eliminates this limitation entirely. With a single extension installed in Chrome, Admins can mass download salesforce files including attachments in a matter of clicks — no code, no configuration, no compromise.
What the Download Feature does
The Download feature in DumoingCloud allows you to:
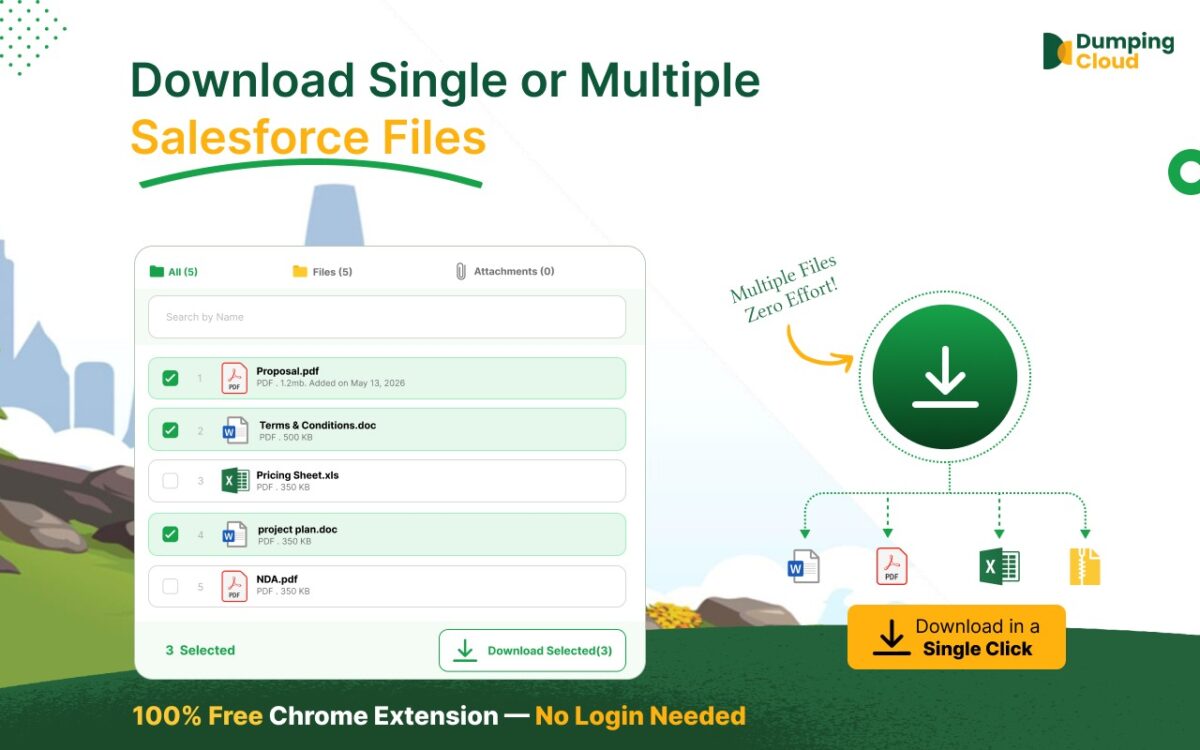
- Download a single file from any Salesforce record with one click
- Select and download multiple files simultaneously from the same record
- Download single or multiple Attachments simultaneously from the same record
- Download all files at once with a single “Select All” action
- Access files and attachments from any standard or custom Salesforce record — Accounts, Contacts, Opportunities, Cases, Contracts, or any custom object and more
- Perform downloads without re-authenticating — the extension automatically uses your active Salesforce session

Who Benefits Most
While this feature is valuable across teams, Salesforce Admins in particular will find it indispensable in the following scenarios:
- Data migrations — Extracting files from records before org restructuring or merging
- Compliance & audit requests — Quickly packaging all documents associated with a record for legal or compliance review
- Client deliverables — Pulling all contract, proposal, or report files from an Opportunity in one action
- Org maintenance — Reviewing and archiving files before deletion or record cleanup
- Support escalations — Downloading all attachments from a Case to share with an engineering or external team
Step-by-Step: How to Download Files (or attachments) Using DumpingCloud
Prerequisites
Before you begin, ensure the following:
- Google Chrome is installed on your desktop
- DumpingCloud – Salesforce Files Manager is installed from the Chrome Web Store (Install here)
- You are logged into your Salesforce Org in the same Chrome browser
01
Step 1
Navigate to the Salesforce Record
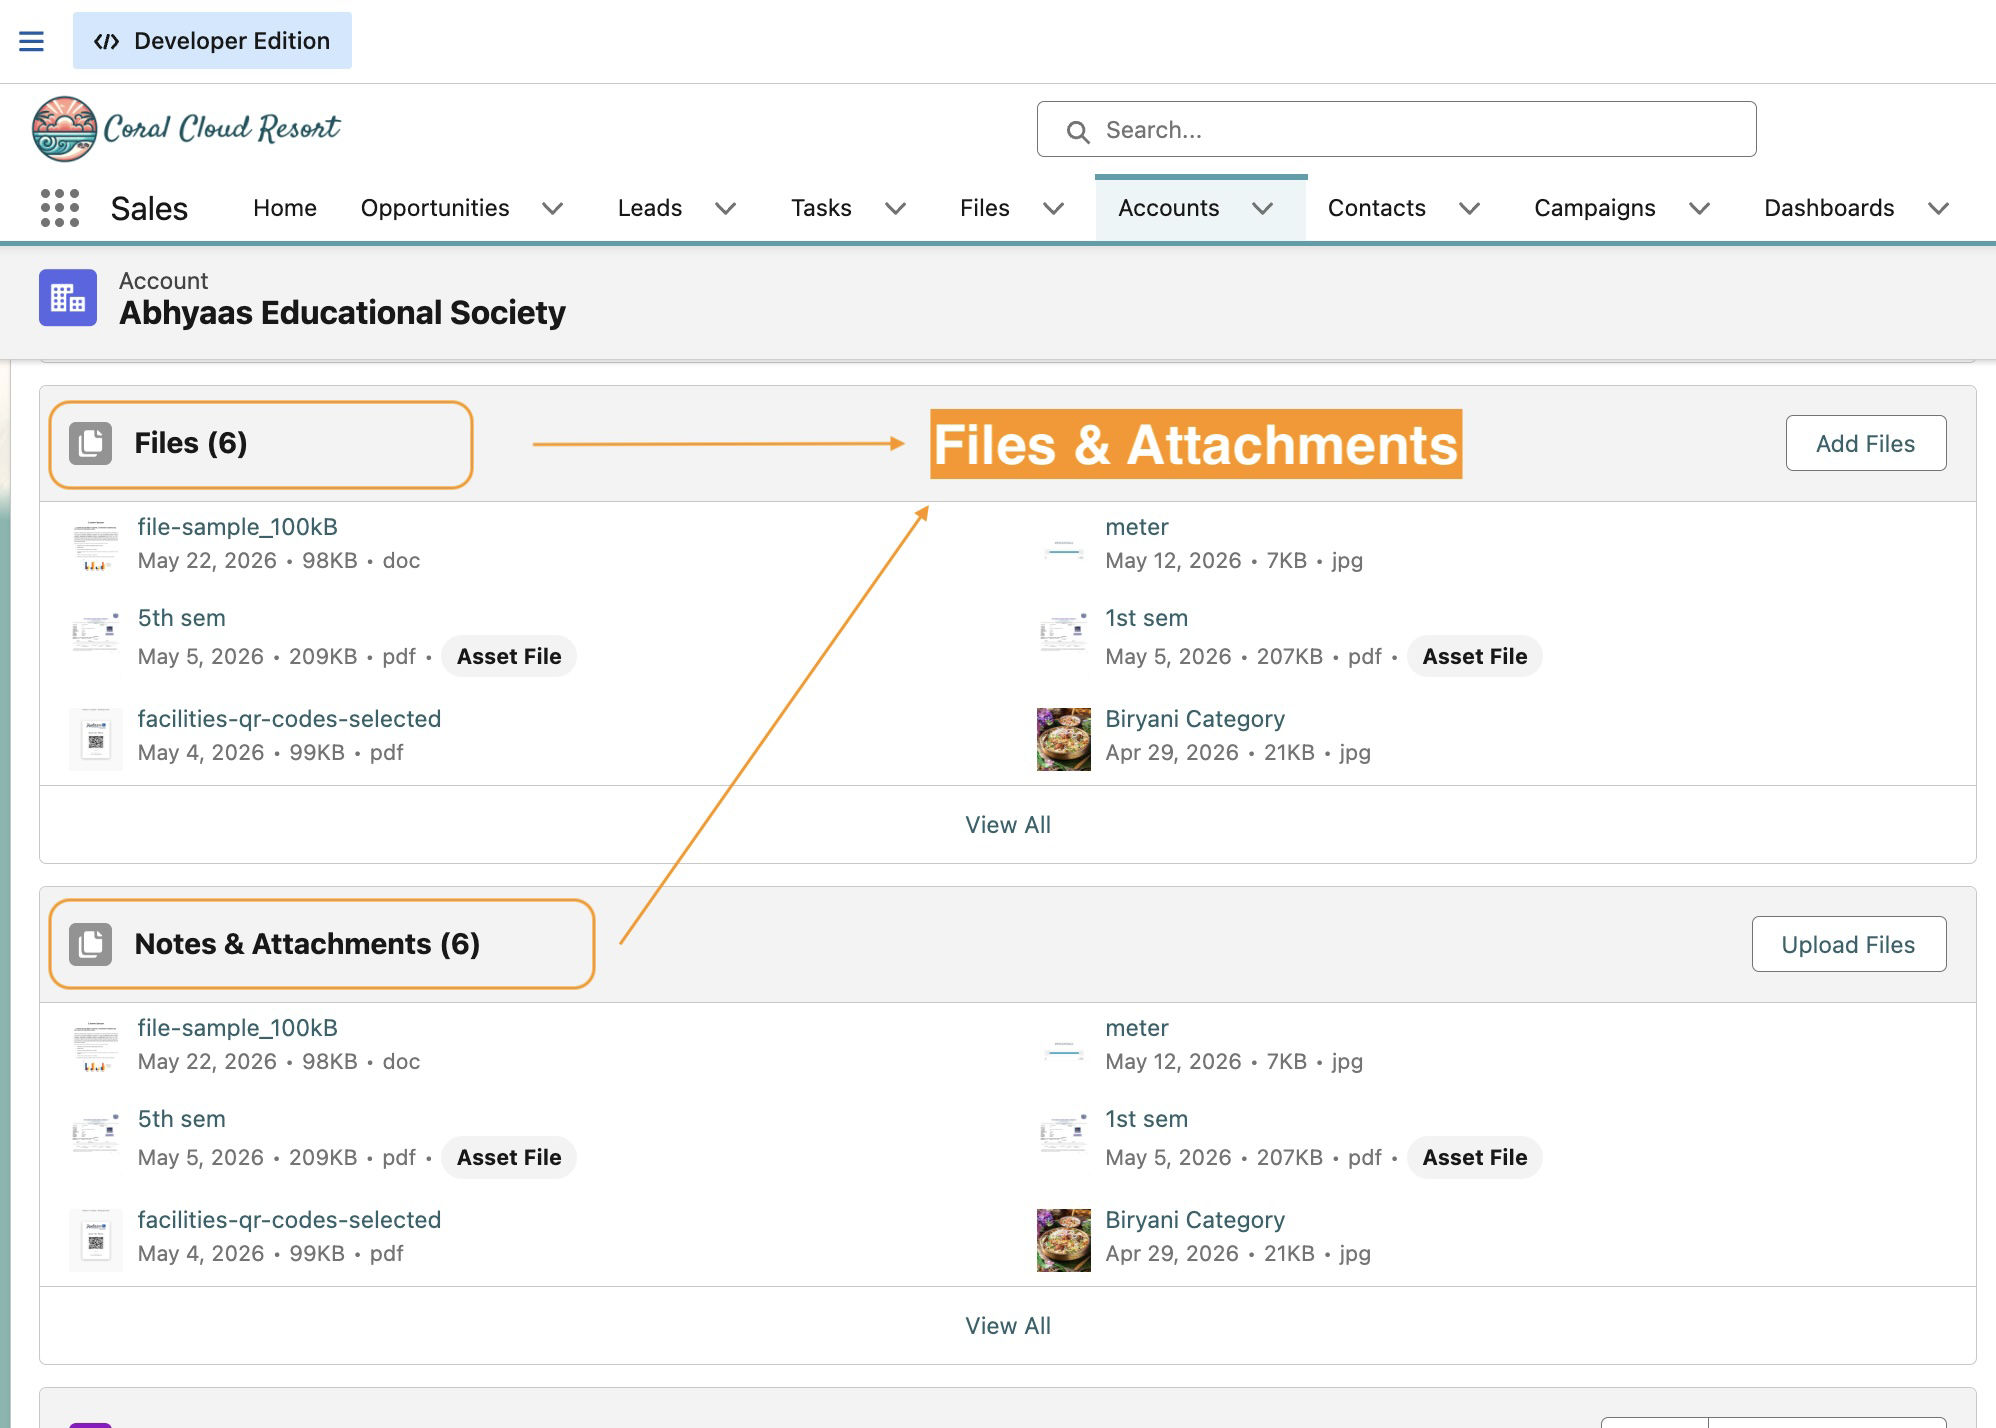
Open Google Chrome and log in to your Salesforce Org. Navigate to any record that contains files/attachments — for example, an Account, Opportunity, Case, or Contact or any custom object.
Ensure the record has files visible in the Files related list.
02
Step 2
Open DumpingCloud – Salesforce Files Manager
Click the DumpingCloud – Salesforce Files Manager icon. The extension automatically detects your active Salesforce session. No additional login is required.
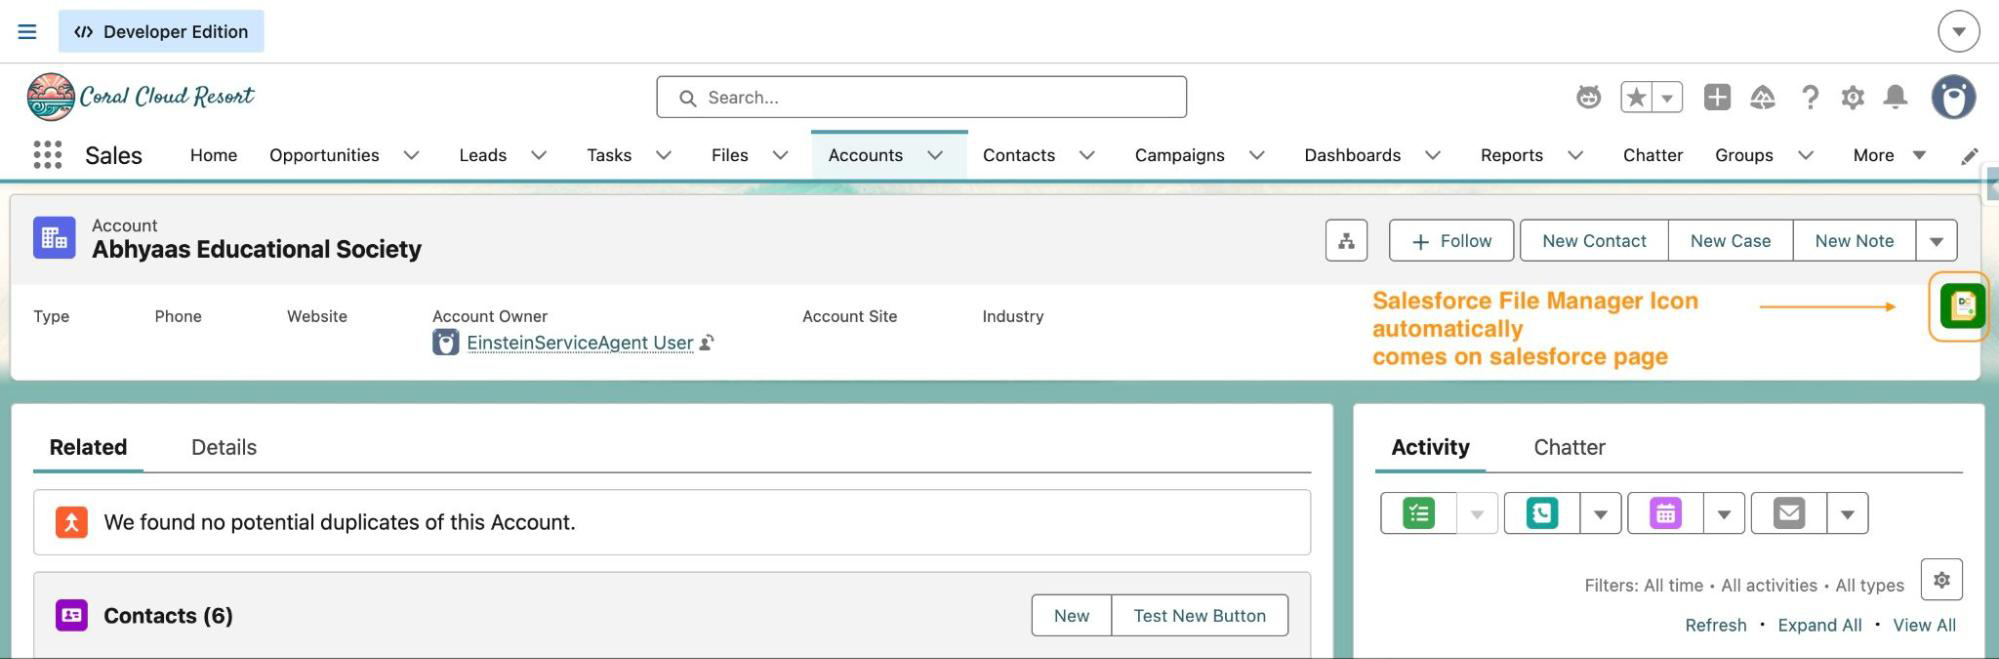
The extension panel will open and automatically load all files and attachments associated with the current record.
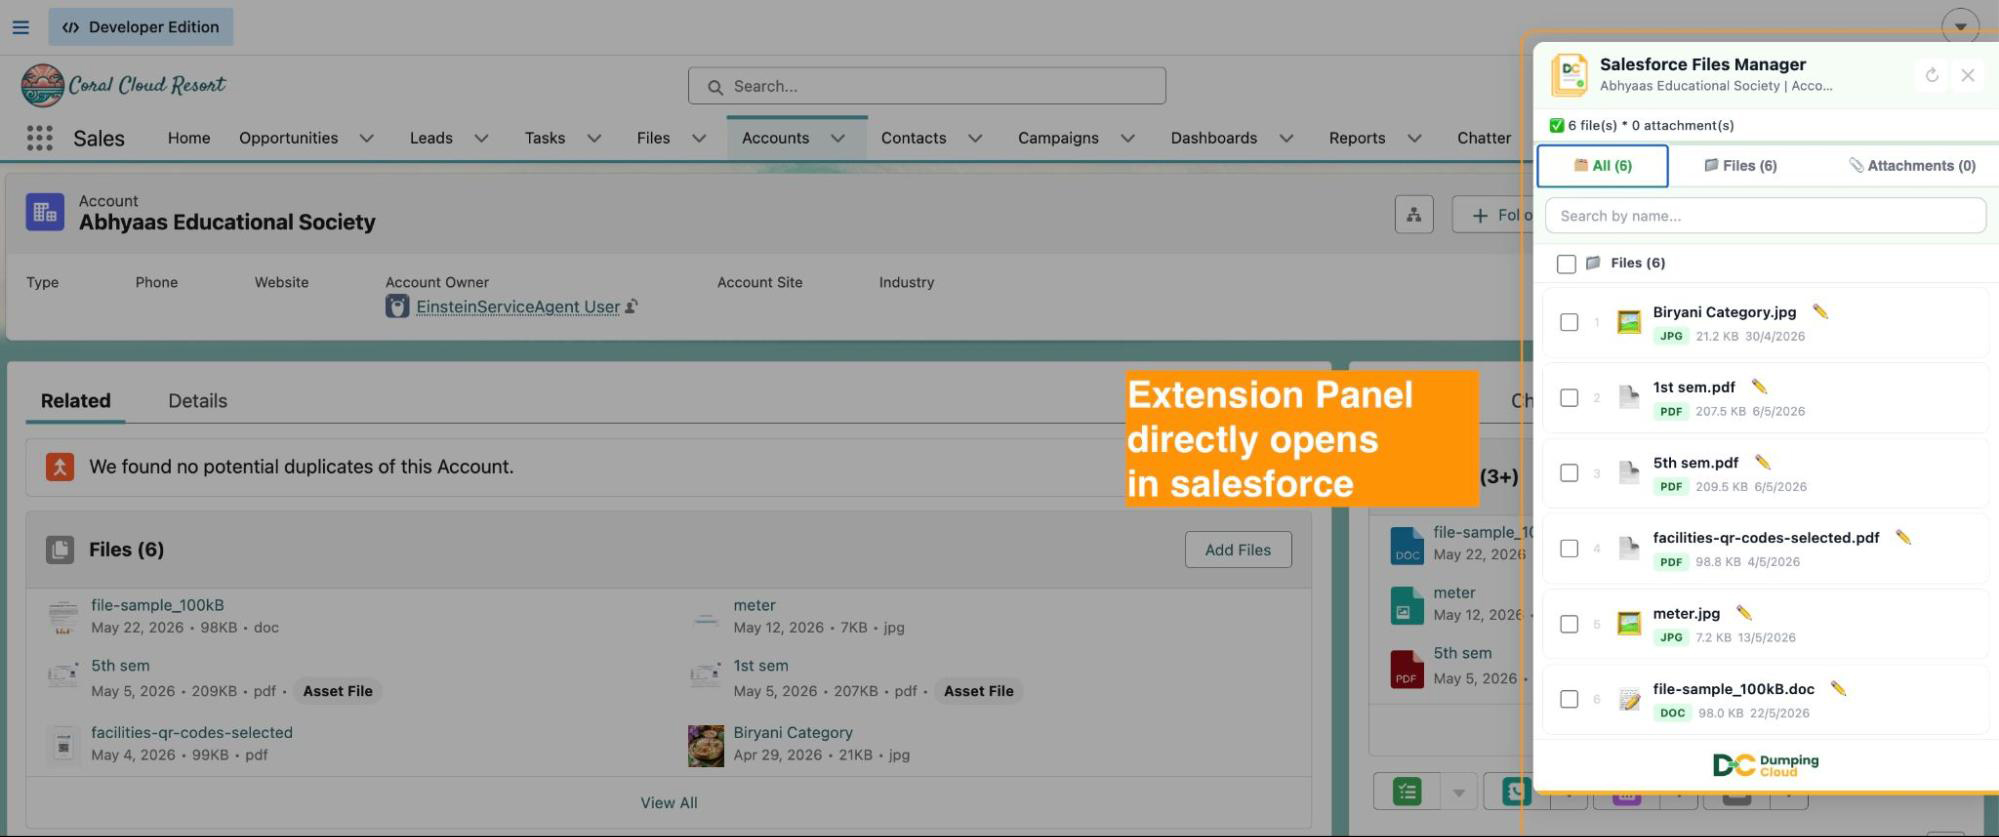
03
Step 3
Select the File(s) You Want to Download
To download a single file: Click the checkbox next to the specific file you wish to download. The file row will highlight to confirm your selection.
To download multiple specific files: Click the checkboxes next to each file you want to include. You can select any combination of files across the list.
To download all files at once: Click the “Select All” checkbox at the top of the file list. All files on the record will be selected in one action.
04
Step 4
Click the Download Button
With your files selected, click the “Download” button in the extension panel.
- If you selected a single file, it will download directly to your browser’s default download location.
- If you selected multiple files, the extension will package them and download all selected files, keeping your browser responsive throughout the process.
05
Step 5
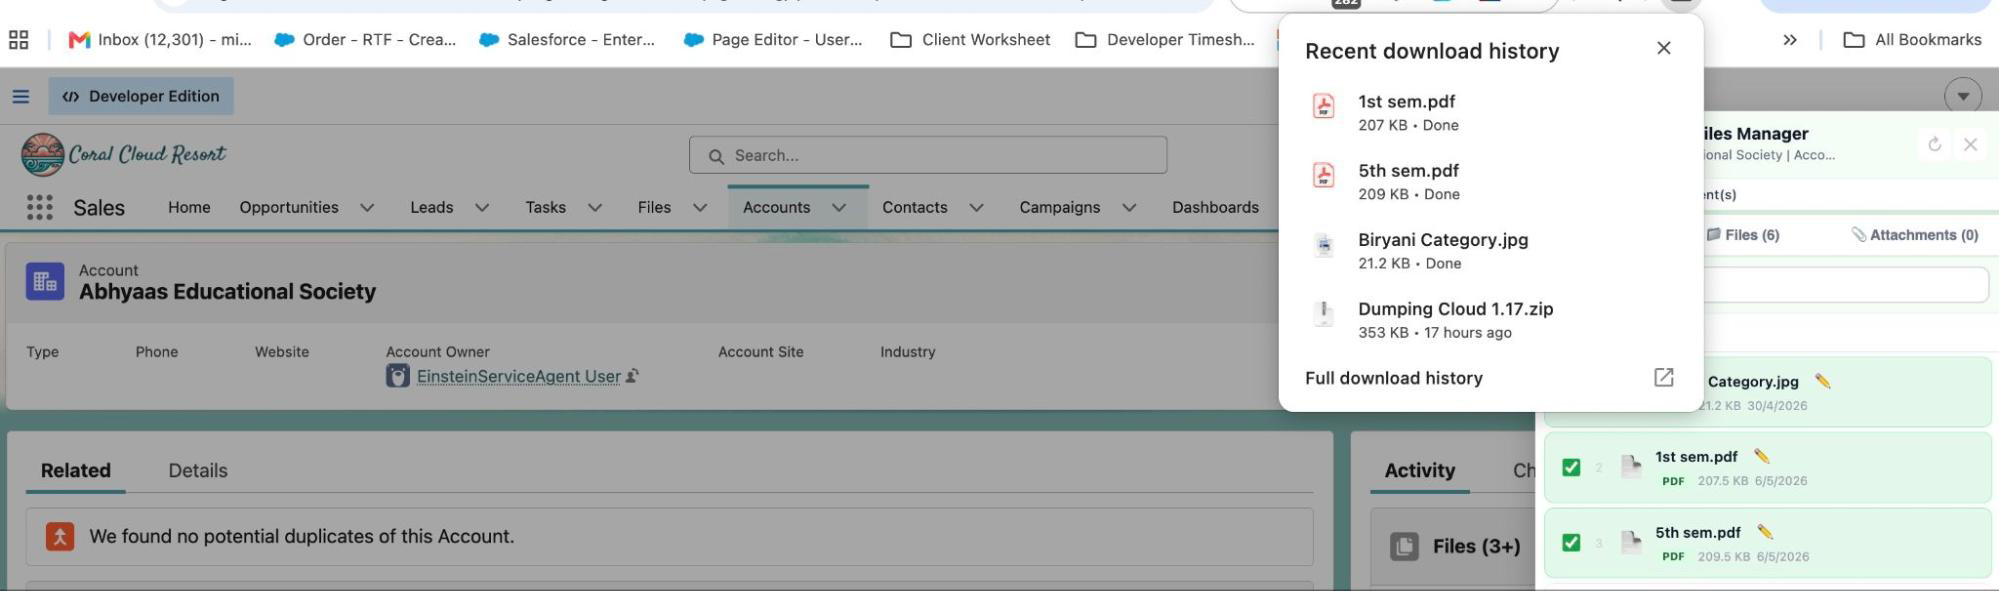
Access Your Downloaded Files
Once the download is complete, your files will be available in your system’s default Downloads folder (or the folder configured in your Chrome download settings).
File names are preserved exactly as they appear in Salesforce, ensuring traceability back to the original records.
Key Advantages Over Native Salesforce
| Capability | Native Salesforce | Salesforce Files Managers |
|---|---|---|
| Download a single file | ✅ Supported | ✅ Supported |
| Download multiple files at once | ❌ Not supported | ✅ Supported |
| Download all files in one click | ❌ Not supported | ✅ Supported |
| Requires developer setup | — | ❌ No setup needed |
| Works across all record types | Partial | ✅ All standard & custom objects |
| Separate login required | — | ❌ Uses existing session |
Frequently Asked Questions
Does downloading files affect the original files in Salesforce? No. The download action is non-destructive. Your files remain in Salesforce exactly as they are. Only a copy is downloaded to your local machine.
Is there a limit to how many files I can download at once? The extension handles bulk downloads efficiently. For records with very large numbers of files, it is recommended to download in batches to maintain browser performance.
Will the original file names be preserved? Yes. Files are downloaded with their original Salesforce file names, making it easy to identify and organize them post-download.
Does this work on custom objects? Yes. DumpingCloud – Salesforce Files Manager works on any record page — standard or custom — as long as files are attached via the Salesforce Files framework.
Do I need to be a System Administrator to use this? You need sufficient Salesforce permissions to view the files on a given record. The extension respects your existing Salesforce profile and sharing rules — it can only access files your user is already permitted to see.
Summary
For Salesforce Admins, time spent on repetitive manual tasks is time taken away from higher-value work. The native file download experience in Salesforce was not designed for bulk operations — but DumpingCloud was.
Whether you are downloading a single file for a quick review or pulling an entire record’s file library for a compliance audit, the process now takes seconds rather than minutes.
Install DumpingCloud – Salesforce Files Manager
For support or enquiries, contact us at mohit.bansal@ayansoftwares.com or call +91 99531 70767.
If you’ve ever spent precious time downloading, deleting, renaming, or reorganizing files one by one inside Salesforce, you already know the pain. The native Salesforce Files related list is functional — but barely. It wasn’t built for bulk operations, and every manual action eats into your day.
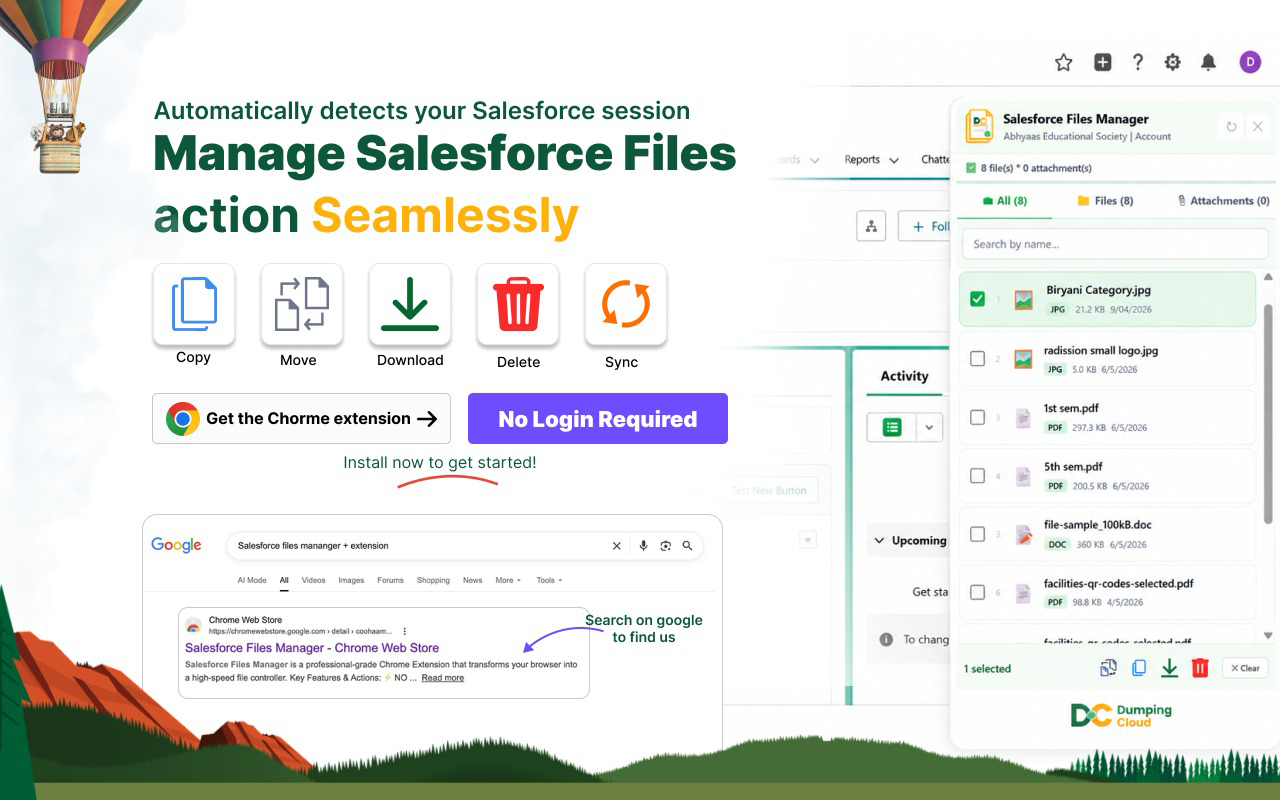
DumpingCloud – Salesforce Files Manager is a free Chrome extension built specifically for Salesforce Admins, Developers, and power users who are done fighting the platform’s file limitations. With it, you can download, delete, move, copy, rename, merge, split, preview, eSign, and even sync files to external cloud storage — all in a few clicks, directly from any Salesforce record page.
This guide walks you through exactly how to install it.
What Is the DumpingCloud – Salesforce Files Manager?
DumpingCloud is a Chrome extension by AYAN SOFTWARES that sits on top of your existing Salesforce session. It requires no separate login — it automatically detects your active Salesforce session and activates on record pages.
Here’s a snapshot of what it can do:
- Bulk Download / Delete — Select multiple files from any record and act on them simultaneously
- Move & Copy — Transfer files between records within the same Org, like a Data Loader for files
- Bulk Rename — Apply naming patterns across multiple files at once
- In-window Preview — View images and PDFs directly inside the extension without opening new tabs
- Side-by-side Comparison — Compare documents visually without downloading them
- Add Watermark — Stamp text or image watermarks onto files directly from the record page, no third-party tools needed
- Translate Files — Translate file content into different languages instantly without leaving Salesforce
- Convert File Type — Convert files between formats (e.g., PDF to Word, image to PDF) right from the extension panel
- PDF Split & Merge — Break large PDFs into parts or combine multiple files into one
- Digital eSign — Send documents for digital signature directly from the file manager interface.
Before You Begin
Make sure you have the following:
- Google Chrome browser installed
- An active Salesforce account (any edition)
- A stable internet connection
Step-by-Step Installation Guide
01
Step 1
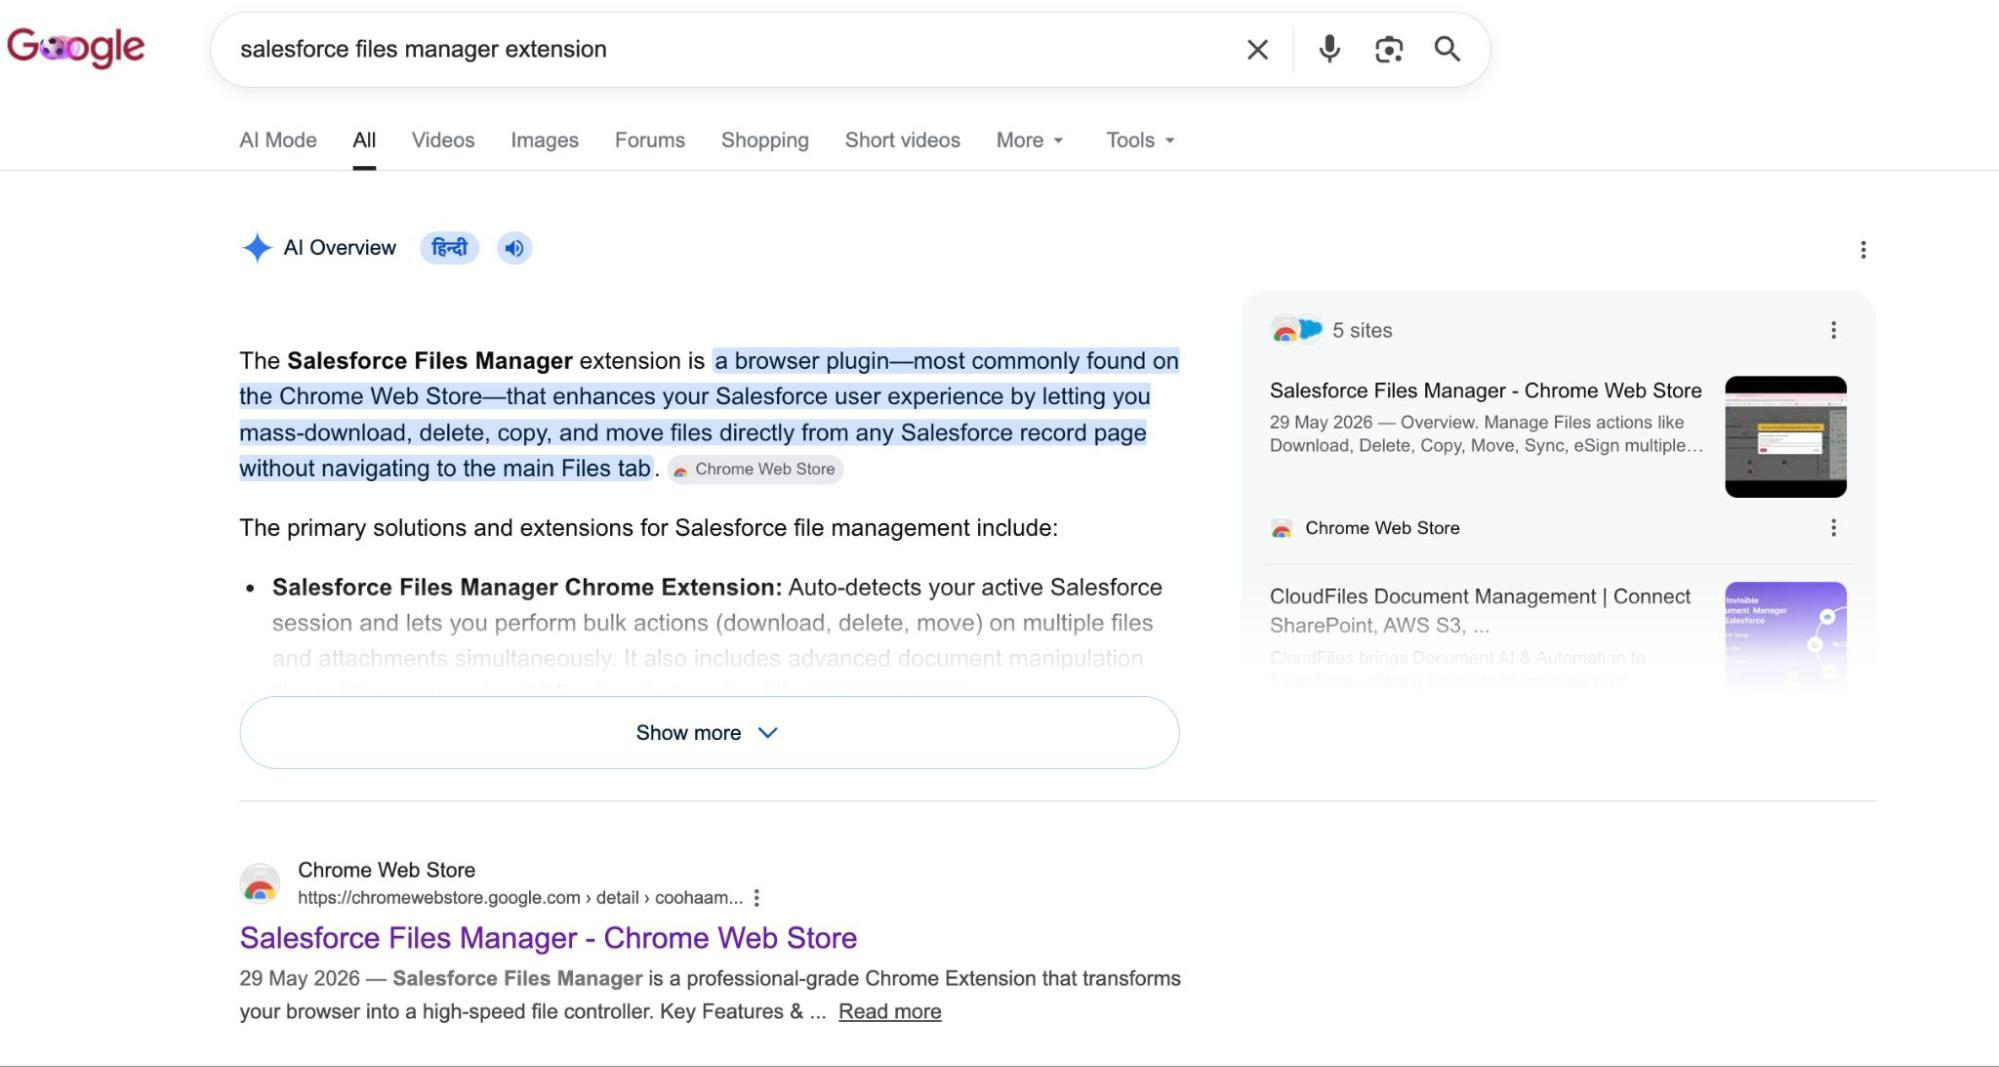
Open the Chrome Web Store Listing
Click the link below or copy it into your Chrome address bar:
https://chromewebstore.google.com/detail/salesforce-files-manager/coohaamekohepanhobgeijejjcfgkdhh
This will take you directly to the official Dumping Cloud – Salesforce Files Manager page on the Chrome Web Store. Or search “Dumping Cloud –Salesforce Files Manager” on google
02
Step 2
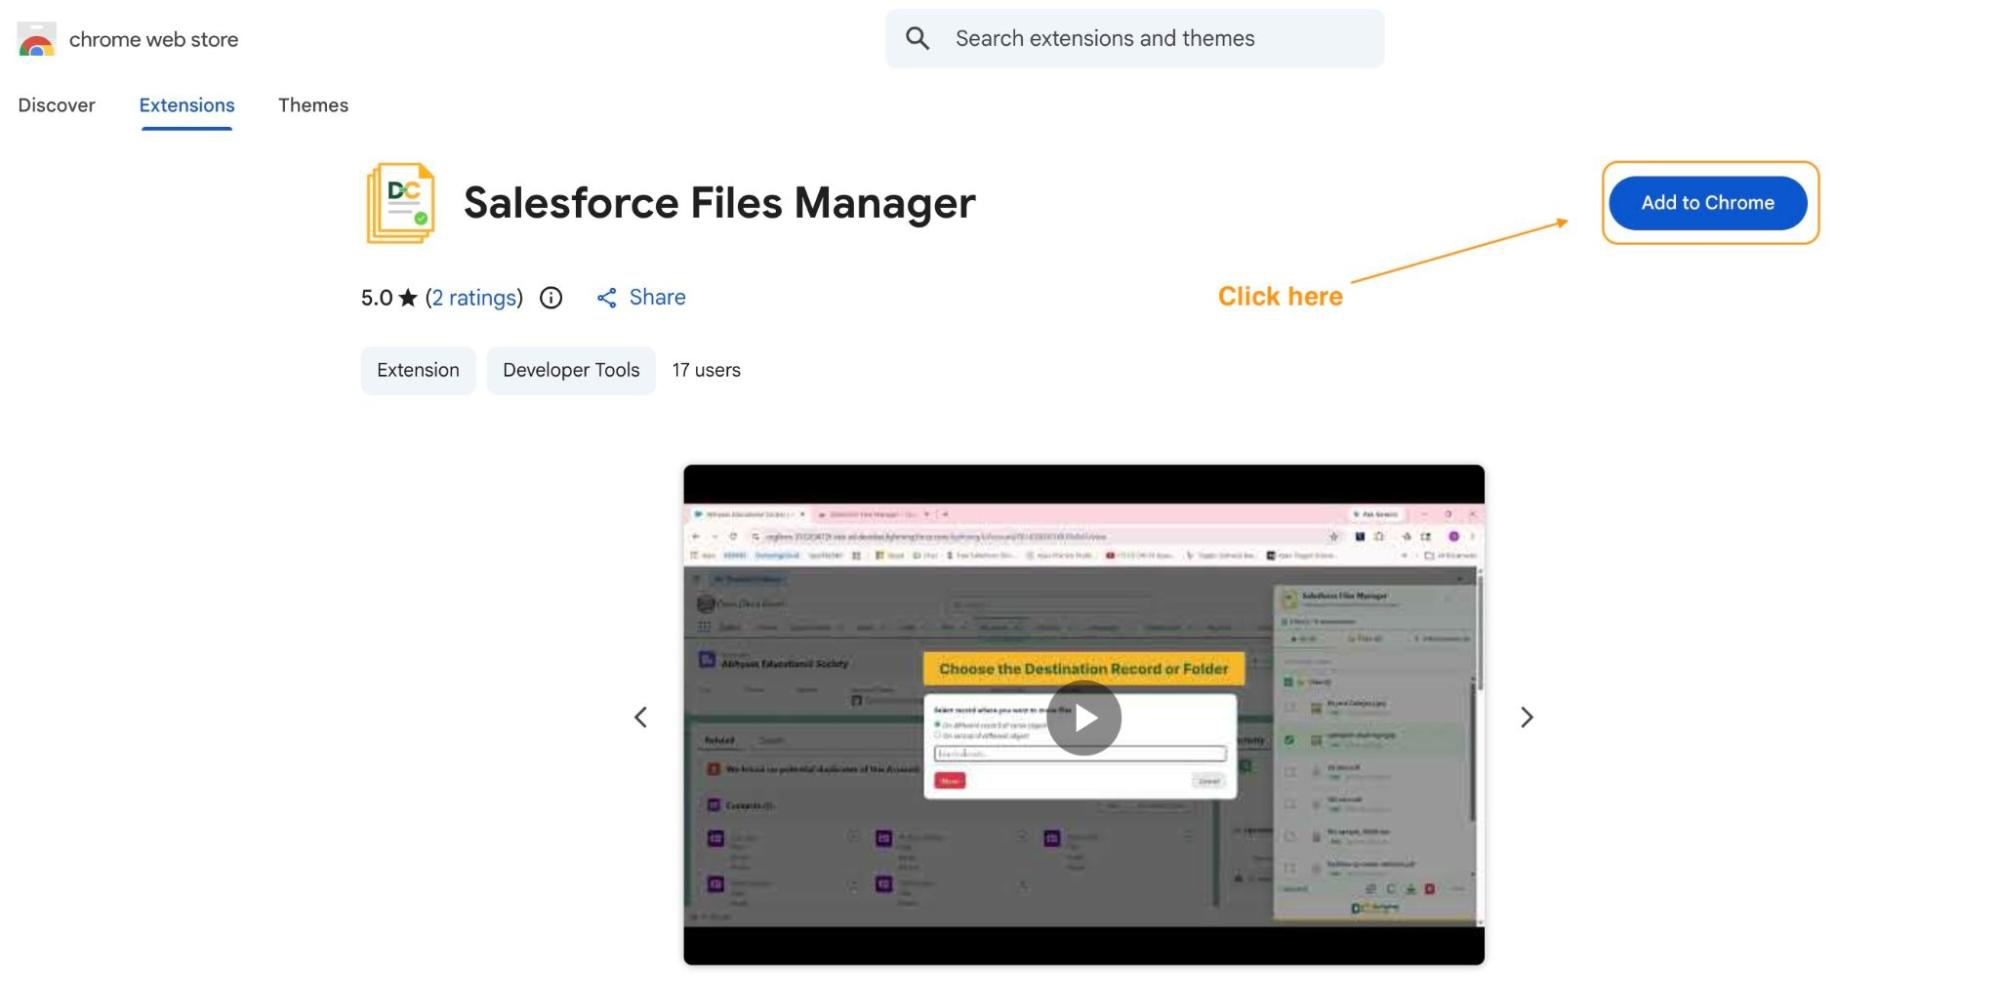
Click “Add to Chrome”
On the extension page, you’ll see a blue “Add to Chrome” button in the top-right area of the listing. Click it.
03
Step 3
Confirm the Installation
A dialog box will appear asking you to confirm. It will list the permissions the extension needs to function (such as access to your active Salesforce tabs).
Click “Add extension” to proceed.
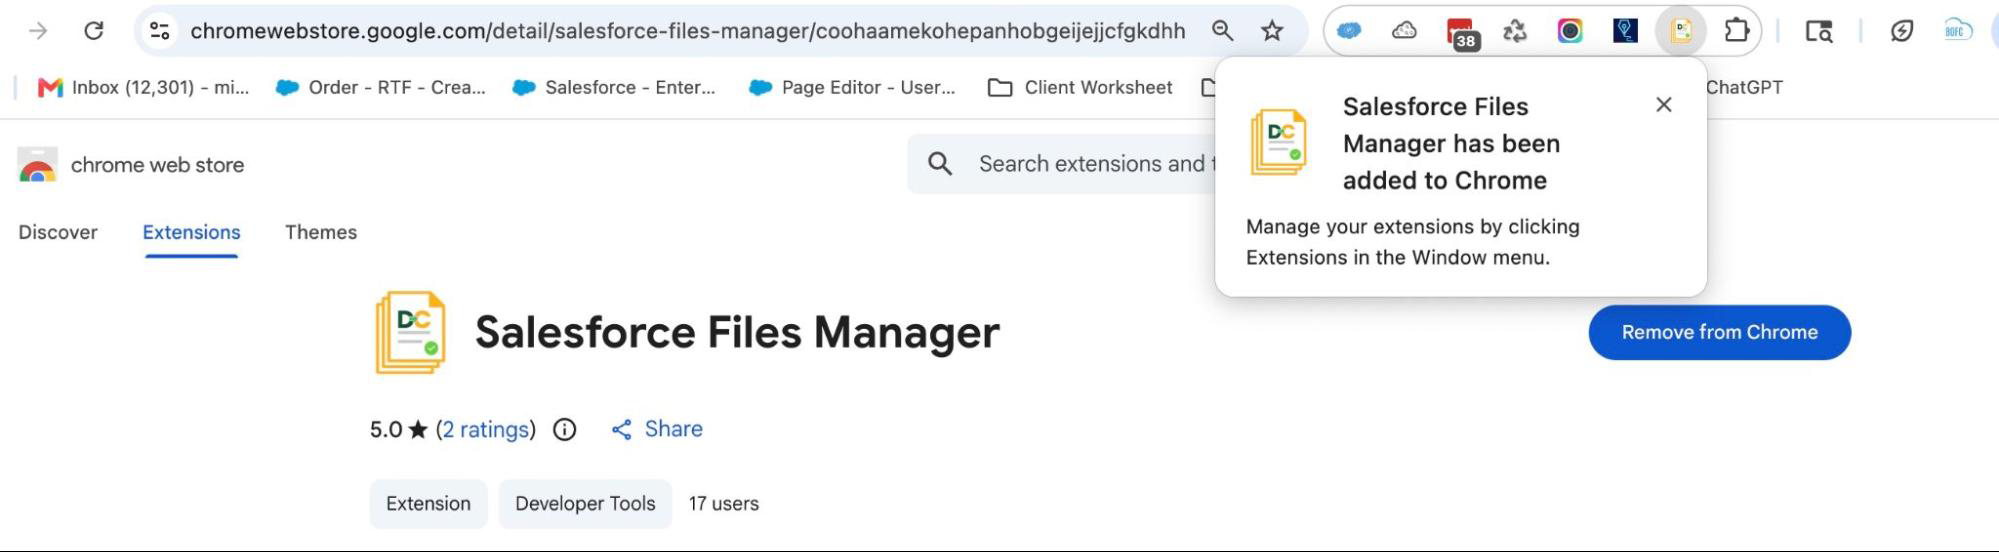
Chrome will download and install the extension automatically. You’ll see a confirmation message once it’s done, and the Salesforce Files Manager icon will appear in your Chrome toolbar.
04
Step 4
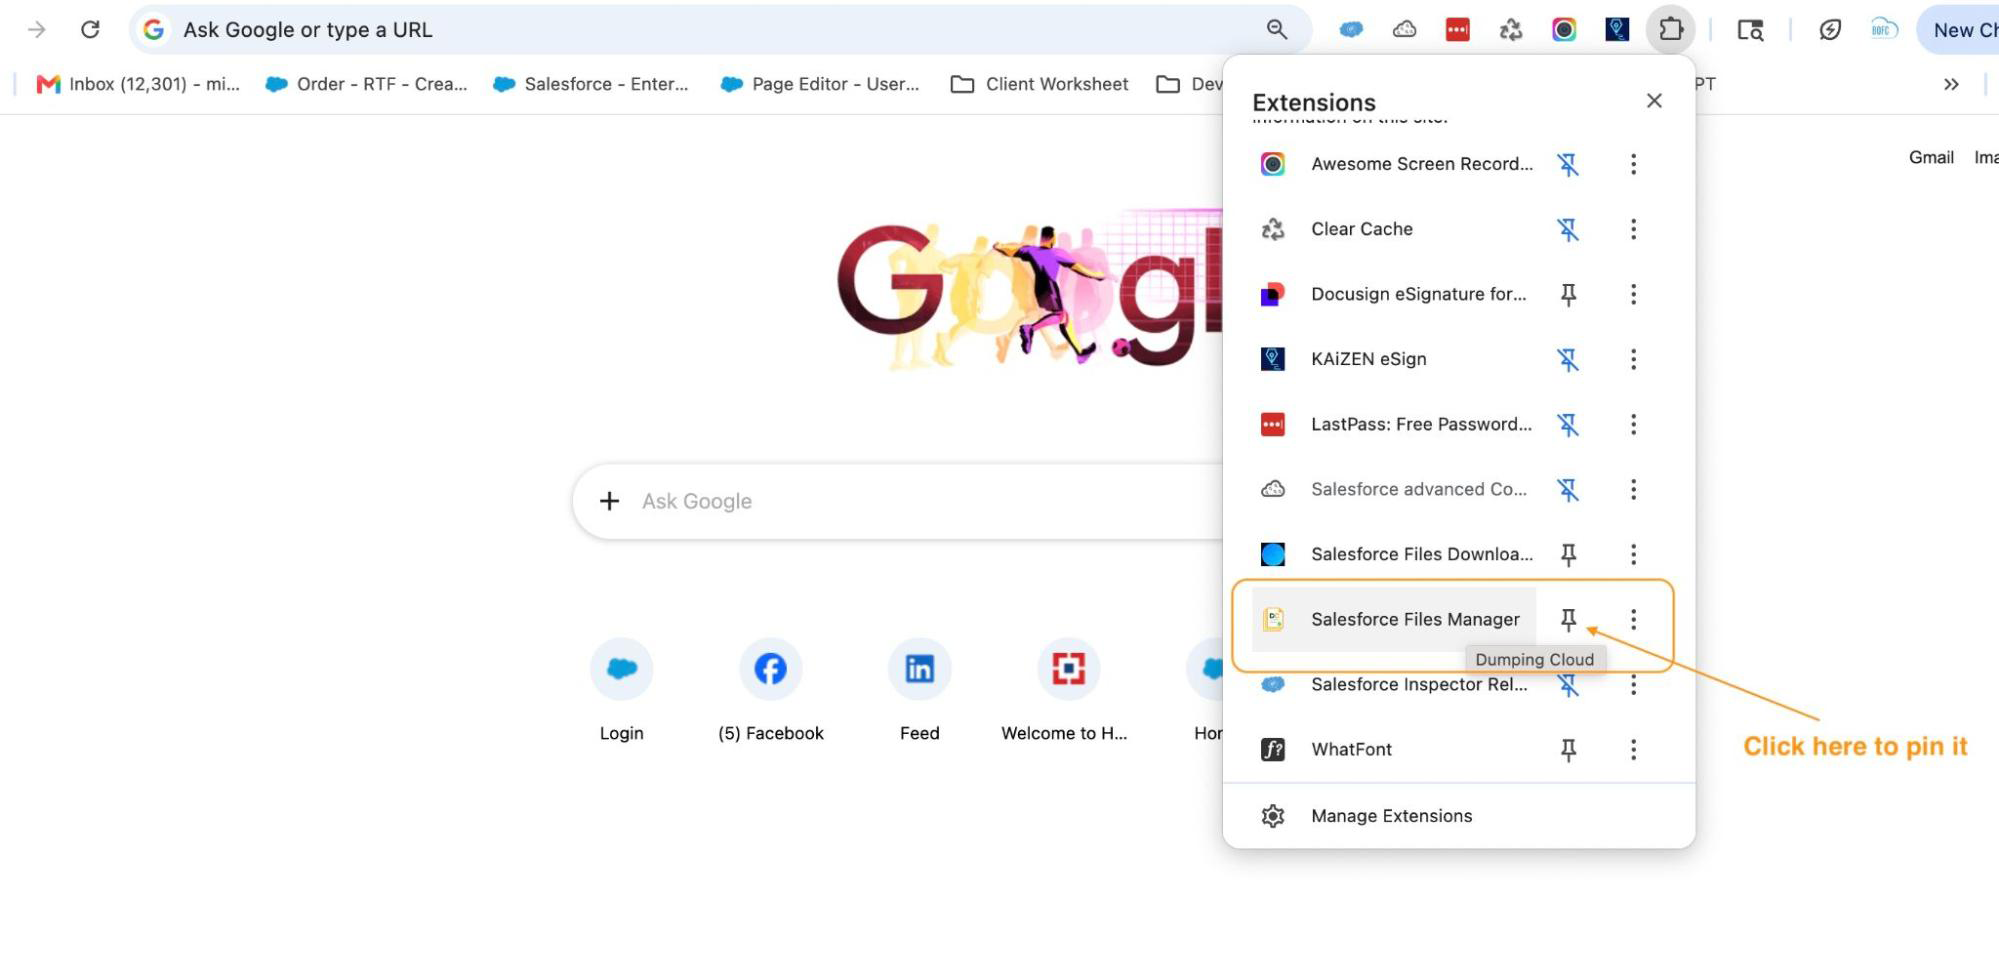
Pin the Extension (Recommended)
By default, newly installed extensions may be hidden in the Extensions menu (the puzzle-piece icon 🧩 in the top-right corner of Chrome).
To keep Dumping Cloud easily accessible:
- Click the puzzle-piece icon in the Chrome toolbar
- Find Salesforce Files Manager in the list
- Click the pin icon next to it
The extension icon will now always be visible in your toolbar for one-click access.
05
Step 5
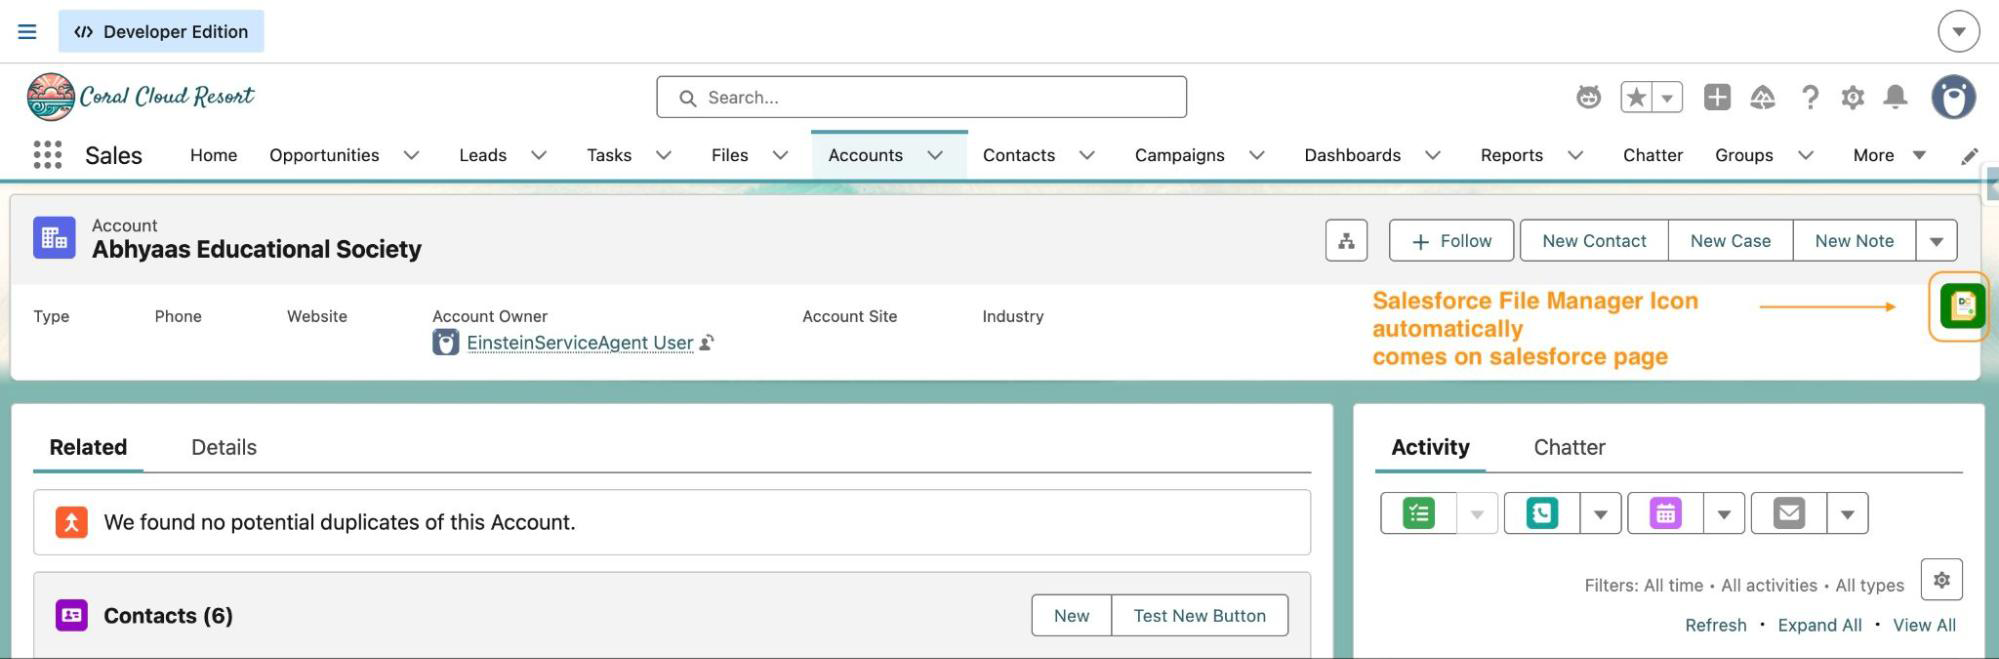
Open a Salesforce Record Page
Navigate to your Salesforce Org and open any record that has files attached — for example, an Account, Opportunity, Case, or Contact.
The extension automatically detects your active Salesforce session. No additional login is required.
06
Step 6
Launch the Extension
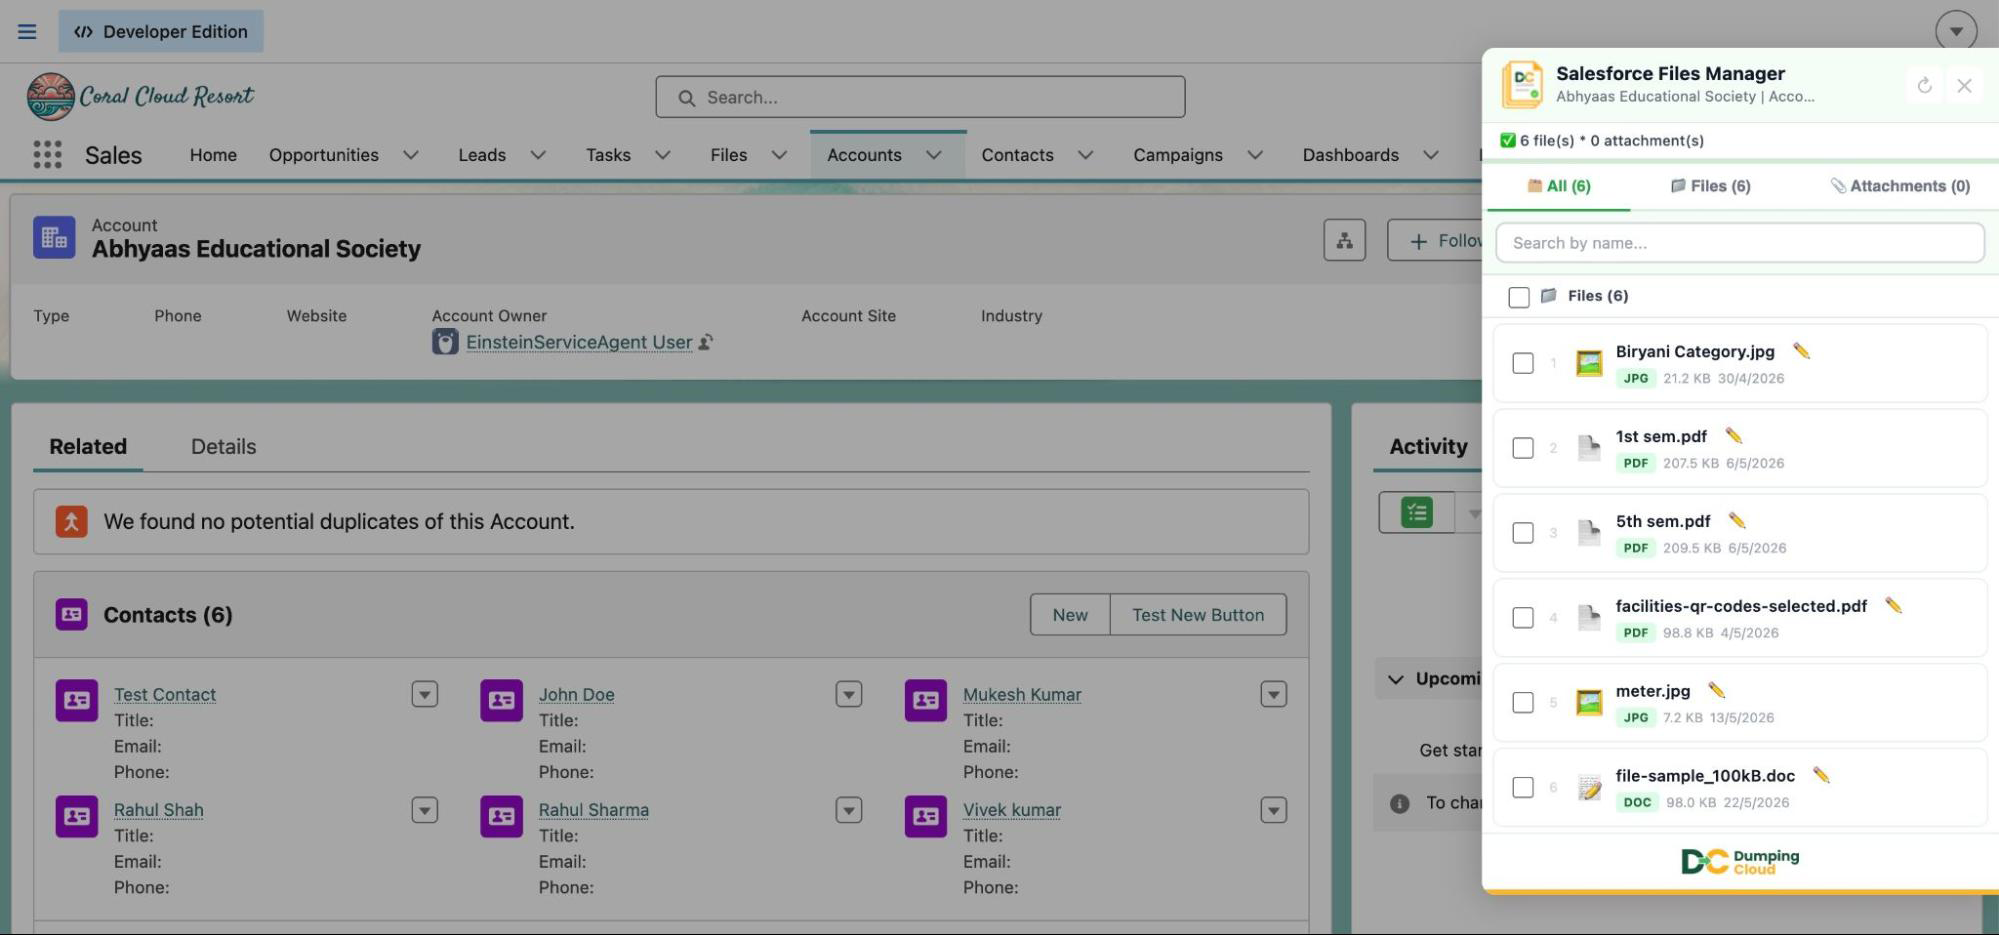
Click the Dumping Cloud – Salesforce Files Manager icon in your Chrome toolbar while you’re on a Salesforce record page.
The extension panel will open, displaying all files and attachments associated with that record. From here, you can select files and use the full suite of actions — download, delete, move, copy, rename, preview, merge, split, eSign, or sync to cloud storage.
Troubleshooting
The extension doesn’t detect my Salesforce session. Make sure you are logged into Salesforce in the same Chrome browser window/profile where the extension is installed. Refresh the record page and try again.
I don’t see any files in the extension panel. Confirm that the Salesforce record you’re on has files attached in the Files related list. The extension reads from your existing record files.
The “Add to Chrome” button isn’t showing. Ensure you’re using Google Chrome (not Firefox, Safari, or another browser) and that you’re viewing the Chrome Web Store page on a desktop computer.
Privacy & Data Security
DumpingCloud – Salesforce Files Manager has a clear privacy stance: the developer does not collect or use your data. Your files and Salesforce session remain within your browser. No data is sold to third parties or used for purposes outside the extension’s core functionality.
The extension is published by AYAN SOFTWARES, a verified trader on the Chrome Web Store, and is compliant with EU laws.
Get Started Today
Installing the Dumping Cloud – Salesforce Files Manager takes under a minute, and the time savings start immediately. Whether you’re a Salesforce Admin cleaning up a cluttered Org, a developer managing file attachments across records, or a sales professional sending documents for eSign — this extension removes the friction.
👉Install DumpingCloud on Chrome Web Store
Have questions or need support? Reach out to the team at mohit.bansal@ayansoftwares.com or call +91 99531 70767.
Stop managing files one at a time. Start managing Salesforce content like a Pro.